
"Capturing the Clouds Advanced Drone Video Techniques for 2024"
Capturing the Clouds: Advanced Drone Video Techniques
How to Edit Drone Videos


Max Wales
Mar 27, 2024• Proven solutions
So, now you have your new drone in your hands and lots of dreams in your eyes to enjoy with it. But sadly, when you viewed your first flight movie, it appeared like a nauseating, shaky and squiggly footage. Weird! Yeah, we know that but don’t worry. Actually it is right time to access some Editing tips from professionals. They can help you to get best out of a shaky aerial video with the help of few post production tactics. Soon you will be able to get an eye catching impressive footage. Get some ideas below:
New to video editing world? Check this how to edit video ultimate guide to learn video editing step by step.
Aerial Video Editing Tips
1. Select your Footage
The very first step in your post production process is to select your shaky footage that you want to edit. If your shots are not able to provide that original breathtaking feeling then you definitely need to process it, avoid all shaky movements, washed out content, frame props and unnecessarily dark or bright appearances.
2. Add Audio Element
Always prefer to pick an impressive sound track that can add value to your footage as stay in touch with your film story. You can easily avail some useful content in online libraries like from YouTube audio.
3. Use editing tools
When we talk about editing tools then there are numbers of software programs available online with wide set of features. But we prefer to recommend Wondershare Filmora due to its impressive integration function and user friendly environment.
You may also like: Best video editor for drone videos/footage >>
4. Size of output
You must be aware of the fact that size of 4K videos naturally becomes very high and they will definitely demand more space in memory. Prefer to export your 4K videos with 1080p resolution level so that they can be easily processed.
5. Long Scenes demand your attention
It is observed that most of drone users spend time on editing too long scenes but one need to understand that watching one scene for longer duration is just a boring task for viewers. Try a balanced approach so that you can maintain interest of all viewers till the end of your video.
6. Variety is always important
Editors are advised to use classic tools of editor to make videos more impressive. Special editing effects can give much appealing look to your videos and the best part is that your editing software tool is loaded with wide variety of effects and transitions.
How to Edit Drone Videos- Workflow
One amazing thing to know about post processing workflow is that it comes with variety of choices for professionals as well as beginners. New users may fide this task little complicated so if you are going to edit your videos then it is good to utilize these important steps for best results. For best editing results, prefer to use Wondershare Filmora as it is easy to use with a rich feature set.
 Download Mac Version ](https://tools.techidaily.com/wondershare/filmora/download/ )
Step 1: Trimming with Instant Cutter

There is no doubt to say that Wondershare Filmora is one of the best tools for easy and advanced editing needs. It contains lots of practical tools to process action cam and drone videos. Its inbuilt instant cutter tool helps users to trim 4K aerial or HD videos with easy drag and drop slider function.
Step 2: Correct the Fisheye effect with Lens Correction
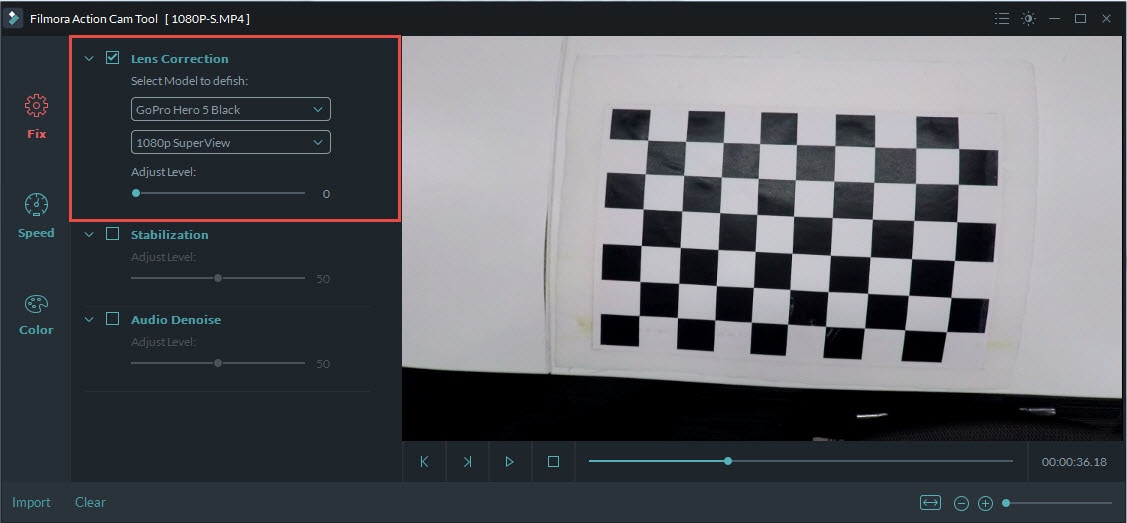
You might be aware about the fact that most of drone cameras, even including the GoPro devices, use to contain wide angle lens. They normally cause visual distortion for development of hemispherical image or wide panoramic form. In case if you don’t want it then use Filmora editing tool to remove this effect.
Step 3: Stabilization
Gimbals can help you to get rid of shaky videos but in case if you are not able to buy one but still want to get shake free results then it is good to access the stabilization feature available inside Filmora platform.
Step 4: Applying Effect/ Music

You will be glad to know that Filmora platform offers more than 500 effects for editing and the list includes filters, overlays, titles, text, transitions and free music content. All of them are capable enough to develop interesting footage for aerial video needs. Further, Filmora also has ability to work with advanced themes like Blockbuster, Holiday, Summer, Spring and Travel.
Step 5: Color Correction
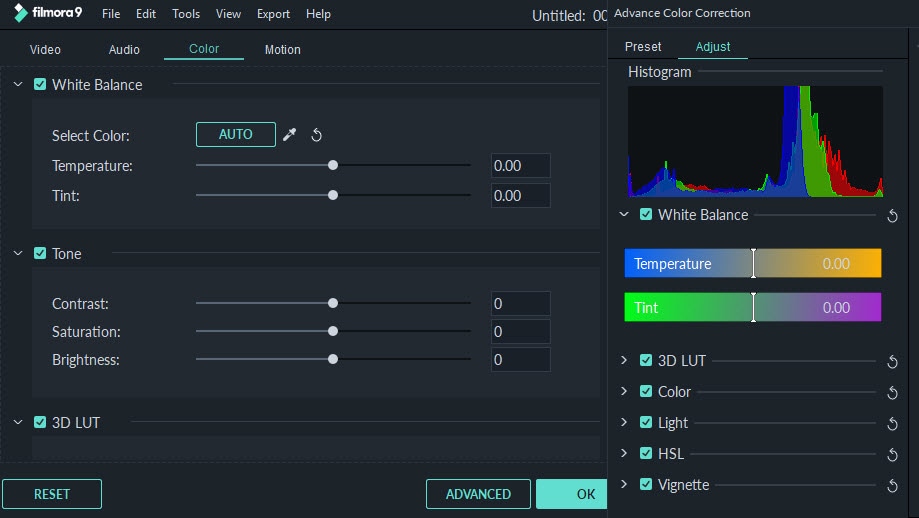
Note that a too bright or too dark footage is not considered as ideal for professional needs. Also, a good footage does not contain colour casts like orange, blue overlays that vary scene to scene. Wondershare Filmora offers colour correction tool that has easy options to make adjustments for tint, temperature, saturation, contrast and brightness. It is also possible to apply 3D luts into videos so that they can provide Hollywood like sensational feeling.
Step 6: Exporting

The best part to know about wondershare Filmora editor tool is that it offers support to almost all popular media file formats that are often desired for UAV videos. Some of the most commonly used formats are: MKV, FLV, MOV, AVI, WMV and MP4 etc. One can also upload edited videos directly to Vimeo, Facebook and YouTube to impress viewers.
Download Mac Version ](https://tools.techidaily.com/wondershare/filmora/download/ )
Max Wales
Max Wales is a writer and a lover of all things video.
Follow @Max Wales
Max Wales
Mar 27, 2024• Proven solutions
So, now you have your new drone in your hands and lots of dreams in your eyes to enjoy with it. But sadly, when you viewed your first flight movie, it appeared like a nauseating, shaky and squiggly footage. Weird! Yeah, we know that but don’t worry. Actually it is right time to access some Editing tips from professionals. They can help you to get best out of a shaky aerial video with the help of few post production tactics. Soon you will be able to get an eye catching impressive footage. Get some ideas below:
New to video editing world? Check this how to edit video ultimate guide to learn video editing step by step.
Aerial Video Editing Tips
1. Select your Footage
The very first step in your post production process is to select your shaky footage that you want to edit. If your shots are not able to provide that original breathtaking feeling then you definitely need to process it, avoid all shaky movements, washed out content, frame props and unnecessarily dark or bright appearances.
2. Add Audio Element
Always prefer to pick an impressive sound track that can add value to your footage as stay in touch with your film story. You can easily avail some useful content in online libraries like from YouTube audio.
3. Use editing tools
When we talk about editing tools then there are numbers of software programs available online with wide set of features. But we prefer to recommend Wondershare Filmora due to its impressive integration function and user friendly environment.
You may also like: Best video editor for drone videos/footage >>
4. Size of output
You must be aware of the fact that size of 4K videos naturally becomes very high and they will definitely demand more space in memory. Prefer to export your 4K videos with 1080p resolution level so that they can be easily processed.
5. Long Scenes demand your attention
It is observed that most of drone users spend time on editing too long scenes but one need to understand that watching one scene for longer duration is just a boring task for viewers. Try a balanced approach so that you can maintain interest of all viewers till the end of your video.
6. Variety is always important
Editors are advised to use classic tools of editor to make videos more impressive. Special editing effects can give much appealing look to your videos and the best part is that your editing software tool is loaded with wide variety of effects and transitions.

How to Edit Drone Videos- Workflow
One amazing thing to know about post processing workflow is that it comes with variety of choices for professionals as well as beginners. New users may fide this task little complicated so if you are going to edit your videos then it is good to utilize these important steps for best results. For best editing results, prefer to use Wondershare Filmora as it is easy to use with a rich feature set.
Download Mac Version ](https://tools.techidaily.com/wondershare/filmora/download/ )
Step 1: Trimming with Instant Cutter

There is no doubt to say that Wondershare Filmora is one of the best tools for easy and advanced editing needs. It contains lots of practical tools to process action cam and drone videos. Its inbuilt instant cutter tool helps users to trim 4K aerial or HD videos with easy drag and drop slider function.
Step 2: Correct the Fisheye effect with Lens Correction
You might be aware about the fact that most of drone cameras, even including the GoPro devices, use to contain wide angle lens. They normally cause visual distortion for development of hemispherical image or wide panoramic form. In case if you don’t want it then use Filmora editing tool to remove this effect.
Step 3: Stabilization
Gimbals can help you to get rid of shaky videos but in case if you are not able to buy one but still want to get shake free results then it is good to access the stabilization feature available inside Filmora platform.
Step 4: Applying Effect/ Music

You will be glad to know that Filmora platform offers more than 500 effects for editing and the list includes filters, overlays, titles, text, transitions and free music content. All of them are capable enough to develop interesting footage for aerial video needs. Further, Filmora also has ability to work with advanced themes like Blockbuster, Holiday, Summer, Spring and Travel.
Step 5: Color Correction
Note that a too bright or too dark footage is not considered as ideal for professional needs. Also, a good footage does not contain colour casts like orange, blue overlays that vary scene to scene. Wondershare Filmora offers colour correction tool that has easy options to make adjustments for tint, temperature, saturation, contrast and brightness. It is also possible to apply 3D luts into videos so that they can provide Hollywood like sensational feeling.
Step 6: Exporting
The best part to know about wondershare Filmora editor tool is that it offers support to almost all popular media file formats that are often desired for UAV videos. Some of the most commonly used formats are: MKV, FLV, MOV, AVI, WMV and MP4 etc. One can also upload edited videos directly to Vimeo, Facebook and YouTube to impress viewers.

Download Mac Version ](https://tools.techidaily.com/wondershare/filmora/download/ )
Max Wales
Max Wales is a writer and a lover of all things video.
Follow @Max Wales
Max Wales
Mar 27, 2024• Proven solutions
So, now you have your new drone in your hands and lots of dreams in your eyes to enjoy with it. But sadly, when you viewed your first flight movie, it appeared like a nauseating, shaky and squiggly footage. Weird! Yeah, we know that but don’t worry. Actually it is right time to access some Editing tips from professionals. They can help you to get best out of a shaky aerial video with the help of few post production tactics. Soon you will be able to get an eye catching impressive footage. Get some ideas below:
New to video editing world? Check this how to edit video ultimate guide to learn video editing step by step.
 Screensaver Factory, Create stunning professional screensavers within minutes. Create screensavers for yourself, for marketing or unlimited royalty-free commercial distribution. Make screensavers from images, video and swf flash, add background music and smooth sprite and transition effects. Screensaver Factory is very easy to use, and it enables you to make self-installing screensaver files and CDs for easy setup and distribution. Screensaver Factory is the most advanced software of its kind.
Aerial Video Editing Tips
1. Select your Footage
The very first step in your post production process is to select your shaky footage that you want to edit. If your shots are not able to provide that original breathtaking feeling then you definitely need to process it, avoid all shaky movements, washed out content, frame props and unnecessarily dark or bright appearances.
2. Add Audio Element
Always prefer to pick an impressive sound track that can add value to your footage as stay in touch with your film story. You can easily avail some useful content in online libraries like from YouTube audio.
3. Use editing tools
When we talk about editing tools then there are numbers of software programs available online with wide set of features. But we prefer to recommend Wondershare Filmora due to its impressive integration function and user friendly environment.
You may also like: Best video editor for drone videos/footage >>
4. Size of output
You must be aware of the fact that size of 4K videos naturally becomes very high and they will definitely demand more space in memory. Prefer to export your 4K videos with 1080p resolution level so that they can be easily processed.
5. Long Scenes demand your attention
It is observed that most of drone users spend time on editing too long scenes but one need to understand that watching one scene for longer duration is just a boring task for viewers. Try a balanced approach so that you can maintain interest of all viewers till the end of your video.
6. Variety is always important
Editors are advised to use classic tools of editor to make videos more impressive. Special editing effects can give much appealing look to your videos and the best part is that your editing software tool is loaded with wide variety of effects and transitions.
Parental Control Software
## How to Edit Drone Videos- WorkflowOne amazing thing to know about post processing workflow is that it comes with variety of choices for professionals as well as beginners. New users may fide this task little complicated so if you are going to edit your videos then it is good to utilize these important steps for best results. For best editing results, prefer to use Wondershare Filmora as it is easy to use with a rich feature set.

Download Mac Version ](https://tools.techidaily.com/wondershare/filmora/download/ )
Step 1: Trimming with Instant Cutter
There is no doubt to say that Wondershare Filmora is one of the best tools for easy and advanced editing needs. It contains lots of practical tools to process action cam and drone videos. Its inbuilt instant cutter tool helps users to trim 4K aerial or HD videos with easy drag and drop slider function.
Step 2: Correct the Fisheye effect with Lens Correction
You might be aware about the fact that most of drone cameras, even including the GoPro devices, use to contain wide angle lens. They normally cause visual distortion for development of hemispherical image or wide panoramic form. In case if you don’t want it then use Filmora editing tool to remove this effect.
Step 3: Stabilization
Gimbals can help you to get rid of shaky videos but in case if you are not able to buy one but still want to get shake free results then it is good to access the stabilization feature available inside Filmora platform.
Step 4: Applying Effect/ Music
You will be glad to know that Filmora platform offers more than 500 effects for editing and the list includes filters, overlays, titles, text, transitions and free music content. All of them are capable enough to develop interesting footage for aerial video needs. Further, Filmora also has ability to work with advanced themes like Blockbuster, Holiday, Summer, Spring and Travel.
Step 5: Color Correction
Note that a too bright or too dark footage is not considered as ideal for professional needs. Also, a good footage does not contain colour casts like orange, blue overlays that vary scene to scene. Wondershare Filmora offers colour correction tool that has easy options to make adjustments for tint, temperature, saturation, contrast and brightness. It is also possible to apply 3D luts into videos so that they can provide Hollywood like sensational feeling.
Step 6: Exporting
The best part to know about wondershare Filmora editor tool is that it offers support to almost all popular media file formats that are often desired for UAV videos. Some of the most commonly used formats are: MKV, FLV, MOV, AVI, WMV and MP4 etc. One can also upload edited videos directly to Vimeo, Facebook and YouTube to impress viewers.
Download Mac Version ](https://tools.techidaily.com/wondershare/filmora/download/ )

Key features:
• Import from any devices and cams, including GoPro and drones. All formats supported. Сurrently the only free video editor that allows users to export in a new H265/HEVC codec, something essential for those working with 4K and HD.
• Everything for hassle-free basic editing: cut, crop and merge files, add titles and favorite music
• Visual effects, advanced color correction and trendy Instagram-like filters
• All multimedia processing done from one app: video editing capabilities reinforced by a video converter, a screen capture, a video capture, a disc burner and a YouTube uploader
• Non-linear editing: edit several files with simultaneously
• Easy export to social networks: special profiles for YouTube, Facebook, Vimeo, Twitter and Instagram
• High quality export – no conversion quality loss, double export speed even of HD files due to hardware acceleration
• Stabilization tool will turn shaky or jittery footage into a more stable video automatically.
• Essential toolset for professional video editing: blending modes, Mask tool, advanced multiple-color Chroma Key
Max Wales
Max Wales is a writer and a lover of all things video.
Follow @Max Wales
Max Wales
Mar 27, 2024• Proven solutions
So, now you have your new drone in your hands and lots of dreams in your eyes to enjoy with it. But sadly, when you viewed your first flight movie, it appeared like a nauseating, shaky and squiggly footage. Weird! Yeah, we know that but don’t worry. Actually it is right time to access some Editing tips from professionals. They can help you to get best out of a shaky aerial video with the help of few post production tactics. Soon you will be able to get an eye catching impressive footage. Get some ideas below:
New to video editing world? Check this how to edit video ultimate guide to learn video editing step by step.
Aerial Video Editing Tips
1. Select your Footage
The very first step in your post production process is to select your shaky footage that you want to edit. If your shots are not able to provide that original breathtaking feeling then you definitely need to process it, avoid all shaky movements, washed out content, frame props and unnecessarily dark or bright appearances.
2. Add Audio Element
Always prefer to pick an impressive sound track that can add value to your footage as stay in touch with your film story. You can easily avail some useful content in online libraries like from YouTube audio.
3. Use editing tools
When we talk about editing tools then there are numbers of software programs available online with wide set of features. But we prefer to recommend Wondershare Filmora due to its impressive integration function and user friendly environment.
You may also like: Best video editor for drone videos/footage >>
4. Size of output
You must be aware of the fact that size of 4K videos naturally becomes very high and they will definitely demand more space in memory. Prefer to export your 4K videos with 1080p resolution level so that they can be easily processed.
5. Long Scenes demand your attention
It is observed that most of drone users spend time on editing too long scenes but one need to understand that watching one scene for longer duration is just a boring task for viewers. Try a balanced approach so that you can maintain interest of all viewers till the end of your video.
6. Variety is always important
Editors are advised to use classic tools of editor to make videos more impressive. Special editing effects can give much appealing look to your videos and the best part is that your editing software tool is loaded with wide variety of effects and transitions.
How to Edit Drone Videos- Workflow
One amazing thing to know about post processing workflow is that it comes with variety of choices for professionals as well as beginners. New users may fide this task little complicated so if you are going to edit your videos then it is good to utilize these important steps for best results. For best editing results, prefer to use Wondershare Filmora as it is easy to use with a rich feature set.
Download Mac Version ](https://tools.techidaily.com/wondershare/filmora/download/ )
Step 1: Trimming with Instant Cutter
There is no doubt to say that Wondershare Filmora is one of the best tools for easy and advanced editing needs. It contains lots of practical tools to process action cam and drone videos. Its inbuilt instant cutter tool helps users to trim 4K aerial or HD videos with easy drag and drop slider function.
Step 2: Correct the Fisheye effect with Lens Correction
You might be aware about the fact that most of drone cameras, even including the GoPro devices, use to contain wide angle lens. They normally cause visual distortion for development of hemispherical image or wide panoramic form. In case if you don’t want it then use Filmora editing tool to remove this effect.
Step 3: Stabilization
Gimbals can help you to get rid of shaky videos but in case if you are not able to buy one but still want to get shake free results then it is good to access the stabilization feature available inside Filmora platform.
Step 4: Applying Effect/ Music
 DEX 3 RE is Easy-To-Use DJ Mixing Software for MAC and Windows Designed for Today’s Versatile DJ.
Mix from your own library of music, iTunes or use the Pulselocker subsciprtion service for in-app access to over 44 million songs. Use with over 85 supported DJ controllers or mix with a keyboard and mouse.
DEX 3 RE is everything you need without the clutter - the perfect 2-deck mixing software solution for mobile DJs or hard-core hobbiests.
PCDJ DEX 3 RE (DJ Software for Win & MAC - Product Activation For 3 Machines)
You will be glad to know that Filmora platform offers more than 500 effects for editing and the list includes filters, overlays, titles, text, transitions and free music content. All of them are capable enough to develop interesting footage for aerial video needs. Further, Filmora also has ability to work with advanced themes like Blockbuster, Holiday, Summer, Spring and Travel.
Step 5: Color Correction
Note that a too bright or too dark footage is not considered as ideal for professional needs. Also, a good footage does not contain colour casts like orange, blue overlays that vary scene to scene. Wondershare Filmora offers colour correction tool that has easy options to make adjustments for tint, temperature, saturation, contrast and brightness. It is also possible to apply 3D luts into videos so that they can provide Hollywood like sensational feeling.
Step 6: Exporting
The best part to know about wondershare Filmora editor tool is that it offers support to almost all popular media file formats that are often desired for UAV videos. Some of the most commonly used formats are: MKV, FLV, MOV, AVI, WMV and MP4 etc. One can also upload edited videos directly to Vimeo, Facebook and YouTube to impress viewers.
 DLNow Video Downloader
Download Mac Version ](https://tools.techidaily.com/wondershare/filmora/download/ )

Max Wales
Max Wales is a writer and a lover of all things video.
Follow @Max Wales
- Title: Capturing the Clouds Advanced Drone Video Techniques for 2024
- Author: Daniel
- Created at : 2024-07-25 01:27:38
- Updated at : 2024-07-26 01:27:38
- Link: https://extra-resources.techidaily.com/capturing-the-clouds-advanced-drone-video-techniques-for-2024/
- License: This work is licensed under CC BY-NC-SA 4.0.