
Crafting Dynamic Musical Journeys with Crossfading
Crafting Dynamic Musical Journeys with Crossfading
So, what is crossfade? In layman terms, audio crossfades duration refers to the amount of time a Media Player needs to fade out one music before fading in the next. In the Crossfade editor, you may change the default crossfades length and form. If you’re looking to kickstart your audio editing journey with the audio cross fade as a part of it? Refer to the upcoming sections to learn that hassle-free.
Part 1. Audio Fade Vs Crossfade
What is Fade?
You may use fades to gently raise or lower the level at the beginning or conclusion of audio events or audio clips and to make transitions seem seamless. You may gradually raise or lower the level of audio events or audio clips by using fade ins and fade outs. Event-based or clip-based fade ins and fade outs are also possible. In this situation, the fade feature in a sequencer or audio editor may often be utilized swiftly and efficiently.
A video transition is comparable to an audio fade. There is often a sweet spot when the fading truly disappears. You often have a choice of fade curves with fade functions. Using the faders on a mixer, whether it be hardware or software, is the most natural method to fade. All current software sequencers will capture your motions, allowing you to modify, fade, and tune until you find the perfect rhythm. Keep fade-ins brief in most situations unless you’re going for a specific impact.
What is Crossfade?
Adding an audio transition between two adjacent audio clips on the same track creates a crossfade. You may apply a crossfade transition to either end of a single clip to have it fade in or fade out. A crossfade is the technique of fading one piece of audio out while also fading the other one in, unlike a fade, which is conducted on only one piece of audio. The sound engine’s maximum crossfade time when switching from Sound A to Sound B is equal to half the duration of Audio File A.
You may use crossfades to provide seamless transitions between several audio events on the same track. Crossfading is always depending on events. You may manually carry out a crossfade, just as with fades. The two songs’ blended versions must be routed to two distinct sets of faders. Only when the subsequent events or their corresponding clips overlap can crossfades be made. This is typically used in recording to make one track on an album fade into or blend with the next. When done well, it has a fantastic impact.
Part 2. How to Crossfade Audio
Because a crossfade requires a bit more work than a fade, it’s important to consider the assistance your sequencer or audio editor may provide. Most include a crossfade feature, and some, once more, give users a choice of curvature. Additionally, you may be able to utilize one fade-in curve and a second one for the fade-out.
1. Crossfade audio on Smartphone
The crossfade function in Spotify for Android and iOS ensures that your music never stops playing by removing the pause between songs. A crossfade is a musical effect in which the sound of one track begins to fade out and the sound of the following song begins to fade in.
Due to the prevalence of transitions in album tracks, Spotify by default does not provide Crossfade.
Step to crossfade audio with Spotify:
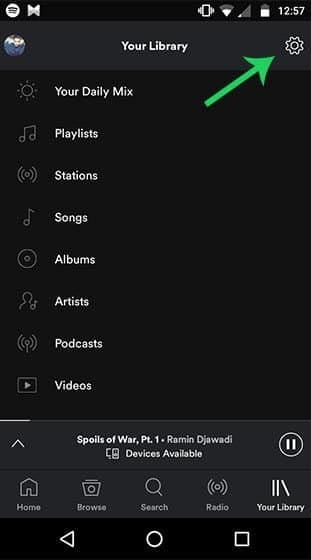
Step1 Open the Spotify app on your Android smartphone first. As shown in the picture below, you must now press on the Settings gear icon.
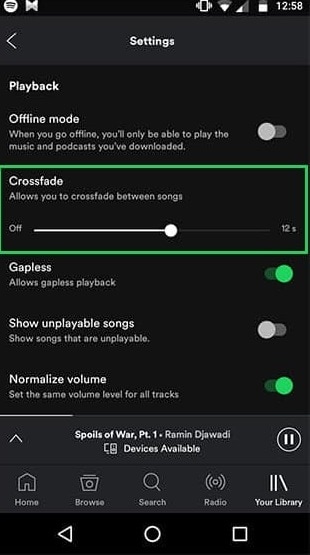
Step2 The Playback section may be found on the Settings page. Scroll down to the “Crossfade” section on iOS. Toggle the option to the “On” position by tapping it. To choose the crossfade length on Android, tap and move the slider. Alternatively, drag the slider all the way to the left to turn off the crossfade.
Step3 You may crossfade tracks on Spotify using this method. The app’s built-in audio normalization tool, which can quickly balance mild and loud music for a more even sound experience, is available to Spotify Premium customers. Obviously, you won’t get much in the way of beat matching, but at least the song will continue playing continuously.
2. Crossfade Audio on Computer
Filmora is one of the better video editors, suited for both amateurs and experts. There are several audio editing programs available, but Wondershare Filmora stands out from the competition thanks to its extensive feature set. You can quickly make movies with various effects, transitions, and more with this program. It is a cutting-edge, user-friendly piece of software with features for quickly editing, rotating, trimming, cropping, and cutting films.
For creating outstanding crossfade films, use the effective and user-friendly video and audio editor Filmora. The user interface is uncomplicated and simple to use. With just a few clicks, you can quickly locate the tools you need to adjust your audio crossfades. In summary, Wondershare Filmora is the best option if you’re seeking for a user-friendly but effective video editing program. Let’s explore how to properly crossfade your audios in Filmora.
Free Download For Win 7 or later(64-bit)
Free Download For macOS 10.14 or later
Steps to crossfade audio with Filmora:
Step1 Install and Launch Filmora Editor
Launch Filmora and add the video sources or save the built-in provided video samples to the desired location. To add the video clips to the timeline for editing or previewing, just drag & drop. After that, it’s time to change them now while having fun. It is simple to reach the whole home screen thanks to the extensive design. It provides almost all typical operations like trimming and audio adjusting.

Step2 Arrange the Audio Tracks in Timeline
Using this tool, you may choose which audio track should be the background track and which audio track should be the primary one. One audio track will fade into faint loudness when someone in the video clip speaks.
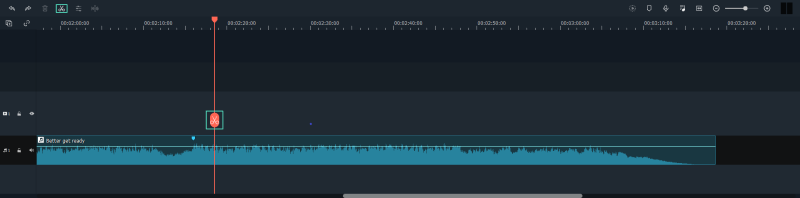
Step3 Use the Audio Crossfade
You will learn the Filmora’s transitioning method in this crucial stage. Use the audio editor that has just displayed on the right side of the program screen by following these instructions. By navigating to the Level section of the audio editor from there and changing the volume of the audio track that you had split for this purpose, you can easily make the audio transitions without any issues.

Step4 Share your Crossfaded Audio
Filmora makes it extremely simple to export a project file that is complete. Select “Export” from the menu. Choose your destination, then wait as it is processed. Even for an audio that’s minutes long, rendering barely took a minute or so. Additionally, Wondershare lets you import media files right into YouTube. If you want to easily share your films with others, this option is fantastic.
Conclusion
In a nutshell, we can suggest Wondershare Filmora as a fantastic video editing program for amateurs and those on a budget based on our crossfade experience on both the computer and the smartphone. You may make films with a professional appearance with this program, which is simple to use and offers a variety of functions. Your editing experience will be the most individualized thanks to this. To finish crossfade and make it unique, you may also edit and animate pictures and text.
Part 1. Audio Fade Vs Crossfade
What is Fade?
You may use fades to gently raise or lower the level at the beginning or conclusion of audio events or audio clips and to make transitions seem seamless. You may gradually raise or lower the level of audio events or audio clips by using fade ins and fade outs. Event-based or clip-based fade ins and fade outs are also possible. In this situation, the fade feature in a sequencer or audio editor may often be utilized swiftly and efficiently.
A video transition is comparable to an audio fade. There is often a sweet spot when the fading truly disappears. You often have a choice of fade curves with fade functions. Using the faders on a mixer, whether it be hardware or software, is the most natural method to fade. All current software sequencers will capture your motions, allowing you to modify, fade, and tune until you find the perfect rhythm. Keep fade-ins brief in most situations unless you’re going for a specific impact.
What is Crossfade?
Adding an audio transition between two adjacent audio clips on the same track creates a crossfade. You may apply a crossfade transition to either end of a single clip to have it fade in or fade out. A crossfade is the technique of fading one piece of audio out while also fading the other one in, unlike a fade, which is conducted on only one piece of audio. The sound engine’s maximum crossfade time when switching from Sound A to Sound B is equal to half the duration of Audio File A.
You may use crossfades to provide seamless transitions between several audio events on the same track. Crossfading is always depending on events. You may manually carry out a crossfade, just as with fades. The two songs’ blended versions must be routed to two distinct sets of faders. Only when the subsequent events or their corresponding clips overlap can crossfades be made. This is typically used in recording to make one track on an album fade into or blend with the next. When done well, it has a fantastic impact.
Part 2. How to Crossfade Audio
Because a crossfade requires a bit more work than a fade, it’s important to consider the assistance your sequencer or audio editor may provide. Most include a crossfade feature, and some, once more, give users a choice of curvature. Additionally, you may be able to utilize one fade-in curve and a second one for the fade-out.
1. Crossfade audio on Smartphone
The crossfade function in Spotify for Android and iOS ensures that your music never stops playing by removing the pause between songs. A crossfade is a musical effect in which the sound of one track begins to fade out and the sound of the following song begins to fade in.
Due to the prevalence of transitions in album tracks, Spotify by default does not provide Crossfade.
Step to crossfade audio with Spotify:
Step1 Open the Spotify app on your Android smartphone first. As shown in the picture below, you must now press on the Settings gear icon.
Step2 The Playback section may be found on the Settings page. Scroll down to the “Crossfade” section on iOS. Toggle the option to the “On” position by tapping it. To choose the crossfade length on Android, tap and move the slider. Alternatively, drag the slider all the way to the left to turn off the crossfade.
Step3 You may crossfade tracks on Spotify using this method. The app’s built-in audio normalization tool, which can quickly balance mild and loud music for a more even sound experience, is available to Spotify Premium customers. Obviously, you won’t get much in the way of beat matching, but at least the song will continue playing continuously.
2. Crossfade Audio on Computer
Filmora is one of the better video editors, suited for both amateurs and experts. There are several audio editing programs available, but Wondershare Filmora stands out from the competition thanks to its extensive feature set. You can quickly make movies with various effects, transitions, and more with this program. It is a cutting-edge, user-friendly piece of software with features for quickly editing, rotating, trimming, cropping, and cutting films.
For creating outstanding crossfade films, use the effective and user-friendly video and audio editor Filmora. The user interface is uncomplicated and simple to use. With just a few clicks, you can quickly locate the tools you need to adjust your audio crossfades. In summary, Wondershare Filmora is the best option if you’re seeking for a user-friendly but effective video editing program. Let’s explore how to properly crossfade your audios in Filmora.
Free Download For Win 7 or later(64-bit)
Free Download For macOS 10.14 or later
Steps to crossfade audio with Filmora:
Step1 Install and Launch Filmora Editor
Launch Filmora and add the video sources or save the built-in provided video samples to the desired location. To add the video clips to the timeline for editing or previewing, just drag & drop. After that, it’s time to change them now while having fun. It is simple to reach the whole home screen thanks to the extensive design. It provides almost all typical operations like trimming and audio adjusting.
Step2 Arrange the Audio Tracks in Timeline
Using this tool, you may choose which audio track should be the background track and which audio track should be the primary one. One audio track will fade into faint loudness when someone in the video clip speaks.
Step3 Use the Audio Crossfade
You will learn the Filmora’s transitioning method in this crucial stage. Use the audio editor that has just displayed on the right side of the program screen by following these instructions. By navigating to the Level section of the audio editor from there and changing the volume of the audio track that you had split for this purpose, you can easily make the audio transitions without any issues.
Step4 Share your Crossfaded Audio
Filmora makes it extremely simple to export a project file that is complete. Select “Export” from the menu. Choose your destination, then wait as it is processed. Even for an audio that’s minutes long, rendering barely took a minute or so. Additionally, Wondershare lets you import media files right into YouTube. If you want to easily share your films with others, this option is fantastic.
Conclusion
In a nutshell, we can suggest Wondershare Filmora as a fantastic video editing program for amateurs and those on a budget based on our crossfade experience on both the computer and the smartphone. You may make films with a professional appearance with this program, which is simple to use and offers a variety of functions. Your editing experience will be the most individualized thanks to this. To finish crossfade and make it unique, you may also edit and animate pictures and text.
Also read:
- [New] A Comprehensive Guide to Crafting Stellar Podcast Sneak Peeks
- [New] A New Era of Visual Narratives Full Rotation
- [Updated] 2024 Approved From Idea to Income A Comprehensive Instagram Guide
- [Updated] Best 14 Text Animation Examples
- [Updated] Capturing Life in High Quality with Xiaomi's Mi 11 Screens
- [Updated] Masterclass in Creativity Best Free 3D Text PSDS
- 2024 Approved Blending Primary and B-Roll for Smooth Transitions
- 2024 Approved Curating Best TikTok Scenes as Pixel Art
- 2024 Approved Pioneering Techniques to Transform Your OBS Studio Projects
- 6 Ways To Transfer Contacts From Honor 100 Pro to iPhone | Dr.fone
- Boosting Photo Skills Speed & Simplicity with Windows 10 Paint App
- Is Investing in a Portable Display Device Wise? Discover the Top Benefits and Choices Explained by Tech Experts at ZDNet
- Is Paying for ChatGPT Plus Advantageous Over the Basic Version? A ZDNet Examination
- Mastering DLL Errors in Windows: A Guide to Overcoming 'LoadLibrary Failed with Error N
- Syncing Scores and Screenplays Top Tunes for Video Unboxing
- The Intricacies of Crafting a Virtual Experience
- Title: Crafting Dynamic Musical Journeys with Crossfading
- Author: Daniel
- Created at : 2025-02-11 16:12:30
- Updated at : 2025-02-17 23:20:17
- Link: https://extra-resources.techidaily.com/crafting-dynamic-musical-journeys-with-crossfading/
- License: This work is licensed under CC BY-NC-SA 4.0.