
Dive Into iPhone Reflective Imaging Magic
Dive Into iPhone Reflective Imaging Magic
Reflection Photography Tips for iPhone

Ollie Mattison
Mar 27, 2024• Proven solutions
Have you ever seen those stunning photos, taken at just the right moment, where the subject is reflected onto something perfectly? This article will show you how to take amazing reflective photographs with just your iPhone. Apple has really invested in improving the quality of it’s in-built lenses in their latest models of the iPhone. Much of the advertising now concerns the stunning photos it’s users can take. Historically this was reserved to those who had powerful SLR cameras. Of course they also want to compete with other manufacturers to be the phone that takes the best selfie!

Reflective photography is an ever growing trend on social media, so you want your images to stand out… This handy guide tells you everything you need to know, and even how to create reflective photos in post production!
So let’s get snapping!

Tips For Perfect Reflective Photography With Your iPhone
1. The Surface
Of course the number one rule of reflective photography is that you have a reflective surface! It doesn’t have to be as simple as a mirror though, as the picture above shows lakes and pools are great if it is a clam weather day. You want to make sure that your surface is clean as far as possible to avoid distraction. If you wanted to be really creative you could find something like these:
A Well Polished Table

A Crystal/Glass Ball

Water in a wine glass (turns everything upside down too!)

2. Pay Attention to Composition
Composition is the very basis of good photography, as the person taking the picture you decide the scene. The most integral part of good composition is the rule of thirds. This means you should divide up the scene/subject into 9 equal squares/rectangles (depending on frame).
You should put the subject or the most important parts of the scene into one or of the lines. Typically we have an impulse to put the subject straight in the middle of the shot, however placing the subject in othe of the other lines off to the side produces a far more engaging photo.
It is also really effective to have the subject where the gridlines intersect. This makes the image standout from others in social media feeds. It subconsciously pulls our attention.
iPhone already has a feature for you to bring up lines before you take the photo with the rule of thirds:
 Lyric Video Creator Professional Version
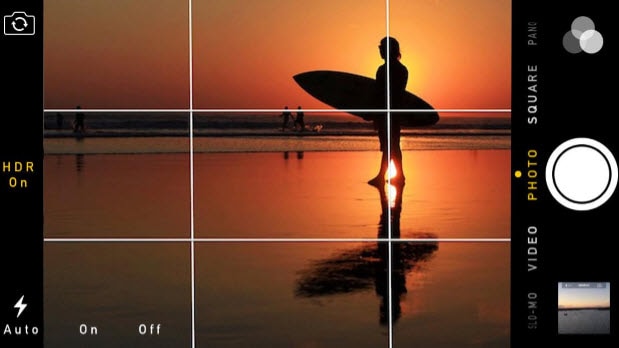
To activate the lines simply go to Settings > Camera and Photographs > Grid
3. Keep it Simple
Reflective photography works best when the scene isn’t busy and there is nothing too distracting. Having one focus/subject will produce a clean image and the reflection of the subject will be far more effective.
Reflective photography should convey a sense of calm, simplicity and tranquility. If the photograph has more than one pull of focus you’re likely to lose this.
Good

Awful


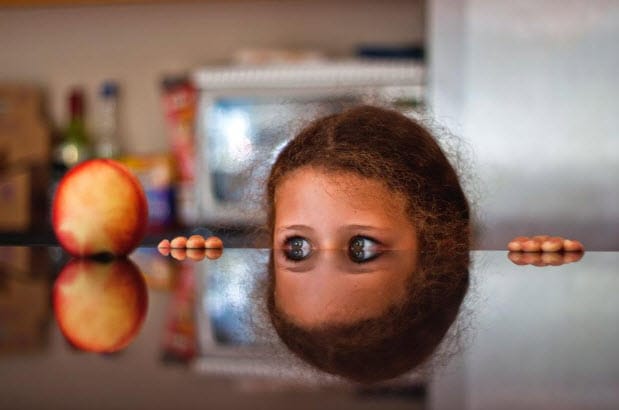
4. Reality and Reflection
Don’t just focus on the reflection, these tend to distract from how good the reflection is. Of course if the reflective surface reflects too well and you just focus on that. The image might come out as looking the same as if you had just pointed and shot the subject.
You should have a mix of the physical real life subject and the reflection. This way you can demonstrate how effective reflective photography is. The iPhone is well equipped for this with the ability to take high quality photos of even moving subjects in bursts.
All you need to do is hold down the shutter/take photo button and burst mode automatically takes lots of photos until you release.
5. Texture
Using a still reflective surface is good, but reflective photos are more effective if you have been able to capture texture. Where the reflective surface distorts the real life subject, you’re able to artistically capture an entirely unique affect each time. This is why waves are a great way to create a truly different image with each shot.
It is also just good photography practice to have your subjects bend and distort the light. The contrasts make for an aesthetically beautiful image, and makes post production optimization even easier.


Post Production Reflective Effects
It’s possible to create great reflective photographs by using reflective effects after you have taken it. You can deceptively take one of your great photos and use the reflective effect to make it appear on a reflective looking surface. Here’s some examples of photos that were created using this effect through software:
The image of the lamp and the puddle were taken separately and meshed together using an app…
You can do this on iPhone using these apps:
| App | Requirements | Price |
|---|---|---|
| Reflect Mirror Camera | iOS 8.0 or later | $2.99 |
| Reflection | iOS 8.0 or later | $2.99 |
| Photo Reflection | iOS 9.0 or later | Free |
| Photo Mirror Effects | iOS 8.0 or later | Free |
1. Reflect Mirror Camera

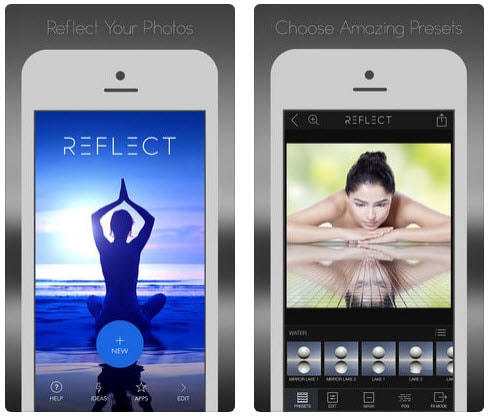
Really easy to use entry level app, you can simply add reflections to your photos and there’s also an option to do this as you take the photograph. The user interface is really clean and easy to use. You also get access to a massive library of templates and effects to make photos truly unique.
2. Reflection
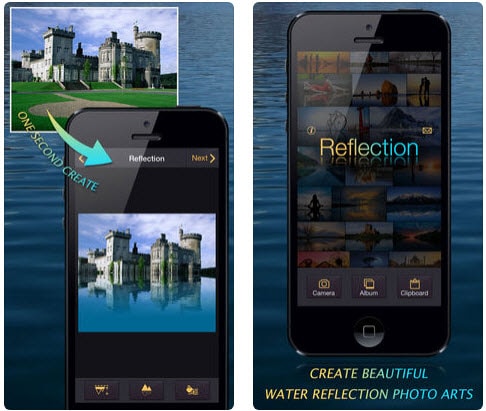
Super user friendly app lets you create HD photos and it’s intuitive feature means you can create reflective photos in a few taps. This is one of the best apps in terms of the quality of images/edits. It has all of the reflective effects of many of the top editing packages like Photoshop.
3. Photo Reflection

If you’re not looking for professional level images then photo reflection is a good choice because it’s free! It lacks some of the advanced features of the other apps but great for the very occasional photographer!
4. Photo Mirror Effects
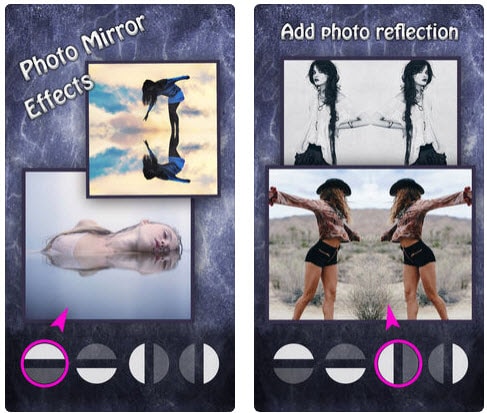
Another great choice for getting started with reflective photography. It has some mid range editing features, but this is made up in it’s easy of use. Perhaps one of the best free reflective photography apps and you can even share the images directly to your social media feeds.
The app also has a large library of free and premium templates for you to use…
 Greeting Card Builder
Ollie Mattison
Ollie Mattison is a writer and a lover of all things video.
Follow @Ollie Mattison
Ollie Mattison
Mar 27, 2024• Proven solutions
Have you ever seen those stunning photos, taken at just the right moment, where the subject is reflected onto something perfectly? This article will show you how to take amazing reflective photographs with just your iPhone. Apple has really invested in improving the quality of it’s in-built lenses in their latest models of the iPhone. Much of the advertising now concerns the stunning photos it’s users can take. Historically this was reserved to those who had powerful SLR cameras. Of course they also want to compete with other manufacturers to be the phone that takes the best selfie!
Reflective photography is an ever growing trend on social media, so you want your images to stand out… This handy guide tells you everything you need to know, and even how to create reflective photos in post production!
So let’s get snapping!
Tips For Perfect Reflective Photography With Your iPhone
1. The Surface
Of course the number one rule of reflective photography is that you have a reflective surface! It doesn’t have to be as simple as a mirror though, as the picture above shows lakes and pools are great if it is a clam weather day. You want to make sure that your surface is clean as far as possible to avoid distraction. If you wanted to be really creative you could find something like these:
A Well Polished Table
A Crystal/Glass Ball
Water in a wine glass (turns everything upside down too!)
2. Pay Attention to Composition
Composition is the very basis of good photography, as the person taking the picture you decide the scene. The most integral part of good composition is the rule of thirds. This means you should divide up the scene/subject into 9 equal squares/rectangles (depending on frame).
You should put the subject or the most important parts of the scene into one or of the lines. Typically we have an impulse to put the subject straight in the middle of the shot, however placing the subject in othe of the other lines off to the side produces a far more engaging photo.
It is also really effective to have the subject where the gridlines intersect. This makes the image standout from others in social media feeds. It subconsciously pulls our attention.
iPhone already has a feature for you to bring up lines before you take the photo with the rule of thirds:
To activate the lines simply go to Settings > Camera and Photographs > Grid
3. Keep it Simple
Reflective photography works best when the scene isn’t busy and there is nothing too distracting. Having one focus/subject will produce a clean image and the reflection of the subject will be far more effective.
Reflective photography should convey a sense of calm, simplicity and tranquility. If the photograph has more than one pull of focus you’re likely to lose this.
Good
Awful
4. Reality and Reflection
Don’t just focus on the reflection, these tend to distract from how good the reflection is. Of course if the reflective surface reflects too well and you just focus on that. The image might come out as looking the same as if you had just pointed and shot the subject.
You should have a mix of the physical real life subject and the reflection. This way you can demonstrate how effective reflective photography is. The iPhone is well equipped for this with the ability to take high quality photos of even moving subjects in bursts.
All you need to do is hold down the shutter/take photo button and burst mode automatically takes lots of photos until you release.
 vMix HD - Software based live production. vMix HD includes everything in vMix Basic HD plus 1000 inputs, Video List, 4 Overlay Channels, and 1 vMix Call
5. Texture
Using a still reflective surface is good, but reflective photos are more effective if you have been able to capture texture. Where the reflective surface distorts the real life subject, you’re able to artistically capture an entirely unique affect each time. This is why waves are a great way to create a truly different image with each shot.
It is also just good photography practice to have your subjects bend and distort the light. The contrasts make for an aesthetically beautiful image, and makes post production optimization even easier.
Post Production Reflective Effects
It’s possible to create great reflective photographs by using reflective effects after you have taken it. You can deceptively take one of your great photos and use the reflective effect to make it appear on a reflective looking surface. Here’s some examples of photos that were created using this effect through software:
The image of the lamp and the puddle were taken separately and meshed together using an app…
You can do this on iPhone using these apps:
| App | Requirements | Price |
|---|---|---|
| Reflect Mirror Camera | iOS 8.0 or later | $2.99 |
| Reflection | iOS 8.0 or later | $2.99 |
| Photo Reflection | iOS 9.0 or later | Free |
| Photo Mirror Effects | iOS 8.0 or later | Free |
1. Reflect Mirror Camera
Really easy to use entry level app, you can simply add reflections to your photos and there’s also an option to do this as you take the photograph. The user interface is really clean and easy to use. You also get access to a massive library of templates and effects to make photos truly unique.
2. Reflection
Super user friendly app lets you create HD photos and it’s intuitive feature means you can create reflective photos in a few taps. This is one of the best apps in terms of the quality of images/edits. It has all of the reflective effects of many of the top editing packages like Photoshop.
3. Photo Reflection

If you’re not looking for professional level images then photo reflection is a good choice because it’s free! It lacks some of the advanced features of the other apps but great for the very occasional photographer!
4. Photo Mirror Effects
Another great choice for getting started with reflective photography. It has some mid range editing features, but this is made up in it’s easy of use. Perhaps one of the best free reflective photography apps and you can even share the images directly to your social media feeds.
The app also has a large library of free and premium templates for you to use…
Ollie Mattison
Ollie Mattison is a writer and a lover of all things video.
Follow @Ollie Mattison
Ollie Mattison
Mar 27, 2024• Proven solutions
Have you ever seen those stunning photos, taken at just the right moment, where the subject is reflected onto something perfectly? This article will show you how to take amazing reflective photographs with just your iPhone. Apple has really invested in improving the quality of it’s in-built lenses in their latest models of the iPhone. Much of the advertising now concerns the stunning photos it’s users can take. Historically this was reserved to those who had powerful SLR cameras. Of course they also want to compete with other manufacturers to be the phone that takes the best selfie!
Reflective photography is an ever growing trend on social media, so you want your images to stand out… This handy guide tells you everything you need to know, and even how to create reflective photos in post production!
So let’s get snapping!
Tips For Perfect Reflective Photography With Your iPhone
1. The Surface
Of course the number one rule of reflective photography is that you have a reflective surface! It doesn’t have to be as simple as a mirror though, as the picture above shows lakes and pools are great if it is a clam weather day. You want to make sure that your surface is clean as far as possible to avoid distraction. If you wanted to be really creative you could find something like these:
A Well Polished Table
A Crystal/Glass Ball

Water in a wine glass (turns everything upside down too!)
2. Pay Attention to Composition
Composition is the very basis of good photography, as the person taking the picture you decide the scene. The most integral part of good composition is the rule of thirds. This means you should divide up the scene/subject into 9 equal squares/rectangles (depending on frame).
You should put the subject or the most important parts of the scene into one or of the lines. Typically we have an impulse to put the subject straight in the middle of the shot, however placing the subject in othe of the other lines off to the side produces a far more engaging photo.
It is also really effective to have the subject where the gridlines intersect. This makes the image standout from others in social media feeds. It subconsciously pulls our attention.
iPhone already has a feature for you to bring up lines before you take the photo with the rule of thirds:
To activate the lines simply go to Settings > Camera and Photographs > Grid
3. Keep it Simple
Reflective photography works best when the scene isn’t busy and there is nothing too distracting. Having one focus/subject will produce a clean image and the reflection of the subject will be far more effective.
Reflective photography should convey a sense of calm, simplicity and tranquility. If the photograph has more than one pull of focus you’re likely to lose this.
Good
 CalendarBudget - Monthly subscription membership to CalendarBudget via web browser or mobile app. Support included.
Awful
 Nero Burning ROM:
The ultimate burning program for all your needs!
4. Reality and Reflection
Don’t just focus on the reflection, these tend to distract from how good the reflection is. Of course if the reflective surface reflects too well and you just focus on that. The image might come out as looking the same as if you had just pointed and shot the subject.
You should have a mix of the physical real life subject and the reflection. This way you can demonstrate how effective reflective photography is. The iPhone is well equipped for this with the ability to take high quality photos of even moving subjects in bursts.
All you need to do is hold down the shutter/take photo button and burst mode automatically takes lots of photos until you release.

5. Texture
Using a still reflective surface is good, but reflective photos are more effective if you have been able to capture texture. Where the reflective surface distorts the real life subject, you’re able to artistically capture an entirely unique affect each time. This is why waves are a great way to create a truly different image with each shot.
It is also just good photography practice to have your subjects bend and distort the light. The contrasts make for an aesthetically beautiful image, and makes post production optimization even easier.

![]() FX PRO (Gold Robot + Silver Robot(Basic Package))
FX PRO (Gold Robot + Silver Robot(Basic Package))
Post Production Reflective Effects
It’s possible to create great reflective photographs by using reflective effects after you have taken it. You can deceptively take one of your great photos and use the reflective effect to make it appear on a reflective looking surface. Here’s some examples of photos that were created using this effect through software:
The image of the lamp and the puddle were taken separately and meshed together using an app…
You can do this on iPhone using these apps:
| App | Requirements | Price |
|---|---|---|
| Reflect Mirror Camera | iOS 8.0 or later | $2.99 |
| Reflection | iOS 8.0 or later | $2.99 |
| Photo Reflection | iOS 9.0 or later | Free |
| Photo Mirror Effects | iOS 8.0 or later | Free |
1. Reflect Mirror Camera
Really easy to use entry level app, you can simply add reflections to your photos and there’s also an option to do this as you take the photograph. The user interface is really clean and easy to use. You also get access to a massive library of templates and effects to make photos truly unique.
2. Reflection
Super user friendly app lets you create HD photos and it’s intuitive feature means you can create reflective photos in a few taps. This is one of the best apps in terms of the quality of images/edits. It has all of the reflective effects of many of the top editing packages like Photoshop.
3. Photo Reflection
 PaperScan Professional: PaperScan Scanner Software is a powerful TWAIN & WIA scanning application centered on one idea: making document acquisition an unparalleled easy task for anyone.
If you’re not looking for professional level images then photo reflection is a good choice because it’s free! It lacks some of the advanced features of the other apps but great for the very occasional photographer!
4. Photo Mirror Effects
Another great choice for getting started with reflective photography. It has some mid range editing features, but this is made up in it’s easy of use. Perhaps one of the best free reflective photography apps and you can even share the images directly to your social media feeds.
The app also has a large library of free and premium templates for you to use…
Ollie Mattison
Ollie Mattison is a writer and a lover of all things video.
Follow @Ollie Mattison
Ollie Mattison
Mar 27, 2024• Proven solutions
Have you ever seen those stunning photos, taken at just the right moment, where the subject is reflected onto something perfectly? This article will show you how to take amazing reflective photographs with just your iPhone. Apple has really invested in improving the quality of it’s in-built lenses in their latest models of the iPhone. Much of the advertising now concerns the stunning photos it’s users can take. Historically this was reserved to those who had powerful SLR cameras. Of course they also want to compete with other manufacturers to be the phone that takes the best selfie!
Reflective photography is an ever growing trend on social media, so you want your images to stand out… This handy guide tells you everything you need to know, and even how to create reflective photos in post production!
So let’s get snapping!
Tips For Perfect Reflective Photography With Your iPhone
1. The Surface
Of course the number one rule of reflective photography is that you have a reflective surface! It doesn’t have to be as simple as a mirror though, as the picture above shows lakes and pools are great if it is a clam weather day. You want to make sure that your surface is clean as far as possible to avoid distraction. If you wanted to be really creative you could find something like these:
A Well Polished Table
A Crystal/Glass Ball
Water in a wine glass (turns everything upside down too!)
2. Pay Attention to Composition
Composition is the very basis of good photography, as the person taking the picture you decide the scene. The most integral part of good composition is the rule of thirds. This means you should divide up the scene/subject into 9 equal squares/rectangles (depending on frame).
You should put the subject or the most important parts of the scene into one or of the lines. Typically we have an impulse to put the subject straight in the middle of the shot, however placing the subject in othe of the other lines off to the side produces a far more engaging photo.
It is also really effective to have the subject where the gridlines intersect. This makes the image standout from others in social media feeds. It subconsciously pulls our attention.
iPhone already has a feature for you to bring up lines before you take the photo with the rule of thirds:
To activate the lines simply go to Settings > Camera and Photographs > Grid
3. Keep it Simple
Reflective photography works best when the scene isn’t busy and there is nothing too distracting. Having one focus/subject will produce a clean image and the reflection of the subject will be far more effective.
Reflective photography should convey a sense of calm, simplicity and tranquility. If the photograph has more than one pull of focus you’re likely to lose this.
Good
Awful
4. Reality and Reflection
Don’t just focus on the reflection, these tend to distract from how good the reflection is. Of course if the reflective surface reflects too well and you just focus on that. The image might come out as looking the same as if you had just pointed and shot the subject.
You should have a mix of the physical real life subject and the reflection. This way you can demonstrate how effective reflective photography is. The iPhone is well equipped for this with the ability to take high quality photos of even moving subjects in bursts.
All you need to do is hold down the shutter/take photo button and burst mode automatically takes lots of photos until you release.
5. Texture
Using a still reflective surface is good, but reflective photos are more effective if you have been able to capture texture. Where the reflective surface distorts the real life subject, you’re able to artistically capture an entirely unique affect each time. This is why waves are a great way to create a truly different image with each shot.
It is also just good photography practice to have your subjects bend and distort the light. The contrasts make for an aesthetically beautiful image, and makes post production optimization even easier.
Post Production Reflective Effects
It’s possible to create great reflective photographs by using reflective effects after you have taken it. You can deceptively take one of your great photos and use the reflective effect to make it appear on a reflective looking surface. Here’s some examples of photos that were created using this effect through software:
The image of the lamp and the puddle were taken separately and meshed together using an app…
You can do this on iPhone using these apps:
| App | Requirements | Price |
|---|---|---|
| Reflect Mirror Camera | iOS 8.0 or later | $2.99 |
| Reflection | iOS 8.0 or later | $2.99 |
| Photo Reflection | iOS 9.0 or later | Free |
| Photo Mirror Effects | iOS 8.0 or later | Free |
1. Reflect Mirror Camera
 Easy and Safe Partition Software & Hard Disk Manager
Really easy to use entry level app, you can simply add reflections to your photos and there’s also an option to do this as you take the photograph. The user interface is really clean and easy to use. You also get access to a massive library of templates and effects to make photos truly unique.
2. Reflection
Super user friendly app lets you create HD photos and it’s intuitive feature means you can create reflective photos in a few taps. This is one of the best apps in terms of the quality of images/edits. It has all of the reflective effects of many of the top editing packages like Photoshop.
3. Photo Reflection
If you’re not looking for professional level images then photo reflection is a good choice because it’s free! It lacks some of the advanced features of the other apps but great for the very occasional photographer!
4. Photo Mirror Effects
Another great choice for getting started with reflective photography. It has some mid range editing features, but this is made up in it’s easy of use. Perhaps one of the best free reflective photography apps and you can even share the images directly to your social media feeds.
The app also has a large library of free and premium templates for you to use…
Ollie Mattison
Ollie Mattison is a writer and a lover of all things video.
Follow @Ollie Mattison
- Title: Dive Into iPhone Reflective Imaging Magic
- Author: Daniel
- Created at : 2024-07-25 03:45:11
- Updated at : 2024-07-26 03:45:11
- Link: https://extra-resources.techidaily.com/dive-into-iphone-reflective-imaging-magic/
- License: This work is licensed under CC BY-NC-SA 4.0.