
"Dive Into Vibrant Visuals GoPro Studio Color Correction"
Dive Into Vibrant Visuals: GoPro Studio Color Correction
How to Do Color Correction in GoPro Studio
 Greeting Card Builder
Max Wales
Mar 27, 2024• Proven solutions
GoPro Action Cameras are ideal for capturing any outdoor moving scenes and for shooting superb vantage points. By making use of the GoPro Studio you will be able to add a lot of creative touches to your video. In today’s post we are about to discuss how to do the perfect color correction on GoPro Studio and how to edit the footage captured on your action camera.
You may also like:
Color Grading and Correction in Final Cut Pro >>

Color Correction in GoPro Studio
One of the easiest and most convenient ways of making the most out of your action camera is to use the “Protune” setting. The Protune among other things is capable of enhancing the dynamic recording range. The enhanced dynamic range would offer you a flat log like image which appears more vigorous while during color grading.
No matter whether you are recording with Protune turned on or off, you will be required to adjust the colors during the time of the edit. Color Correction in GoPro Studio is simple and intuitive.
Just follow the steps below:
Step 1: The first thing you have to do is setting the cam to the Protune shooting mode. Now just import and get your Protune footage converted.
Step 2: Split the Image- On the right of the screen there is a split button. You need to shift the point almost halfway. Doing this would split the window in ½ though you will not be able to see that. When the color profile of the image is changed the right side is going to change without affecting the left side. This would allow you to compare the image as it was before and after correcting the color. In order to view the original image or the edited one you have to draw the pointer to the right or left.
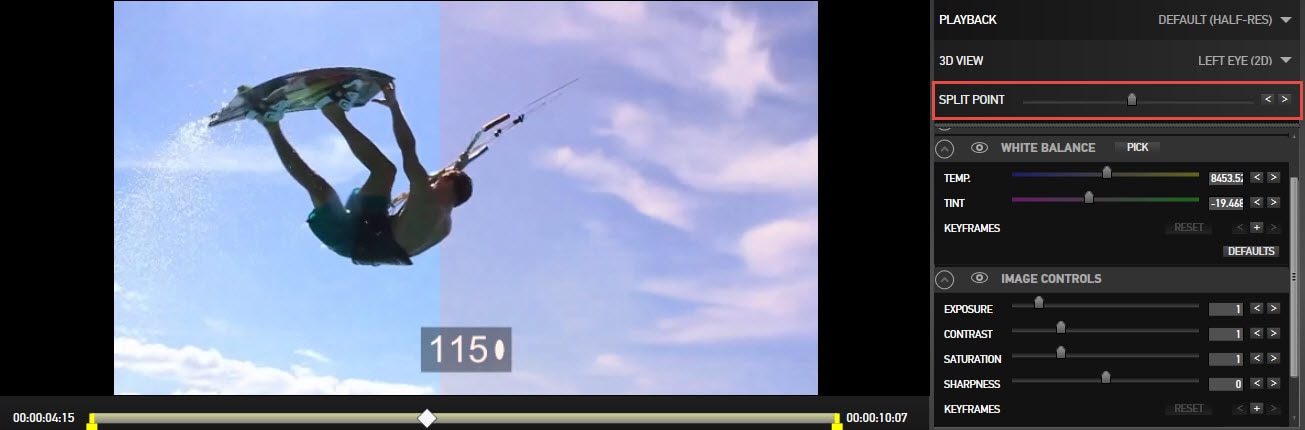
Step 3: Color Correction- On the right hand side of your window the color correction can be done just by hitting on the arrow beside the White Balance button and the Image button. Now you can see the options which needed to be changed in order to correct the color. You will be able to view all the options like temperature, exposure, sharpness, contrast, tint and saturation. You can also choose to apply different preset overlays to give the footage a special filter.
 Simple and intuitive video editing
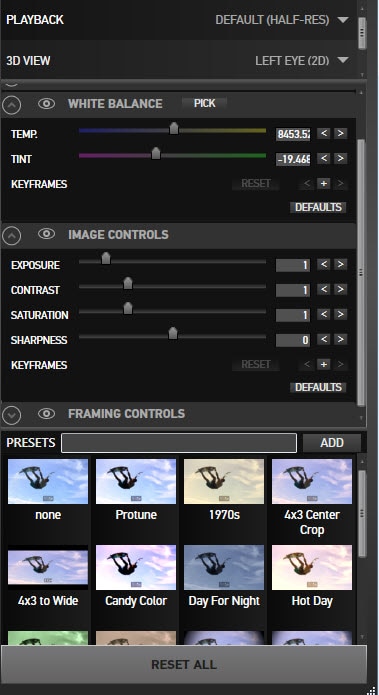
The GoPro Studio is very user friendly and effective video editing software but in order to use it you need to convert the format of your video before you start to edit. There aren’t many options especially when you require enhanced controls on the GoPro recordings. This is why we would recommend you to use the Wondershare Filmora editing software. It is equipped with a special action cam tool which not only allows the user to alter the color by changing the brightness, saturation, vignette, tint or temp but even comes with loads of 3D LUT filters which adds a nice effect.


The all new version of the Wondershare Filmora editing software for Windows and Mac is packed with exciting features meant exclusively for action cameras. These features include:
- Video stabilization , advanced speed control (slow motion, fast motion, replay, freeze frame and reverse), audio de-noise, along with color correction features (3D, white balance, LUT etc).
- The Instant Cutter tool would give the users the option of trimming and merging video files without any loss of quality. It would allow you to cut a 8GB footage within just a minutes time.
- It fully supports encoded MP4 format, MTS and Mov videos shot on any action cams, camcorders and phones.
GoPro Footage Color Correction in Wondershare Filmora
In order to do the color correction in Filmora you just need to follow the 3 easy steps.
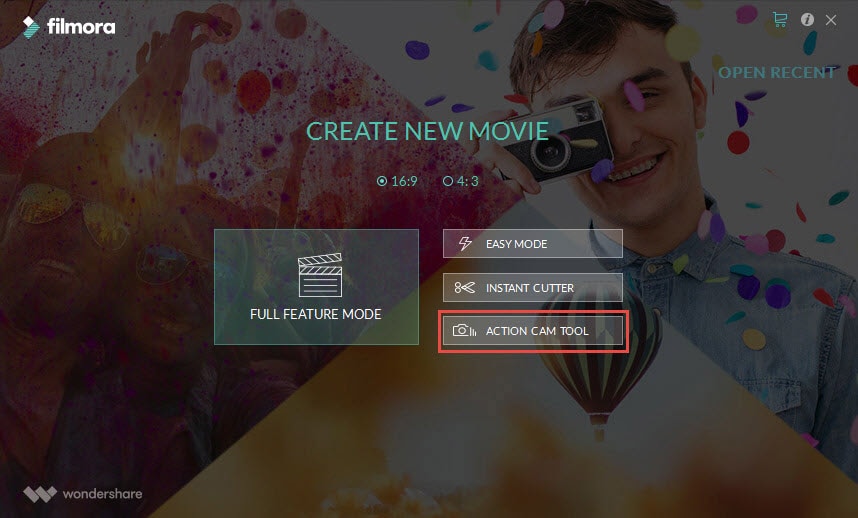
Step 1: Import the file. After opening the Filmora app go to the Action Cam Tool right on the interface of the software. Now click on the import button or just drag and drop your clip shot on any action cam into the middle of your timeline.
Step 2: Color Tuning. Now you need to choose the Color Tab on the left of your control panel. Here you will be able to drag the individual slider so as to alter the contrast, brightness, tint, vignette and saturation.
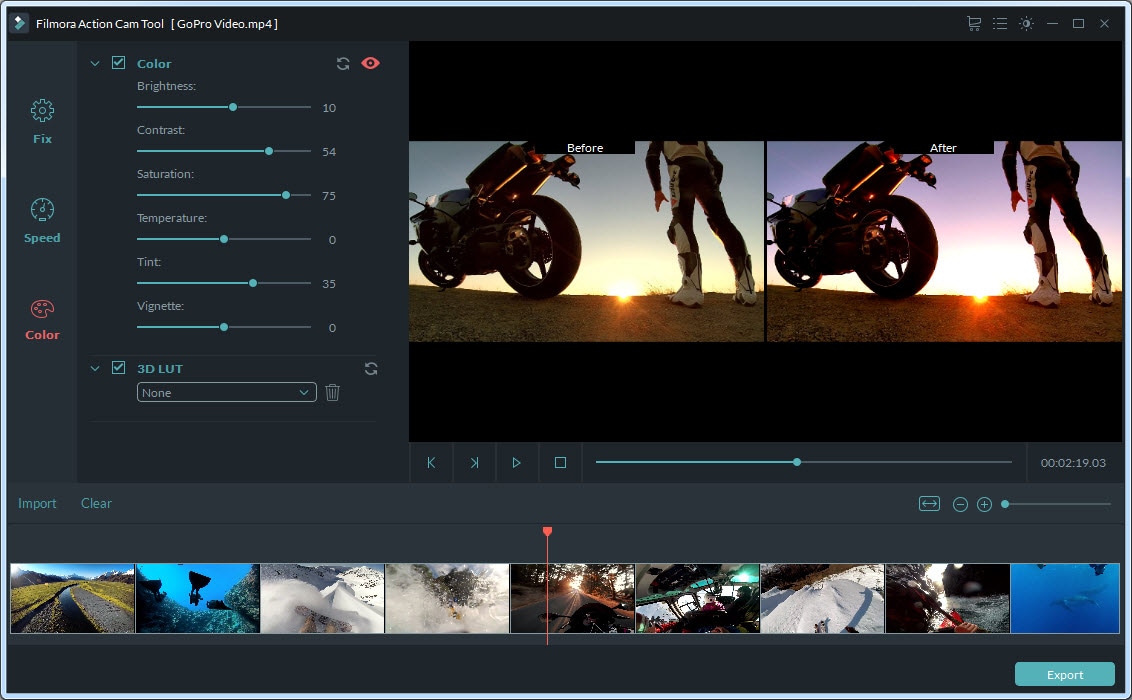
The compare button located on the top right lets you check all the segments before and after the correction simultaneously. While the Reset button  would allow you to clear all the color corrections anytime.
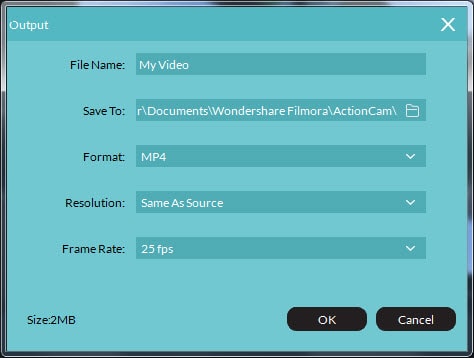
Step 3: Save and Share- Once the edit is finished you need to hit the Export button in order to save the edited clip as MOV or MP4 format. You can also alter the video res and the frames per sec. Now just hit the OK button to start the export.
Max Wales
Max Wales is a writer and a lover of all things video.
Follow @Max Wales
Max Wales
Mar 27, 2024• Proven solutions
GoPro Action Cameras are ideal for capturing any outdoor moving scenes and for shooting superb vantage points. By making use of the GoPro Studio you will be able to add a lot of creative touches to your video. In today’s post we are about to discuss how to do the perfect color correction on GoPro Studio and how to edit the footage captured on your action camera.
You may also like:
Color Grading and Correction in Final Cut Pro >>
Color Correction in GoPro Studio
One of the easiest and most convenient ways of making the most out of your action camera is to use the “Protune” setting. The Protune among other things is capable of enhancing the dynamic recording range. The enhanced dynamic range would offer you a flat log like image which appears more vigorous while during color grading.
No matter whether you are recording with Protune turned on or off, you will be required to adjust the colors during the time of the edit. Color Correction in GoPro Studio is simple and intuitive.
Just follow the steps below:
Step 1: The first thing you have to do is setting the cam to the Protune shooting mode. Now just import and get your Protune footage converted.
Step 2: Split the Image- On the right of the screen there is a split button. You need to shift the point almost halfway. Doing this would split the window in ½ though you will not be able to see that. When the color profile of the image is changed the right side is going to change without affecting the left side. This would allow you to compare the image as it was before and after correcting the color. In order to view the original image or the edited one you have to draw the pointer to the right or left.
Step 3: Color Correction- On the right hand side of your window the color correction can be done just by hitting on the arrow beside the White Balance button and the Image button. Now you can see the options which needed to be changed in order to correct the color. You will be able to view all the options like temperature, exposure, sharpness, contrast, tint and saturation. You can also choose to apply different preset overlays to give the footage a special filter.
The GoPro Studio is very user friendly and effective video editing software but in order to use it you need to convert the format of your video before you start to edit. There aren’t many options especially when you require enhanced controls on the GoPro recordings. This is why we would recommend you to use the Wondershare Filmora editing software. It is equipped with a special action cam tool which not only allows the user to alter the color by changing the brightness, saturation, vignette, tint or temp but even comes with loads of 3D LUT filters which adds a nice effect.
 Glarysoft File Recovery Pro - Helps to recover your lost file/data, even permanently deleted data.
The all new version of the Wondershare Filmora editing software for Windows and Mac is packed with exciting features meant exclusively for action cameras. These features include:
- Video stabilization , advanced speed control (slow motion, fast motion, replay, freeze frame and reverse), audio de-noise, along with color correction features (3D, white balance, LUT etc).
- The Instant Cutter tool would give the users the option of trimming and merging video files without any loss of quality. It would allow you to cut a 8GB footage within just a minutes time.
- It fully supports encoded MP4 format, MTS and Mov videos shot on any action cams, camcorders and phones.
GoPro Footage Color Correction in Wondershare Filmora
In order to do the color correction in Filmora you just need to follow the 3 easy steps.
Step 1: Import the file. After opening the Filmora app go to the Action Cam Tool right on the interface of the software. Now click on the import button or just drag and drop your clip shot on any action cam into the middle of your timeline.
Step 2: Color Tuning. Now you need to choose the Color Tab on the left of your control panel. Here you will be able to drag the individual slider so as to alter the contrast, brightness, tint, vignette and saturation.
The compare button located on the top right lets you check all the segments before and after the correction simultaneously. While the Reset button would allow you to clear all the color corrections anytime.
Step 3: Save and Share- Once the edit is finished you need to hit the Export button in order to save the edited clip as MOV or MP4 format. You can also alter the video res and the frames per sec. Now just hit the OK button to start the export.
Max Wales
Max Wales is a writer and a lover of all things video.
Follow @Max Wales
Max Wales
Mar 27, 2024• Proven solutions
GoPro Action Cameras are ideal for capturing any outdoor moving scenes and for shooting superb vantage points. By making use of the GoPro Studio you will be able to add a lot of creative touches to your video. In today’s post we are about to discuss how to do the perfect color correction on GoPro Studio and how to edit the footage captured on your action camera.
You may also like:
Color Grading and Correction in Final Cut Pro >>
 CollageIt Pro
Color Correction in GoPro Studio
One of the easiest and most convenient ways of making the most out of your action camera is to use the “Protune” setting. The Protune among other things is capable of enhancing the dynamic recording range. The enhanced dynamic range would offer you a flat log like image which appears more vigorous while during color grading.
No matter whether you are recording with Protune turned on or off, you will be required to adjust the colors during the time of the edit. Color Correction in GoPro Studio is simple and intuitive.
Just follow the steps below:
Step 1: The first thing you have to do is setting the cam to the Protune shooting mode. Now just import and get your Protune footage converted.
Step 2: Split the Image- On the right of the screen there is a split button. You need to shift the point almost halfway. Doing this would split the window in ½ though you will not be able to see that. When the color profile of the image is changed the right side is going to change without affecting the left side. This would allow you to compare the image as it was before and after correcting the color. In order to view the original image or the edited one you have to draw the pointer to the right or left.
Step 3: Color Correction- On the right hand side of your window the color correction can be done just by hitting on the arrow beside the White Balance button and the Image button. Now you can see the options which needed to be changed in order to correct the color. You will be able to view all the options like temperature, exposure, sharpness, contrast, tint and saturation. You can also choose to apply different preset overlays to give the footage a special filter.
 PaperScan Professional: PaperScan Scanner Software is a powerful TWAIN & WIA scanning application centered on one idea: making document acquisition an unparalleled easy task for anyone.
The GoPro Studio is very user friendly and effective video editing software but in order to use it you need to convert the format of your video before you start to edit. There aren’t many options especially when you require enhanced controls on the GoPro recordings. This is why we would recommend you to use the Wondershare Filmora editing software. It is equipped with a special action cam tool which not only allows the user to alter the color by changing the brightness, saturation, vignette, tint or temp but even comes with loads of 3D LUT filters which adds a nice effect.
The all new version of the Wondershare Filmora editing software for Windows and Mac is packed with exciting features meant exclusively for action cameras. These features include:
- Video stabilization , advanced speed control (slow motion, fast motion, replay, freeze frame and reverse), audio de-noise, along with color correction features (3D, white balance, LUT etc).
- The Instant Cutter tool would give the users the option of trimming and merging video files without any loss of quality. It would allow you to cut a 8GB footage within just a minutes time.
- It fully supports encoded MP4 format, MTS and Mov videos shot on any action cams, camcorders and phones.
GoPro Footage Color Correction in Wondershare Filmora
In order to do the color correction in Filmora you just need to follow the 3 easy steps.
Step 1: Import the file. After opening the Filmora app go to the Action Cam Tool right on the interface of the software. Now click on the import button or just drag and drop your clip shot on any action cam into the middle of your timeline.
Step 2: Color Tuning. Now you need to choose the Color Tab on the left of your control panel. Here you will be able to drag the individual slider so as to alter the contrast, brightness, tint, vignette and saturation.
The compare button located on the top right lets you check all the segments before and after the correction simultaneously. While the Reset button would allow you to clear all the color corrections anytime.
Step 3: Save and Share- Once the edit is finished you need to hit the Export button in order to save the edited clip as MOV or MP4 format. You can also alter the video res and the frames per sec. Now just hit the OK button to start the export.
 Software Update Pro - Check and update software installed on your computer.
Max Wales
Max Wales is a writer and a lover of all things video.
Follow @Max Wales
Max Wales
Mar 27, 2024• Proven solutions
GoPro Action Cameras are ideal for capturing any outdoor moving scenes and for shooting superb vantage points. By making use of the GoPro Studio you will be able to add a lot of creative touches to your video. In today’s post we are about to discuss how to do the perfect color correction on GoPro Studio and how to edit the footage captured on your action camera.
You may also like:
Color Grading and Correction in Final Cut Pro >>
Color Correction in GoPro Studio
One of the easiest and most convenient ways of making the most out of your action camera is to use the “Protune” setting. The Protune among other things is capable of enhancing the dynamic recording range. The enhanced dynamic range would offer you a flat log like image which appears more vigorous while during color grading.
No matter whether you are recording with Protune turned on or off, you will be required to adjust the colors during the time of the edit. Color Correction in GoPro Studio is simple and intuitive.
Just follow the steps below:
Step 1: The first thing you have to do is setting the cam to the Protune shooting mode. Now just import and get your Protune footage converted.
Step 2: Split the Image- On the right of the screen there is a split button. You need to shift the point almost halfway. Doing this would split the window in ½ though you will not be able to see that. When the color profile of the image is changed the right side is going to change without affecting the left side. This would allow you to compare the image as it was before and after correcting the color. In order to view the original image or the edited one you have to draw the pointer to the right or left.
 NeoDownloader - Fast and fully automatic image/video/music downloader.
Step 3: Color Correction- On the right hand side of your window the color correction can be done just by hitting on the arrow beside the White Balance button and the Image button. Now you can see the options which needed to be changed in order to correct the color. You will be able to view all the options like temperature, exposure, sharpness, contrast, tint and saturation. You can also choose to apply different preset overlays to give the footage a special filter.
The GoPro Studio is very user friendly and effective video editing software but in order to use it you need to convert the format of your video before you start to edit. There aren’t many options especially when you require enhanced controls on the GoPro recordings. This is why we would recommend you to use the Wondershare Filmora editing software. It is equipped with a special action cam tool which not only allows the user to alter the color by changing the brightness, saturation, vignette, tint or temp but even comes with loads of 3D LUT filters which adds a nice effect.
 With Screensaver Wonder you can easily make a screensaver from your own pictures and video files. Create screensavers for your own computer or create standalone, self-installing screensavers for easy sharing with your friends. Together with its sister product Screensaver Factory, Screensaver Wonder is one of the most popular screensaver software products in the world, helping thousands of users decorate their computer screens quickly and easily.
The all new version of the Wondershare Filmora editing software for Windows and Mac is packed with exciting features meant exclusively for action cameras. These features include:
- Video stabilization , advanced speed control (slow motion, fast motion, replay, freeze frame and reverse), audio de-noise, along with color correction features (3D, white balance, LUT etc).
- The Instant Cutter tool would give the users the option of trimming and merging video files without any loss of quality. It would allow you to cut a 8GB footage within just a minutes time.
- It fully supports encoded MP4 format, MTS and Mov videos shot on any action cams, camcorders and phones.
GoPro Footage Color Correction in Wondershare Filmora
In order to do the color correction in Filmora you just need to follow the 3 easy steps.
Step 1: Import the file. After opening the Filmora app go to the Action Cam Tool right on the interface of the software. Now click on the import button or just drag and drop your clip shot on any action cam into the middle of your timeline.
Step 2: Color Tuning. Now you need to choose the Color Tab on the left of your control panel. Here you will be able to drag the individual slider so as to alter the contrast, brightness, tint, vignette and saturation.

The compare button located on the top right lets you check all the segments before and after the correction simultaneously. While the Reset button would allow you to clear all the color corrections anytime.
Step 3: Save and Share- Once the edit is finished you need to hit the Export button in order to save the edited clip as MOV or MP4 format. You can also alter the video res and the frames per sec. Now just hit the OK button to start the export.

Max Wales
Max Wales is a writer and a lover of all things video.
Follow @Max Wales
- Title: Dive Into Vibrant Visuals GoPro Studio Color Correction
- Author: Daniel
- Created at : 2024-07-25 03:15:28
- Updated at : 2024-07-26 03:15:28
- Link: https://extra-resources.techidaily.com/dive-into-vibrant-visuals-gopro-studio-color-correction/
- License: This work is licensed under CC BY-NC-SA 4.0.