
Gentle Volume Reduction Methods in Ableton Live
Gentle Volume Reduction Methods in Ableton Live
As a result of its distinctive method of loop-based composition, Ableton live fades are favorite among hip-hop and electronic music producers. Ableton Live is one of the greatest DAWs to learn if you’re just beginning to make beats or write songs. For many artists, Ableton Live has emerged as the preferred setting for writing music with an eye on live performance. If you’re coming from a conventionally built digital audio workstation, Live’s approach to composition and arrangement is undoubtedly odd.
One of the most user-friendly pieces of music software ever created is Ableton Live. With a little instruction, you can quickly master Ableton fade and produce recordings of studio-caliber. Since then, Ableton has emerged as one of the top names in electronic music production. Live is a robust DAW with mature capabilities that can be used to produce any kind of music, although it works especially well with certain processes. Follow this guide to learn about Ableton fade in detail.
Part 1. 2 Ways to Fade audio in Ableton
You’ve certainly heard the terms “audio fade-in” and “audio fade-out” a few times as a newbie, and you may be wondering what they mean and how you might apply them to your films. Crossfading clips on the same track is easier and only needs one track, however crossfading clips on different tracks allows you to apply independent audio effects processing and gives greater flexibility in structuring the fade curves. Both strategies may be helpful for organizing and creating sounds.
Way 1. Use Warp/Fades
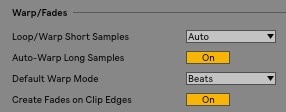
To avoid any clicks, turn on Create Fades on Clip Edges in the Record/Warp/Launch section of Live’s Preferences. The beginning and ending of the Clip will each have a little fade.
You must disable the automated mode in order to alter the clip fades. You may accomplish this by doing the following:
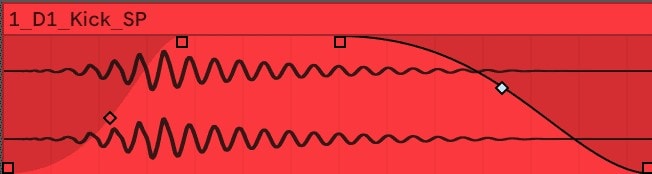
The fade-in and fade-out handles should display when you hover the mouse icon over the audio clip you want to fade. In case, if they don’t, hit ‘A’ on your keyboard to make them appear. Then, you hold down the mouse button while left-clicking on the handle you wish to fade and lowering the fader.
Way 2. Using the MIDI Track
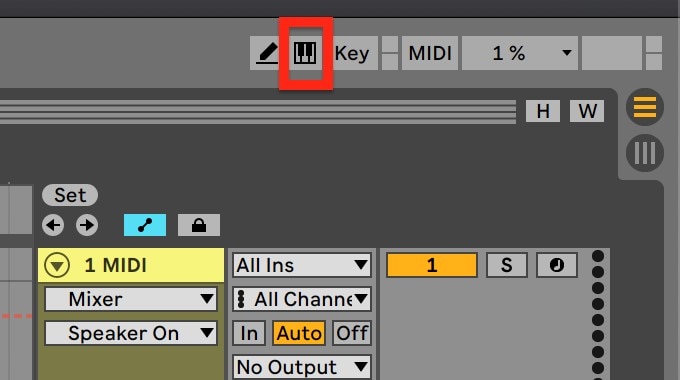
In the method 2, you can use it on MIDI track. It will load the Utility effect to the specified MIDI track wherever you drag it on the track. Left-click on the little box in the bottom right corner of the DAW to view the Utility effect on your track. Follow the procedure below to do so.
Live’s ability to easily clean up the beginning and conclusion of audio samples has long been one of its strengths. Simply hit A and hover over the clip to check sure Automation Mode isn’t turned on. There are two handles you may drag on the left and right, as well as two curve adjusters:
Part 2. Alternative way to Fade Audio without Ableton
As you are now aware with the phrase audio fade-in/fade-out, it is now time to implement this unique effect using a user-friendly tool. For this reason, we have provided Wondershare Filmora , which will allow you to learn how to implement this feature using the Filmora video editing interface. The finest feature of this all-in-one package software is that it is a convenient and simple platform, especially for novices. Since audio fading is your main worry, it is obvious for you to choose this program.
Filmora delivers a scalable experience since it was created for both novice and seasoned content makers. You may start cutting and editing your films like an expert even if you’re a novice. You may get all the information you want from the toolbar after the program has been launched on your computer. This includes media, audio, titles, effects, split-screen formatting, components, and transitions.
Free Download For Win 7 or later(64-bit)
Free Download For macOS 10.14 or later
Step1Download and Install Wondershare Filmora
Available for free, Filmora is the simple platform to begin modifying your audio and music files. To use this program hassle-free, you must first download and install it on your windows computer. Start by downloading the most recent version of this program. Once you’ve done that, it’s time to install it on your computer. To do it quickly, simply follow the usual setup instructions and install this software on your computer.
Step2Launch and Import Audios in Filmora
We’ll walk you through the process of utilizing this platform for audio fade-in/fade-out in the following step. You can quickly launch Filmora from your desktop or the search bar and open it as follows to get started. You may now examine the fundamental structure of editing by selecting the Video Editor option from the software’s beginning screen. This will take you to Filmora’s primary interface. Simply choose the Import button from the software’s main interface as shown below to import your audio and video files:

Step3Open up Audio Editor of Filmora
Following the import of your media files into Filmora, you must drag the files onto the program’s timeline. Your media files may be edited using all available methods in the timeline. Simply right-click on the particular audio file and choose “Edit Audio” from the list to use Filmora’s audio editor as seen below.
Step4Fade-in/Fade-out Audio
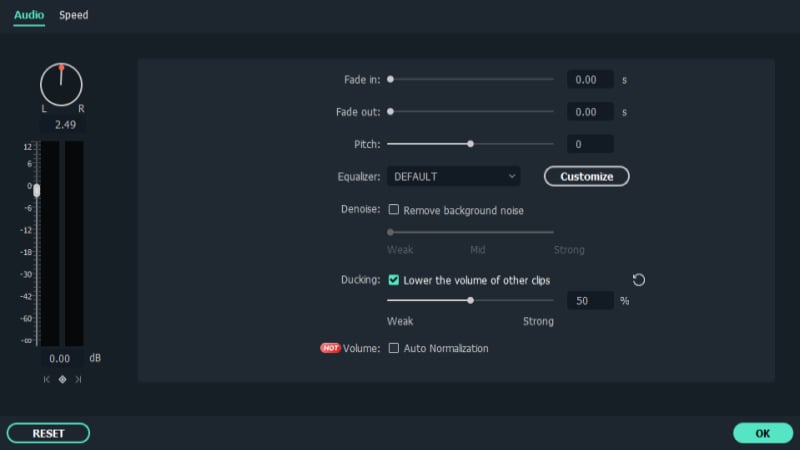
The primary step in this respect is how to begin fading-in/fading-out your audio files using Filmora, which is presented here. The nicest feature of the Filmora is how easy you can use these methods from the timeline. To do so, center your attention on your audio file inside the timeline; after you’ve chosen it, the two icons will appear above the audio file. Drag the first one to the length you want to conduct the audio fade-in option, as shown:

Step5Edit and Export Your Video/Sound
Filmora features a built-in video editing toolbox in addition to an audio editor. Within the app, you may use editing methods ranging from simple to advanced. Simply click on the video file inside the timeline as shown below to choose the basic editor:

On that note, if you are happy with how your voice has changed, right now could be the greatest moment to preserve it or perhaps record it. All popular video and audio formats, including MP3, are supported. To do this, click “Export” and choose “File Format.” Select the necessary configuration from the rundown by clicking the Format button. The specific document will be saved to the specified directory on a computer.
Part 3. Related FAQs
1. Can you fade in Ableton Live Lite?
For budding music producers and performers, the Ableton Live Lite edition’s free assortment of keyboards and midi controllers makes it a fantastic starting place. Fades may also be initiated in Live Lite by pressing the Clip Fade button. Drag the square icon in the upper left or right of an audio clip to manually change the duration of the Fades.
2. How to Fade in Ableton?
We can create Fade in or Fade Out, which induce a progressive rise or drop in loudness, using audio clips. The little white squares at each corner of the clip allow you to adjust these two settings. The Fade In, which can be found at the start of each clip, enables a progressive rise in loudness. For this, we will drag a corner of a clip that is directly next to another clip to the clip we want.
3. Why can’t I fade in Ableton?
In essence, Ableton just refuses to display fades on certain songs. Fades won’t function with automation mode activated. You should be able to use fades if you off track automation. Fades are present on all audio clips, however, if you have that setting turned on. Since they are off by default, you must create them.
Free Download For Win 7 or later(64-bit)
Free Download For macOS 10.14 or later
Free Download For macOS 10.14 or later
Step1Download and Install Wondershare Filmora
Available for free, Filmora is the simple platform to begin modifying your audio and music files. To use this program hassle-free, you must first download and install it on your windows computer. Start by downloading the most recent version of this program. Once you’ve done that, it’s time to install it on your computer. To do it quickly, simply follow the usual setup instructions and install this software on your computer.
Step2Launch and Import Audios in Filmora
We’ll walk you through the process of utilizing this platform for audio fade-in/fade-out in the following step. You can quickly launch Filmora from your desktop or the search bar and open it as follows to get started. You may now examine the fundamental structure of editing by selecting the Video Editor option from the software’s beginning screen. This will take you to Filmora’s primary interface. Simply choose the Import button from the software’s main interface as shown below to import your audio and video files:
Step3Open up Audio Editor of Filmora
Following the import of your media files into Filmora, you must drag the files onto the program’s timeline. Your media files may be edited using all available methods in the timeline. Simply right-click on the particular audio file and choose “Edit Audio” from the list to use Filmora’s audio editor as seen below.
Step4Fade-in/Fade-out Audio
The primary step in this respect is how to begin fading-in/fading-out your audio files using Filmora, which is presented here. The nicest feature of the Filmora is how easy you can use these methods from the timeline. To do so, center your attention on your audio file inside the timeline; after you’ve chosen it, the two icons will appear above the audio file. Drag the first one to the length you want to conduct the audio fade-in option, as shown:
Step5Edit and Export Your Video/Sound
Filmora features a built-in video editing toolbox in addition to an audio editor. Within the app, you may use editing methods ranging from simple to advanced. Simply click on the video file inside the timeline as shown below to choose the basic editor:
On that note, if you are happy with how your voice has changed, right now could be the greatest moment to preserve it or perhaps record it. All popular video and audio formats, including MP3, are supported. To do this, click “Export” and choose “File Format.” Select the necessary configuration from the rundown by clicking the Format button. The specific document will be saved to the specified directory on a computer.
Part 3. Related FAQs
1. Can you fade in Ableton Live Lite?
For budding music producers and performers, the Ableton Live Lite edition’s free assortment of keyboards and midi controllers makes it a fantastic starting place. Fades may also be initiated in Live Lite by pressing the Clip Fade button. Drag the square icon in the upper left or right of an audio clip to manually change the duration of the Fades.
2. How to Fade in Ableton?
We can create Fade in or Fade Out, which induce a progressive rise or drop in loudness, using audio clips. The little white squares at each corner of the clip allow you to adjust these two settings. The Fade In, which can be found at the start of each clip, enables a progressive rise in loudness. For this, we will drag a corner of a clip that is directly next to another clip to the clip we want.
3. Why can’t I fade in Ableton?
In essence, Ableton just refuses to display fades on certain songs. Fades won’t function with automation mode activated. You should be able to use fades if you off track automation. Fades are present on all audio clips, however, if you have that setting turned on. Since they are off by default, you must create them.
Free Download For Win 7 or later(64-bit)
Free Download For macOS 10.14 or later
Also read:
- [New] 2024 Approved Unveiling Past Images 3 Approaches for FB Reverse Search
- [New] In 2024, Augmenting Realities for Better Outcomes
- [New] Skybound Innovations with DJI's Latest Pro Drone Review
- [Updated] Charting the Course to Celebrity The #9 Instagram Techniques You Must Learn
- Best 3D Model Suites for Animation Artists
- Boost Cinematographic Capabilities Essential iPhone Gear
- Easy Tips for Transferring Printed Files to Your Computer via Scanner
- Exquisite Drone Fleet The Pinnacle of Visual Artistry
- Find & Download Your Favorite Movie Soundtracks Easily – A Comprehensive Guide
- Mastering Family Sharing: Essential Solutions to Common Sharing Problems With Subscriptions
- SDR to HD, Now HDR The Next Leap in Editing Workflows
- Step Into Cinematic World Shooting Dynamic Timelapses on GoPro Hero5 Black
- Superior Suggestions Prime Platforms for Grabbing SnapAlert Rhythms
- The Ultimate Guide 10 Cost-Free Passport Image Makers for 2024
- Top Camera/Phone Gimbal – Optimal Pan & Tilt Stability
- Top-Tier Mobile and Desktop Player for AVIs
- Transform Videos Into Stories Discover the Top 10 Reactions
- Trouble with iPhone Screen Brightness Automation? Try These 7 Solutions!
- Troubleshooting and Correcting Error 0X80070091 During Windows 11 System Restore - Solved
- Title: Gentle Volume Reduction Methods in Ableton Live
- Author: Daniel
- Created at : 2024-11-14 19:00:41
- Updated at : 2024-11-21 19:19:31
- Link: https://extra-resources.techidaily.com/gentle-volume-reduction-methods-in-ableton-live/
- License: This work is licensed under CC BY-NC-SA 4.0.