
"IPhone Camera Savvy Image Optimization Secrets"
IPhone Camera Savvy: Image Optimization Secrets
Photography Tips for iPhone


Liza Brown
Mar 27, 2024• Proven solutions
iPhone photography has developed so much that now you can even enter photo competitions with images taken on these devices. In this article, we are going to show you how to use your iPhone as a tool for capturing breathtaking images and supply you with a healthy dose of photography tips that will enable you to take better photos.
You may also like: iPhone Night Photography Tips: Take Night Photos with iPhone >>
iPhone Photography Tips
Curiosity is the most important trait of any successful photographer because you have to be a tireless explorer of the world around you, in order to capture its beauty. The following tips will help you take your iPhone photography to a new level.
1. Become a Master of Light
Photography is the art of writing with light, as a matter of fact, the way you use light in a photo will determine how good it is. The trouble is, that each scene you shoot is going to have different light values, which means that you’ll have to adjust the iPhone camera settings each time you decide to take a photo on a new location.
How to Avoid Sources of Light in a Shot: The first and most basic rule of photography is to try to avoid having sources of light in your shot, and the best way to achieve this is to turn your back to the light source and have the subject of the photo positioned in the direction from which the light is coming from. If you do this, taking pictures that depict stark contrast of shadows and light will become much easier.
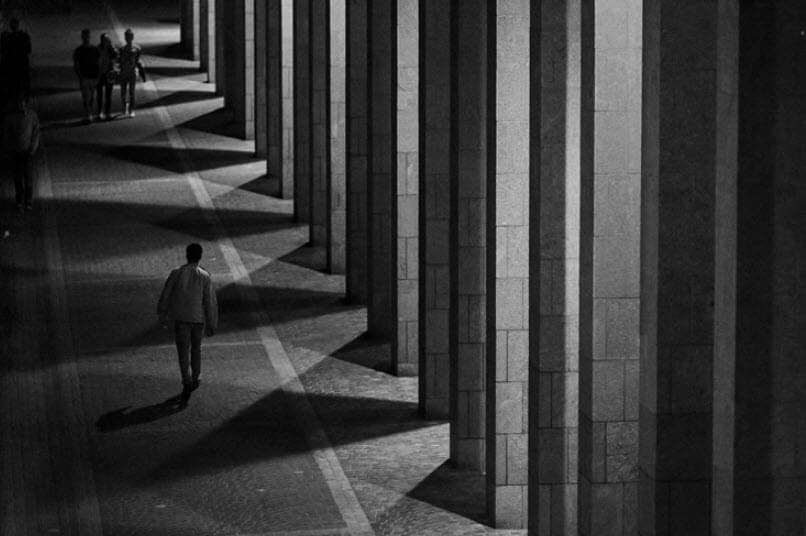
Image resource: Contrastly
How to Take a Silhouette Photo: If you want to take a silhouette photo, simply place the subject of a photo between the light source and your iPhone camera. The source of light in the background will direct too much light into your camera, which will force you to reduce the exposure of a photo, thus the subject of the photo will become underexposed or a mere silhouette.

Image resource: YouTube
How to Take Advantage of Natural Light: The best periods during the day for photography are the sunrise and the sunset because the light provided by the sun is the softest. Portrait and numerous other genres of photography benefit from soft, diffused light. The colors in your pictures will appear much warmer and the results you’ll be able to get will be much more visually pleasing than on photos on which you used direct lightning.

Image resource: Contrastly
2. Learn How To Compose Your Photos and Videos
Organization of the elements depicted within a frame is called composition, and each iPhone videographer or photographer has to practice shot composition in order to be able to improve the quality of the visual content they are producing. Some of the most basic principles of picture composition include the rule of thirds or the diagonal method of arranging objects on a photo.
How to Use the Grid feature: The Grid feature on iPhone camera app can help you master the rule of thirds because it will divide your screen into nine equal rectangles, so you can use each rectangle to improve the organization of the elements within a shot.
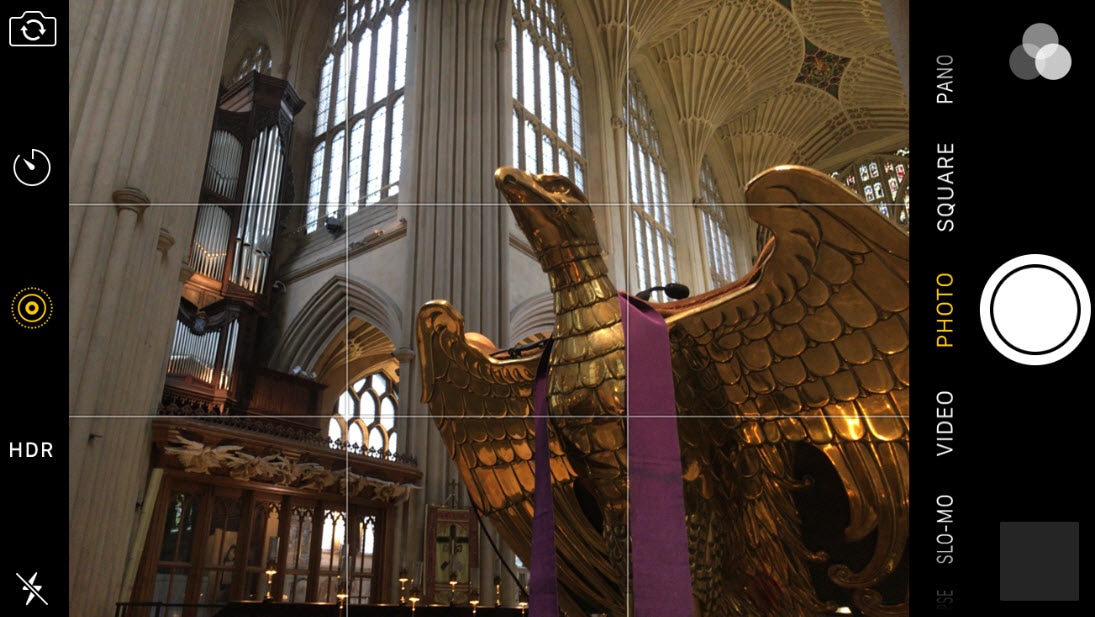
Image resource: Macworld
How to Use the Diagonal Method of Image Composition: Using the diagonal method of photo composition is also a fairly simple task, since you just need to follow a diagonal of the frame, and you can use this method on horizontally and vertically oriented images.
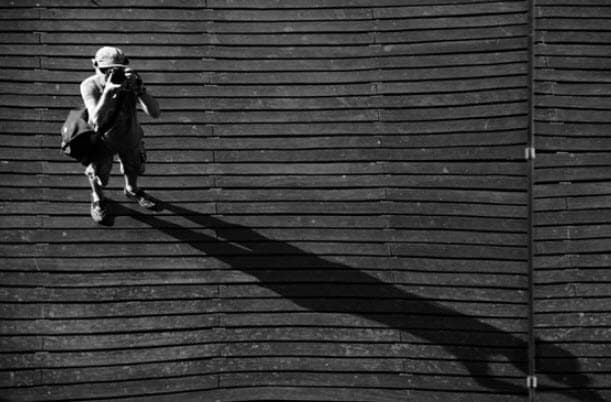
Image resource: PictureCorrect
How to Use Symetry on a Photo: Symmetry is often used for the depiction of reflections because this method of photo composition enables you to show the real object or a scene and its reflections in equal measure. Symmetric photos are more pleasing to the human eye than asymmetric images, which is the reason why pictures that use symmetry as the guiding compositional principal have a better chance of being recognized as good or beautiful.
.png) Kanto Player Professional
Kanto Player Professional
Image resource: PictureCorrect
3. Use Different Camera Angles to Depict a Scene
How to Use 180-degree Rule: When approaching a new scene, even a simple scene such as a selfie, try to visualize a straight line at the height of your eye level between the iPhone camera you are holding and the subject of the photo. The so-called 180-degree rule suggests that you shouldn’t ever cross that imaginary line, but each degree between 0 and 180 degrees can be an angle from which you take the shot.
How to Use Low-Angle Shots: Every camera position that goes above this line is called the bird’s eye view, and each camera position below this line is called a low-angle shot. Placing the camera below the level of your eyesight can be quite beneficial for the photo’s aesthetic qualities because it will offer a unique view of the scene to the viewer.

Image resource: Storyboard Class
Exploring different camera angles will enable you to show the scene from different points of view and it will allow you to ‘solve’ the scene in a more efficient way. Assuming that the best angle for a certain scene is at our eye level is natural, but trying to depict a scene from different points of view usually results in better pictures.
4. Accentuate Depth in Your Images
How to Separate the Foreground From the Background: The illusion of depth in a photo makes the picture look more realistic, and it also creates a visual dynamics between the foreground and the background of an image. There are a number of techniques you can use to accentuate depth on your photos or in your videos. The most common trick is to move the subject of your photo into the background and have the elements in the foreground lead the spectator to the subject.
How to Use Shallow Depth of Field: Alternatively, you can place the subject of a photo in the foreground, thus creating a considerable amount of separation between the two picture planes. The blurry background surrounding the razor-sharp foreground creates an illusion of depth that captivates the viewer’s attention. In order to achieve this you need to create a shallow depth of field, which may not be an easy task when using an iPhone camera, fortunately, there are a lot of apps at the App Store that can be used to highlight the illusion of depth in a photo.


Image resource: Makeuseof
Liza Brown
Liza Brown is a writer and a lover of all things video.
Follow @Liza Brown
Liza Brown
Mar 27, 2024• Proven solutions
iPhone photography has developed so much that now you can even enter photo competitions with images taken on these devices. In this article, we are going to show you how to use your iPhone as a tool for capturing breathtaking images and supply you with a healthy dose of photography tips that will enable you to take better photos.
You may also like: iPhone Night Photography Tips: Take Night Photos with iPhone >>
iPhone Photography Tips
Curiosity is the most important trait of any successful photographer because you have to be a tireless explorer of the world around you, in order to capture its beauty. The following tips will help you take your iPhone photography to a new level.
1. Become a Master of Light
Photography is the art of writing with light, as a matter of fact, the way you use light in a photo will determine how good it is. The trouble is, that each scene you shoot is going to have different light values, which means that you’ll have to adjust the iPhone camera settings each time you decide to take a photo on a new location.
How to Avoid Sources of Light in a Shot: The first and most basic rule of photography is to try to avoid having sources of light in your shot, and the best way to achieve this is to turn your back to the light source and have the subject of the photo positioned in the direction from which the light is coming from. If you do this, taking pictures that depict stark contrast of shadows and light will become much easier.
Image resource: Contrastly
How to Take a Silhouette Photo: If you want to take a silhouette photo, simply place the subject of a photo between the light source and your iPhone camera. The source of light in the background will direct too much light into your camera, which will force you to reduce the exposure of a photo, thus the subject of the photo will become underexposed or a mere silhouette.
Image resource: YouTube
How to Take Advantage of Natural Light: The best periods during the day for photography are the sunrise and the sunset because the light provided by the sun is the softest. Portrait and numerous other genres of photography benefit from soft, diffused light. The colors in your pictures will appear much warmer and the results you’ll be able to get will be much more visually pleasing than on photos on which you used direct lightning.
Image resource: Contrastly
2. Learn How To Compose Your Photos and Videos
Organization of the elements depicted within a frame is called composition, and each iPhone videographer or photographer has to practice shot composition in order to be able to improve the quality of the visual content they are producing. Some of the most basic principles of picture composition include the rule of thirds or the diagonal method of arranging objects on a photo.
How to Use the Grid feature: The Grid feature on iPhone camera app can help you master the rule of thirds because it will divide your screen into nine equal rectangles, so you can use each rectangle to improve the organization of the elements within a shot.
Image resource: Macworld
How to Use the Diagonal Method of Image Composition: Using the diagonal method of photo composition is also a fairly simple task, since you just need to follow a diagonal of the frame, and you can use this method on horizontally and vertically oriented images.
Image resource: PictureCorrect
How to Use Symetry on a Photo: Symmetry is often used for the depiction of reflections because this method of photo composition enables you to show the real object or a scene and its reflections in equal measure. Symmetric photos are more pleasing to the human eye than asymmetric images, which is the reason why pictures that use symmetry as the guiding compositional principal have a better chance of being recognized as good or beautiful.
Image resource: PictureCorrect
3. Use Different Camera Angles to Depict a Scene
How to Use 180-degree Rule: When approaching a new scene, even a simple scene such as a selfie, try to visualize a straight line at the height of your eye level between the iPhone camera you are holding and the subject of the photo. The so-called 180-degree rule suggests that you shouldn’t ever cross that imaginary line, but each degree between 0 and 180 degrees can be an angle from which you take the shot.
How to Use Low-Angle Shots: Every camera position that goes above this line is called the bird’s eye view, and each camera position below this line is called a low-angle shot. Placing the camera below the level of your eyesight can be quite beneficial for the photo’s aesthetic qualities because it will offer a unique view of the scene to the viewer.

Image resource: Storyboard Class
Exploring different camera angles will enable you to show the scene from different points of view and it will allow you to ‘solve’ the scene in a more efficient way. Assuming that the best angle for a certain scene is at our eye level is natural, but trying to depict a scene from different points of view usually results in better pictures.
4. Accentuate Depth in Your Images
How to Separate the Foreground From the Background: The illusion of depth in a photo makes the picture look more realistic, and it also creates a visual dynamics between the foreground and the background of an image. There are a number of techniques you can use to accentuate depth on your photos or in your videos. The most common trick is to move the subject of your photo into the background and have the elements in the foreground lead the spectator to the subject.
How to Use Shallow Depth of Field: Alternatively, you can place the subject of a photo in the foreground, thus creating a considerable amount of separation between the two picture planes. The blurry background surrounding the razor-sharp foreground creates an illusion of depth that captivates the viewer’s attention. In order to achieve this you need to create a shallow depth of field, which may not be an easy task when using an iPhone camera, fortunately, there are a lot of apps at the App Store that can be used to highlight the illusion of depth in a photo.
Image resource: Makeuseof
Liza Brown
Liza Brown is a writer and a lover of all things video.
Follow @Liza Brown
Liza Brown
Mar 27, 2024• Proven solutions
iPhone photography has developed so much that now you can even enter photo competitions with images taken on these devices. In this article, we are going to show you how to use your iPhone as a tool for capturing breathtaking images and supply you with a healthy dose of photography tips that will enable you to take better photos.
You may also like: iPhone Night Photography Tips: Take Night Photos with iPhone >>
iPhone Photography Tips
Curiosity is the most important trait of any successful photographer because you have to be a tireless explorer of the world around you, in order to capture its beauty. The following tips will help you take your iPhone photography to a new level.
1. Become a Master of Light
Photography is the art of writing with light, as a matter of fact, the way you use light in a photo will determine how good it is. The trouble is, that each scene you shoot is going to have different light values, which means that you’ll have to adjust the iPhone camera settings each time you decide to take a photo on a new location.
How to Avoid Sources of Light in a Shot: The first and most basic rule of photography is to try to avoid having sources of light in your shot, and the best way to achieve this is to turn your back to the light source and have the subject of the photo positioned in the direction from which the light is coming from. If you do this, taking pictures that depict stark contrast of shadows and light will become much easier.
Image resource: Contrastly
How to Take a Silhouette Photo: If you want to take a silhouette photo, simply place the subject of a photo between the light source and your iPhone camera. The source of light in the background will direct too much light into your camera, which will force you to reduce the exposure of a photo, thus the subject of the photo will become underexposed or a mere silhouette.
Image resource: YouTube
How to Take Advantage of Natural Light: The best periods during the day for photography are the sunrise and the sunset because the light provided by the sun is the softest. Portrait and numerous other genres of photography benefit from soft, diffused light. The colors in your pictures will appear much warmer and the results you’ll be able to get will be much more visually pleasing than on photos on which you used direct lightning.
Image resource: Contrastly
2. Learn How To Compose Your Photos and Videos
Organization of the elements depicted within a frame is called composition, and each iPhone videographer or photographer has to practice shot composition in order to be able to improve the quality of the visual content they are producing. Some of the most basic principles of picture composition include the rule of thirds or the diagonal method of arranging objects on a photo.
How to Use the Grid feature: The Grid feature on iPhone camera app can help you master the rule of thirds because it will divide your screen into nine equal rectangles, so you can use each rectangle to improve the organization of the elements within a shot.

Image resource: Macworld
How to Use the Diagonal Method of Image Composition: Using the diagonal method of photo composition is also a fairly simple task, since you just need to follow a diagonal of the frame, and you can use this method on horizontally and vertically oriented images.
Image resource: PictureCorrect
How to Use Symetry on a Photo: Symmetry is often used for the depiction of reflections because this method of photo composition enables you to show the real object or a scene and its reflections in equal measure. Symmetric photos are more pleasing to the human eye than asymmetric images, which is the reason why pictures that use symmetry as the guiding compositional principal have a better chance of being recognized as good or beautiful.
 TubeDigger - online video downloader from mostly any site
Image resource: PictureCorrect
3. Use Different Camera Angles to Depict a Scene
How to Use 180-degree Rule: When approaching a new scene, even a simple scene such as a selfie, try to visualize a straight line at the height of your eye level between the iPhone camera you are holding and the subject of the photo. The so-called 180-degree rule suggests that you shouldn’t ever cross that imaginary line, but each degree between 0 and 180 degrees can be an angle from which you take the shot.
How to Use Low-Angle Shots: Every camera position that goes above this line is called the bird’s eye view, and each camera position below this line is called a low-angle shot. Placing the camera below the level of your eyesight can be quite beneficial for the photo’s aesthetic qualities because it will offer a unique view of the scene to the viewer.
Image resource: Storyboard Class
Exploring different camera angles will enable you to show the scene from different points of view and it will allow you to ‘solve’ the scene in a more efficient way. Assuming that the best angle for a certain scene is at our eye level is natural, but trying to depict a scene from different points of view usually results in better pictures.
4. Accentuate Depth in Your Images
How to Separate the Foreground From the Background: The illusion of depth in a photo makes the picture look more realistic, and it also creates a visual dynamics between the foreground and the background of an image. There are a number of techniques you can use to accentuate depth on your photos or in your videos. The most common trick is to move the subject of your photo into the background and have the elements in the foreground lead the spectator to the subject.
How to Use Shallow Depth of Field: Alternatively, you can place the subject of a photo in the foreground, thus creating a considerable amount of separation between the two picture planes. The blurry background surrounding the razor-sharp foreground creates an illusion of depth that captivates the viewer’s attention. In order to achieve this you need to create a shallow depth of field, which may not be an easy task when using an iPhone camera, fortunately, there are a lot of apps at the App Store that can be used to highlight the illusion of depth in a photo.
 With Screensaver Wonder you can easily make a screensaver from your own pictures and video files. Create screensavers for your own computer or create standalone, self-installing screensavers for easy sharing with your friends. Together with its sister product Screensaver Factory, Screensaver Wonder is one of the most popular screensaver software products in the world, helping thousands of users decorate their computer screens quickly and easily.
Image resource: Makeuseof
Parental Control Software
Liza Brown
 is a writer and a lover of all things video.
Follow @Liza Brown
Liza Brown
Mar 27, 2024• Proven solutions
iPhone photography has developed so much that now you can even enter photo competitions with images taken on these devices. In this article, we are going to show you how to use your iPhone as a tool for capturing breathtaking images and supply you with a healthy dose of photography tips that will enable you to take better photos.
You may also like: iPhone Night Photography Tips: Take Night Photos with iPhone >>
iPhone Photography Tips
Curiosity is the most important trait of any successful photographer because you have to be a tireless explorer of the world around you, in order to capture its beauty. The following tips will help you take your iPhone photography to a new level.
1. Become a Master of Light
Photography is the art of writing with light, as a matter of fact, the way you use light in a photo will determine how good it is. The trouble is, that each scene you shoot is going to have different light values, which means that you’ll have to adjust the iPhone camera settings each time you decide to take a photo on a new location.
How to Avoid Sources of Light in a Shot: The first and most basic rule of photography is to try to avoid having sources of light in your shot, and the best way to achieve this is to turn your back to the light source and have the subject of the photo positioned in the direction from which the light is coming from. If you do this, taking pictures that depict stark contrast of shadows and light will become much easier.
Image resource: Contrastly
How to Take a Silhouette Photo: If you want to take a silhouette photo, simply place the subject of a photo between the light source and your iPhone camera. The source of light in the background will direct too much light into your camera, which will force you to reduce the exposure of a photo, thus the subject of the photo will become underexposed or a mere silhouette.

Image resource: YouTube
How to Take Advantage of Natural Light: The best periods during the day for photography are the sunrise and the sunset because the light provided by the sun is the softest. Portrait and numerous other genres of photography benefit from soft, diffused light. The colors in your pictures will appear much warmer and the results you’ll be able to get will be much more visually pleasing than on photos on which you used direct lightning.
Image resource: Contrastly
2. Learn How To Compose Your Photos and Videos
Organization of the elements depicted within a frame is called composition, and each iPhone videographer or photographer has to practice shot composition in order to be able to improve the quality of the visual content they are producing. Some of the most basic principles of picture composition include the rule of thirds or the diagonal method of arranging objects on a photo.
How to Use the Grid feature: The Grid feature on iPhone camera app can help you master the rule of thirds because it will divide your screen into nine equal rectangles, so you can use each rectangle to improve the organization of the elements within a shot.
Image resource: Macworld
How to Use the Diagonal Method of Image Composition: Using the diagonal method of photo composition is also a fairly simple task, since you just need to follow a diagonal of the frame, and you can use this method on horizontally and vertically oriented images.
Image resource: PictureCorrect
How to Use Symetry on a Photo: Symmetry is often used for the depiction of reflections because this method of photo composition enables you to show the real object or a scene and its reflections in equal measure. Symmetric photos are more pleasing to the human eye than asymmetric images, which is the reason why pictures that use symmetry as the guiding compositional principal have a better chance of being recognized as good or beautiful.
 KoolReport Pro is an advanced solution for creating data reports and dashboards in PHP. Equipped with all extended packages , KoolReport Pro is able to connect to various datasources, perform advanced data analysis, construct stunning charts and graphs and export your beautiful work to PDF, Excel, JPG or other formats. Plus, it includes powerful built-in reports such as pivot report and drill-down report which will save your time in building ones.
 It will help you to write dynamic data reports easily, to construct intuitive dashboards or to build a whole business intelligence cockpit.
KoolReport Pro package goes with Full Source Code, Royal Free, ONE (1) Year Priority Support, ONE (1) Year Free Upgrade and 30-Days Money Back Guarantee.
Developer License allows Single Developer to create Unlimited Reports, deploy on Unlimited Servers and able deliver the work to Unlimited Clients.
Image resource: PictureCorrect
3. Use Different Camera Angles to Depict a Scene
How to Use 180-degree Rule: When approaching a new scene, even a simple scene such as a selfie, try to visualize a straight line at the height of your eye level between the iPhone camera you are holding and the subject of the photo. The so-called 180-degree rule suggests that you shouldn’t ever cross that imaginary line, but each degree between 0 and 180 degrees can be an angle from which you take the shot.
How to Use Low-Angle Shots: Every camera position that goes above this line is called the bird’s eye view, and each camera position below this line is called a low-angle shot. Placing the camera below the level of your eyesight can be quite beneficial for the photo’s aesthetic qualities because it will offer a unique view of the scene to the viewer.
Image resource: Storyboard Class
Exploring different camera angles will enable you to show the scene from different points of view and it will allow you to ‘solve’ the scene in a more efficient way. Assuming that the best angle for a certain scene is at our eye level is natural, but trying to depict a scene from different points of view usually results in better pictures.
4. Accentuate Depth in Your Images
How to Separate the Foreground From the Background: The illusion of depth in a photo makes the picture look more realistic, and it also creates a visual dynamics between the foreground and the background of an image. There are a number of techniques you can use to accentuate depth on your photos or in your videos. The most common trick is to move the subject of your photo into the background and have the elements in the foreground lead the spectator to the subject.
How to Use Shallow Depth of Field: Alternatively, you can place the subject of a photo in the foreground, thus creating a considerable amount of separation between the two picture planes. The blurry background surrounding the razor-sharp foreground creates an illusion of depth that captivates the viewer’s attention. In order to achieve this you need to create a shallow depth of field, which may not be an easy task when using an iPhone camera, fortunately, there are a lot of apps at the App Store that can be used to highlight the illusion of depth in a photo.
Image resource: Makeuseof

Liza Brown
Liza Brown is a writer and a lover of all things video.
Follow @Liza Brown
- Title: IPhone Camera Savvy Image Optimization Secrets
- Author: Daniel
- Created at : 2024-07-25 03:35:33
- Updated at : 2024-07-26 03:35:33
- Link: https://extra-resources.techidaily.com/iphone-camera-savvy-image-optimization-secrets/
- License: This work is licensed under CC BY-NC-SA 4.0.