![[New] A Step-by-Step Tutorial for Speech Transcription in Word](https://thmb.techidaily.com/402a192fa8f9a76c25001597879db6a11d907dc8fe3db6a194aec02ff3403057.jpg)
"[New] A Step-by-Step Tutorial for Speech Transcription in Word"
A Step-by-Step Tutorial for Speech Transcription in Word
Microsoft Word’s speech-to-text tool is helpful for people who spend a lot of time using the program and don’t want to strain their fingers or keyboard with all of that typing. While Microsoft Word’s text-to-speech technology used to be prone to errors that needed correcting later, it has advanced considerably in recent years and is now among the best in the business.
Whether you have the best Windows laptop or Mac—Microsoft Word’s speech-to-text is simple to discover and use. You’ll find all you need to know about connecting your microphone and inserting punctuation in this manual, from the first steps to the more complex aspects.
Here’s how to use Microsoft Word’s speech-to-text feature:
Part 1: How to Use Speech to Text in Microsoft Word?
Before you can use Speech to Text in Microsoft Word, the first thing you need is a valid Microsoft 365 subscription. Without a Microsoft 365 subscription, Microsoft won’t allow you to use voice typing. However, if you’re working for a company, it’s likely that your company already has a Microsoft 365 enterprise subscription. If you’re a student or your company doesn’t offer it, the subscription plans are pretty affordable. For example, Microsoft 365 Personal and Microsoft 365 Family plans cost $6.99/month and $9.99/month, respectively.
The second thing you need is a dependable internet connection. The reason is Microsoft Word’s dictation software works on remote servers to interpret your words. These enormous servers and lightning-fast processors require a large amount of speech data to transcribe your text. In reality, the program uses sophisticated neural networks and deep machine learning technology to ensure that it understands the nuances of human speech. These two technologies have helped voice typing technology evolve rapidly in recent years, which is why an internet connection is necessary.
Now let’s start typing:
Step1Open Microsoft Word
Create a new, empty document in Microsoft Word on your device. Name your document and save it on the desktop or wherever you like it.


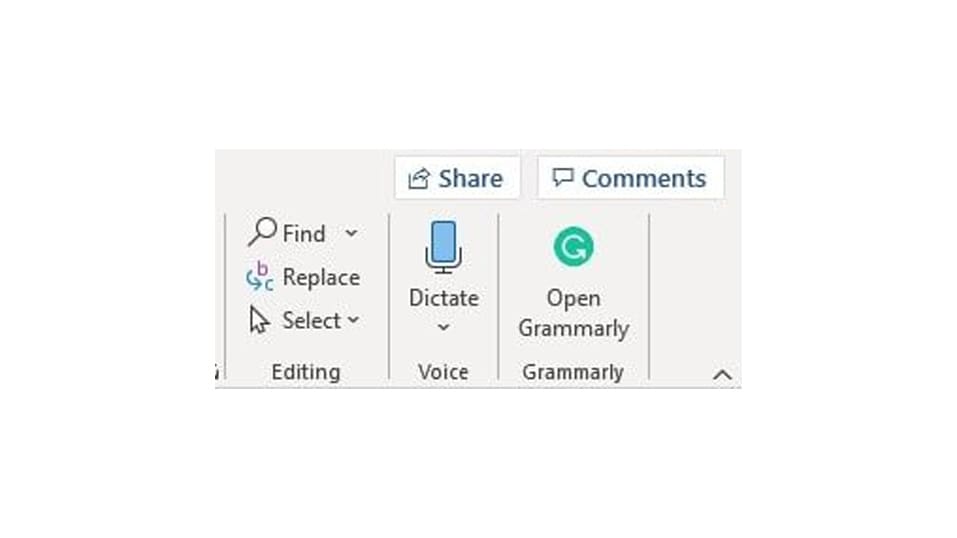
Step2Click on the Dictate button
When you first open a new document, go to the top right corner of the Home menu includes a Dictate button and a drop-down menu. It has a microphone symbol above it. Double-check that the language is set to English using the drop-down menu. Choose English or any of the supported languages.

Microsoft Word Speech to Text tool supports many languages as well languages that have multiple variants, such as English and French. In addition, you can type on Microsoft Word in Chinese (Simplified), Chinese (Taiwanese), English, French (France, Canada), German, Hindi, Italian, Korean, Polish, Portuguese (Brazil, Portugal), Russian, Spanish (Mexico, Spain), Thai, and more.
Step3Allow Microsoft Word Access to the Microphone
If you’ve never used Microsoft Word’s speech-to-text engine on Windows PC before, you’ll need to allow the program access to your microphone. This may be completed with a single click when prompted. You can use your laptop’s built-in microphone or connect an external one. But, we suggest you use an external microphone for improved accuracy.
Parental Control Software
Follow these steps to activate the microphone in Mac.
To turn voice dictation on or off:
- Select Apple > System Preferences
- Select View > Dictation & Speech
- Click ON to enable Dictation or OFF to disable it
Step4Start Dictating Your Document
Once again, click the dictate button after completing all the preceding steps. The blue symbol will vanish, and a red recording symbol will appear, signifying that Microsoft Word has begun listening for your voice. A chime will sound if your sound is turned up, indicating that transcription has started. Say the words you want Microsoft to transcribe out loud. It may seem odd at first, but after a while, you’ll get a flow going, and everyone will find their own method for getting the most out of the program. To stop the recording, click on the microphone button again or press “Ctrl + Shift + S” on your keyboard. This will show the Stop Dictation dialogue box. From here, you can either save or cancel your work.
Step5Using Punctuation Commands
Microsoft Word’s text-to-speech technology does more than simply transcribing your voice. Instead, Microsoft’s voice typing technology, which originally listened only to single words, now listens to individual words and the phrase as a whole, thanks to the advent and improvement of artificial neural networks. This has allowed Microsoft to develop a long list of commands for incorporating punctuation, symbols, and other formatting options into your text without saying anything out loud except for the command word itself. To see the list of commands, press “Ctrl + Shift + S” on your keyboard to open the Stop Dictation dialogue box, then click on the Commands button.
We can’t go through all of the punctuation instructions here, but we’ll mention a few of the most important. For example, the command “period” inserts a period, and “comma” creates a comma, as you may guess. The same rules apply to exclamation marks and colons. In addition, you may use the command “new line” to create a new line, “new paragraph” to start a new paragraph, and “tab” to create a tab space.
If you want to insert symbols, the commands are a bit different. For example, saying “open parenthesis” will automatically insert an opening parenthesis, but you’ll need to say “close parenthesis” to get a closing parenthesis. The same goes for brackets, braces, and quotation marks.
Microsoft’s speech-to-text program is excellent. We can honestly state that Microsoft has the most refined product when it comes to cost vs performance because the software is integrated directly into Microsoft 365, which many businesses already use. So if your company uses Microsoft 365, you may start utilizing the voice typing technology right now with no additional expenses.
Part 2: Alternatives to Microsoft Word STT
There are some great alternative options to Microsoft Word’s speech-to-text feature. Here are a few of our favorites:
### 1\. Top Recommendation: [Wondershare Filmora](https://tools.techidaily.com/wondershare/filmora/download/)Wondershare Filmora Speech to Text is quite different with other STT service providers. Other STT platforms/stages require you to use the application to convert speech-to-text, save, and export into other third-party software. However, Wondershare Filmora allows you to directly convert your speech-to-text on an ongoing production. For example, you can convert speech into subtitles during a video production on Wondershare Filmora.
What’s more, now Filmora’s STT feature supports direct transcription of bilingual subtitles with up to 27 languages of transcription in Filmora version 13.
Top Adavantages of Filmora:
- Supports direct transcription of bilingual subtitles.
- Allows to transcribe video speech to text in one click.
- Boosts editing efficiency by applying the STT feature.
Top Alternative to Microsoft Word STT Save plenty of time on transcribing subtitles and boost your editing efficiency by applying Filmora Speech-To-Text.
Try STT Now Try STT Now Explore STT

2. Evernote Speech-To-Text
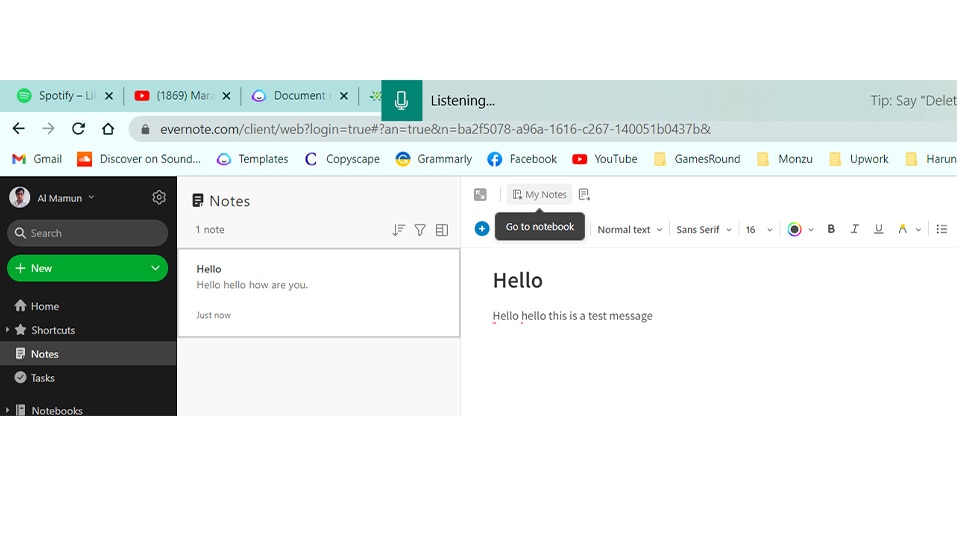
Evernote is a widely used note-taking application that also offers a speech-to-text feature. To use this feature on Windows PC, create a new note and “Windows + H” to activate the microphone of your PC. You’ll see the microphone icon at the top of the screen. Evernote will then start recording your voice and transcribing it into text in real-time. Once you’re done, click the Stop button, and your transcription will be automatically saved. Evernote also offers a variety of other features that make it a great alternative to Microsoft Word, such as the ability to add images, attachments, and more.
To use voice dictation in Evernote on Mac:
- Select text field
- Press the ‘fn’ key twice/select Edit > Start Dictation
- Speak the text you want to transcribe clearly into the computer or device microphone. Your words will appear in the text field.
- Select Done or hit the ‘fn’ key again to end.
 LYRX is an easy-to-use karaoke software with the professional features karaoke hosts need to perform with precision. LYRX is karaoke show hosting software that supports all standard karaoke file types as well as HD video formats, and it’s truly fun to use.
3. Google Doc Speech To Text
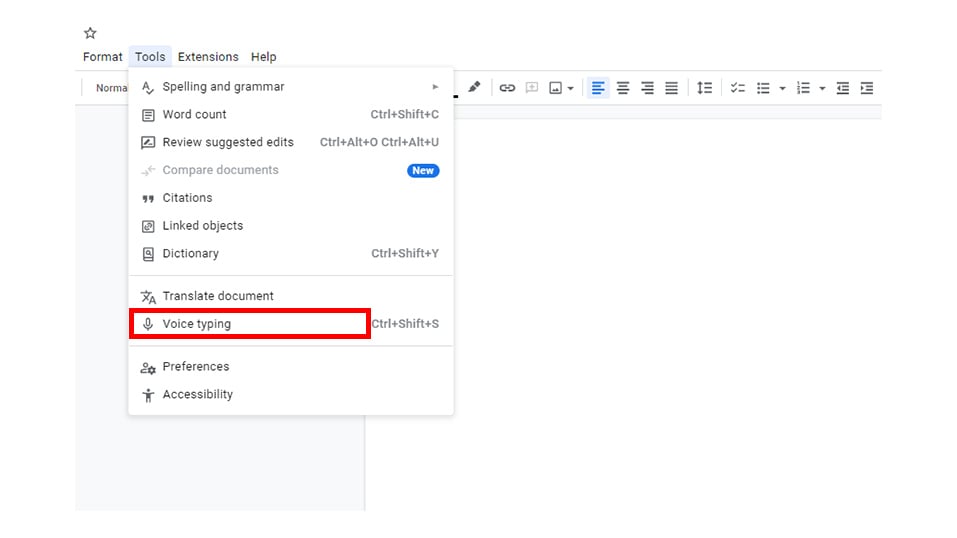
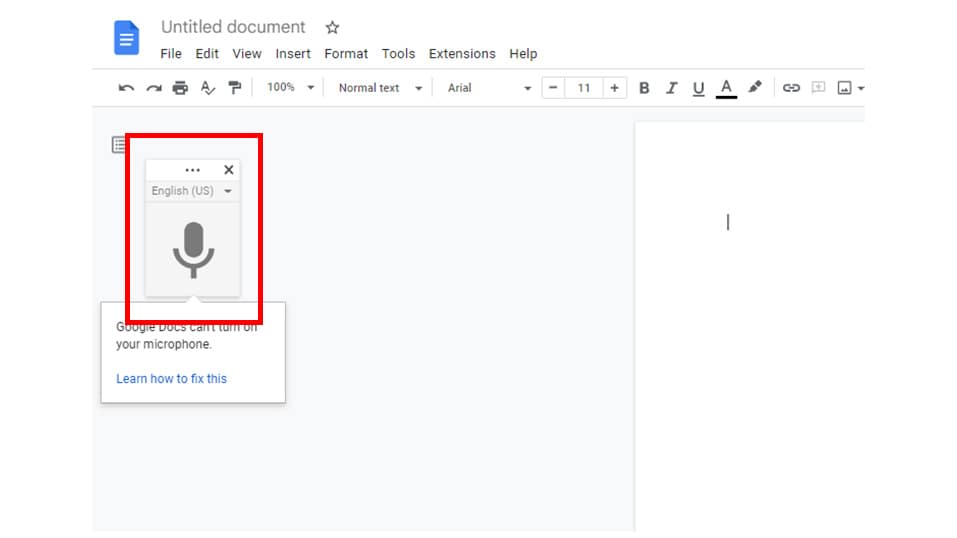
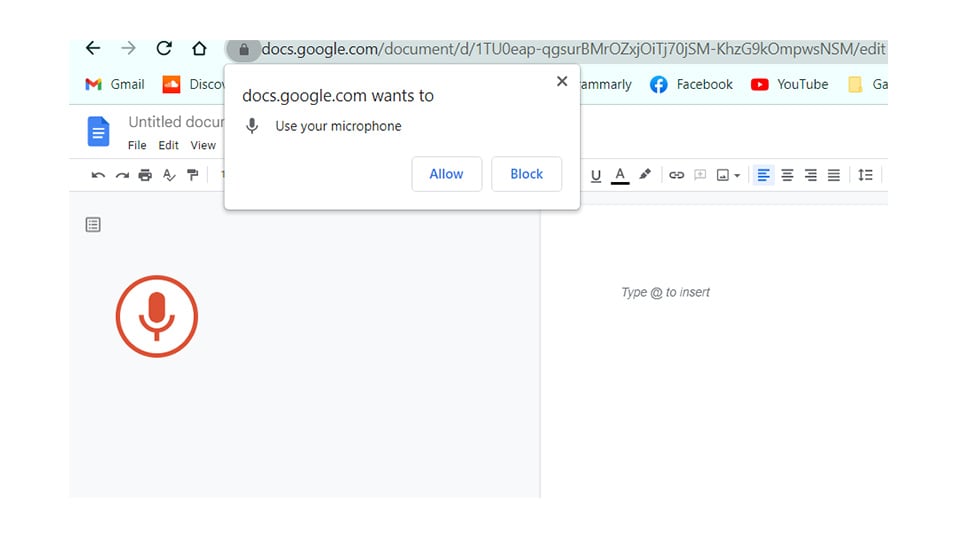
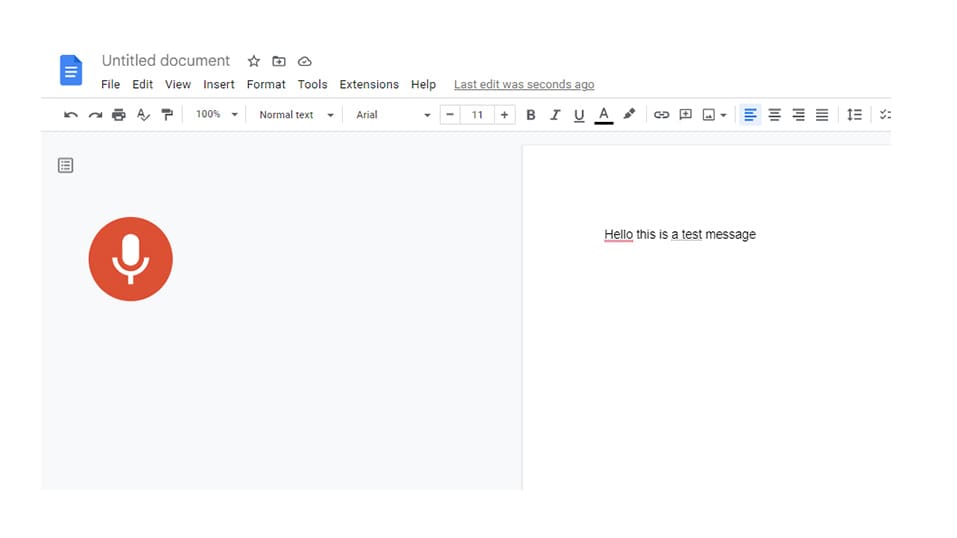
Google Docs is another popular word processing application with a speech-to-text feature. To use this feature, create a new document and click the Tools menu at the top of the screen. Next, select the Voice Typing option and start speaking into your microphone. Google Docs will then transcribe your voice into text in real-time.
Once you’re done, click the Stop button, and your transcription will be automatically saved. Google Docs also offers a variety of other features that make it a great alternative to Microsoft Word, such as the ability to collaborate with others in real-time, add images, attachments, and more.
Microsoft Word’s speech-to-text feature is an excellent tool for quickly transcribing your voice into text. However, there are some drawbacks. First, it only works with Microsoft Word documents. Second, you need a Microsoft 365 subscription to use it. Third, it can be challenging to use and is often inaccurate. If you’re looking for a better alternative to Microsoft Word’s speech-to-text feature, we recommend Evernote speech-to-text or Google Docs speech-to-text. Both of these options are free to use and offer more features than Microsoft Word’s speech-to-text feature.
FAQs
Can MS Word write what I speak?
Yes, MS Word can write what you speak. With speech recognition software, MS Word can interpret your words and turn them into text. This is a great feature for those who have difficulty typing or want to dictate their thoughts without typing them out. However, there are a few things to keep in mind when using this feature, such as speaking clearly and at a moderate pace.

Why does my speech-to-text not work?
There are several reasons why your speech-to-text is not working. One issue is that your microphone is not turned on. Another possibility could be that there is too much background noise interfering with the recognition process. Finally, it’s also possible that you have not enabled speech-to-text in your settings. Try going to your settings and turning on the speech-to-text feature. If that doesn’t work, try restarting your device.
Is Microsoft 365 free?
Microsoft 365 is not free, but it does offer a free trial. You can find more information on the Microsoft website.
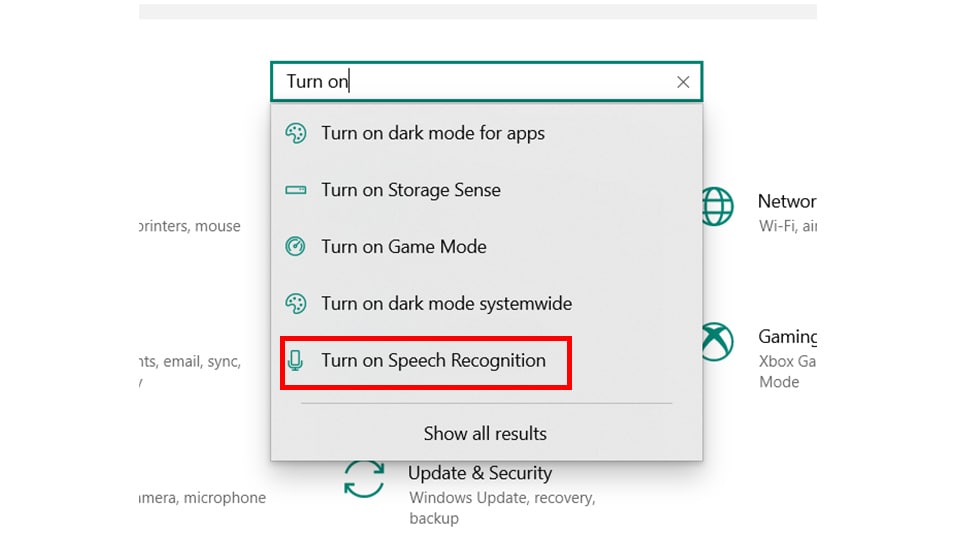
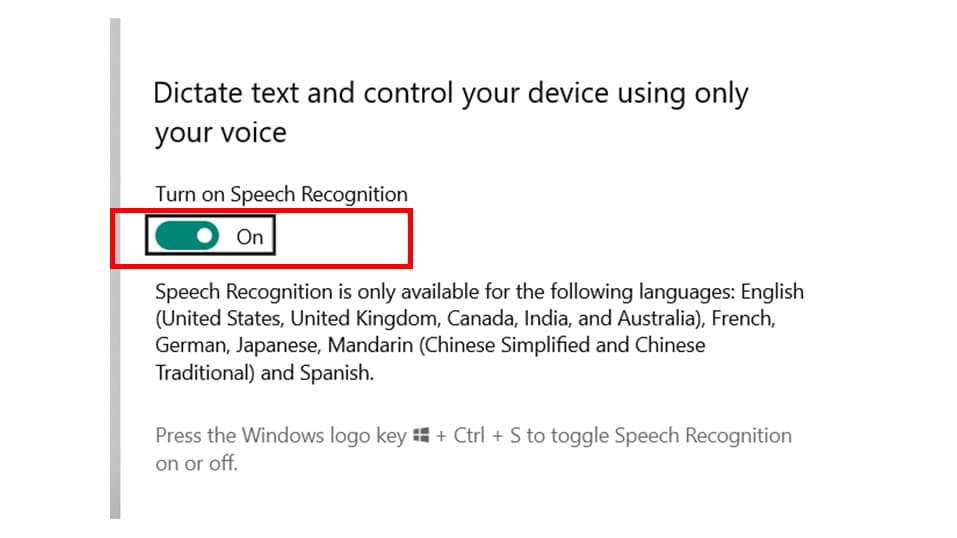
Does Windows 10 have voice typing?
Yes, Windows 10 includes a voice typing feature that allows you to type by speaking. To use it, open the Start menu and select “Windows Accessories.” Then, choose “Voice Typing.” A microphone icon will appear on the screen. Click it, and then start speaking. Your words will appear on the screen as you speak them.
Final Words
Microsoft Word’s speech-to-text feature is not perfect, but it can be a huge time saver for those who use the program regularly. If you’re looking for an alternative to expensive voice recognition software or want to take a break from typing, give Microsoft Word’s speech-to-text feature a try. You might be surprised at how accurate it is.
Free Download For Win 7 or later(64-bit)
Free Download For macOS 10.14 or later
Part 1: How to Use Speech to Text in Microsoft Word?
Before you can use Speech to Text in Microsoft Word, the first thing you need is a valid Microsoft 365 subscription. Without a Microsoft 365 subscription, Microsoft won’t allow you to use voice typing. However, if you’re working for a company, it’s likely that your company already has a Microsoft 365 enterprise subscription. If you’re a student or your company doesn’t offer it, the subscription plans are pretty affordable. For example, Microsoft 365 Personal and Microsoft 365 Family plans cost $6.99/month and $9.99/month, respectively.
The second thing you need is a dependable internet connection. The reason is Microsoft Word’s dictation software works on remote servers to interpret your words. These enormous servers and lightning-fast processors require a large amount of speech data to transcribe your text. In reality, the program uses sophisticated neural networks and deep machine learning technology to ensure that it understands the nuances of human speech. These two technologies have helped voice typing technology evolve rapidly in recent years, which is why an internet connection is necessary.
Now let’s start typing:
Step1Open Microsoft Word
Create a new, empty document in Microsoft Word on your device. Name your document and save it on the desktop or wherever you like it.
Step2Click on the Dictate button
When you first open a new document, go to the top right corner of the Home menu includes a Dictate button and a drop-down menu. It has a microphone symbol above it. Double-check that the language is set to English using the drop-down menu. Choose English or any of the supported languages.
Microsoft Word Speech to Text tool supports many languages as well languages that have multiple variants, such as English and French. In addition, you can type on Microsoft Word in Chinese (Simplified), Chinese (Taiwanese), English, French (France, Canada), German, Hindi, Italian, Korean, Polish, Portuguese (Brazil, Portugal), Russian, Spanish (Mexico, Spain), Thai, and more.
Step3Allow Microsoft Word Access to the Microphone
If you’ve never used Microsoft Word’s speech-to-text engine on Windows PC before, you’ll need to allow the program access to your microphone. This may be completed with a single click when prompted. You can use your laptop’s built-in microphone or connect an external one. But, we suggest you use an external microphone for improved accuracy.


 ZoneAlarm Extreme Security NextGen
Follow these steps to activate the microphone in Mac.
To turn voice dictation on or off:
- Select Apple > System Preferences
- Select View > Dictation & Speech
- Click ON to enable Dictation or OFF to disable it
Step4Start Dictating Your Document
Once again, click the dictate button after completing all the preceding steps. The blue symbol will vanish, and a red recording symbol will appear, signifying that Microsoft Word has begun listening for your voice. A chime will sound if your sound is turned up, indicating that transcription has started. Say the words you want Microsoft to transcribe out loud. It may seem odd at first, but after a while, you’ll get a flow going, and everyone will find their own method for getting the most out of the program. To stop the recording, click on the microphone button again or press “Ctrl + Shift + S” on your keyboard. This will show the Stop Dictation dialogue box. From here, you can either save or cancel your work.
Step5Using Punctuation Commands
Microsoft Word’s text-to-speech technology does more than simply transcribing your voice. Instead, Microsoft’s voice typing technology, which originally listened only to single words, now listens to individual words and the phrase as a whole, thanks to the advent and improvement of artificial neural networks. This has allowed Microsoft to develop a long list of commands for incorporating punctuation, symbols, and other formatting options into your text without saying anything out loud except for the command word itself. To see the list of commands, press “Ctrl + Shift + S” on your keyboard to open the Stop Dictation dialogue box, then click on the Commands button.
We can’t go through all of the punctuation instructions here, but we’ll mention a few of the most important. For example, the command “period” inserts a period, and “comma” creates a comma, as you may guess. The same rules apply to exclamation marks and colons. In addition, you may use the command “new line” to create a new line, “new paragraph” to start a new paragraph, and “tab” to create a tab space.
If you want to insert symbols, the commands are a bit different. For example, saying “open parenthesis” will automatically insert an opening parenthesis, but you’ll need to say “close parenthesis” to get a closing parenthesis. The same goes for brackets, braces, and quotation marks.
Microsoft’s speech-to-text program is excellent. We can honestly state that Microsoft has the most refined product when it comes to cost vs performance because the software is integrated directly into Microsoft 365, which many businesses already use. So if your company uses Microsoft 365, you may start utilizing the voice typing technology right now with no additional expenses.
 KoolReport Pro is an advanced solution for creating data reports and dashboards in PHP. Equipped with all extended packages , KoolReport Pro is able to connect to various datasources, perform advanced data analysis, construct stunning charts and graphs and export your beautiful work to PDF, Excel, JPG or other formats. Plus, it includes powerful built-in reports such as pivot report and drill-down report which will save your time in building ones.
 It will help you to write dynamic data reports easily, to construct intuitive dashboards or to build a whole business intelligence cockpit.
KoolReport Pro package goes with Full Source Code, Royal Free, ONE (1) Year Priority Support, ONE (1) Year Free Upgrade and 30-Days Money Back Guarantee.
Developer License allows Single Developer to create Unlimited Reports, deploy on Unlimited Servers and able deliver the work to Unlimited Clients.
Part 2: Alternatives to Microsoft Word STT
There are some great alternative options to Microsoft Word’s speech-to-text feature. Here are a few of our favorites:
1. Top Recommendation: Wondershare Filmora
Wondershare Filmora Speech to Text is quite different with other STT service providers. Other STT platforms/stages require you to use the application to convert speech-to-text, save, and export into other third-party software. However, Wondershare Filmora allows you to directly convert your speech-to-text on an ongoing production. For example, you can convert speech into subtitles during a video production on Wondershare Filmora.
What’s more, now Filmora’s STT feature supports direct transcription of bilingual subtitles with up to 27 languages of transcription in Filmora version 13.
Top Adavantages of Filmora:
- Supports direct transcription of bilingual subtitles.
- Allows to transcribe video speech to text in one click.
- Boosts editing efficiency by applying the STT feature.
Top Alternative to Microsoft Word STT Save plenty of time on transcribing subtitles and boost your editing efficiency by applying Filmora Speech-To-Text.
Try STT Now Try STT Now Explore STT
2. Evernote Speech-To-Text
Evernote is a widely used note-taking application that also offers a speech-to-text feature. To use this feature on Windows PC, create a new note and “Windows + H” to activate the microphone of your PC. You’ll see the microphone icon at the top of the screen. Evernote will then start recording your voice and transcribing it into text in real-time. Once you’re done, click the Stop button, and your transcription will be automatically saved. Evernote also offers a variety of other features that make it a great alternative to Microsoft Word, such as the ability to add images, attachments, and more.

To use voice dictation in Evernote on Mac:
- Select text field
- Press the ‘fn’ key twice/select Edit > Start Dictation
- Speak the text you want to transcribe clearly into the computer or device microphone. Your words will appear in the text field.
- Select Done or hit the ‘fn’ key again to end.

3. Google Doc Speech To Text
Google Docs is another popular word processing application with a speech-to-text feature. To use this feature, create a new document and click the Tools menu at the top of the screen. Next, select the Voice Typing option and start speaking into your microphone. Google Docs will then transcribe your voice into text in real-time.
Once you’re done, click the Stop button, and your transcription will be automatically saved. Google Docs also offers a variety of other features that make it a great alternative to Microsoft Word, such as the ability to collaborate with others in real-time, add images, attachments, and more.
Microsoft Word’s speech-to-text feature is an excellent tool for quickly transcribing your voice into text. However, there are some drawbacks. First, it only works with Microsoft Word documents. Second, you need a Microsoft 365 subscription to use it. Third, it can be challenging to use and is often inaccurate. If you’re looking for a better alternative to Microsoft Word’s speech-to-text feature, we recommend Evernote speech-to-text or Google Docs speech-to-text. Both of these options are free to use and offer more features than Microsoft Word’s speech-to-text feature.
FAQs
Can MS Word write what I speak?
Yes, MS Word can write what you speak. With speech recognition software, MS Word can interpret your words and turn them into text. This is a great feature for those who have difficulty typing or want to dictate their thoughts without typing them out. However, there are a few things to keep in mind when using this feature, such as speaking clearly and at a moderate pace.
Why does my speech-to-text not work?
There are several reasons why your speech-to-text is not working. One issue is that your microphone is not turned on. Another possibility could be that there is too much background noise interfering with the recognition process. Finally, it’s also possible that you have not enabled speech-to-text in your settings. Try going to your settings and turning on the speech-to-text feature. If that doesn’t work, try restarting your device.
Is Microsoft 365 free?
Microsoft 365 is not free, but it does offer a free trial. You can find more information on the Microsoft website.
Does Windows 10 have voice typing?
Yes, Windows 10 includes a voice typing feature that allows you to type by speaking. To use it, open the Start menu and select “Windows Accessories.” Then, choose “Voice Typing.” A microphone icon will appear on the screen. Click it, and then start speaking. Your words will appear on the screen as you speak them.

Final Words
Microsoft Word’s speech-to-text feature is not perfect, but it can be a huge time saver for those who use the program regularly. If you’re looking for an alternative to expensive voice recognition software or want to take a break from typing, give Microsoft Word’s speech-to-text feature a try. You might be surprised at how accurate it is.
Free Download For Win 7 or later(64-bit)
Free Download For macOS 10.14 or later
- Title: [New] A Step-by-Step Tutorial for Speech Transcription in Word
- Author: Daniel
- Created at : 2024-07-25 02:55:14
- Updated at : 2024-07-26 02:55:14
- Link: https://extra-resources.techidaily.com/new-a-step-by-step-tutorial-for-speech-transcription-in-word/
- License: This work is licensed under CC BY-NC-SA 4.0.