![[New] Capturing the Best on iPhone 8 Techniques for Pro Video Shoots](https://thmb.techidaily.com/59bb6881bb451ab6f15e5a33afa6f776cb1ec0282754802f441bb66f0c3a3719.jpg)
"[New] Capturing the Best on iPhone 8 Techniques for Pro Video Shoots"
Capturing the Best on iPhone: 8 Techniques for Pro Video Shoots
iPhone Videography: 8 Tips of Recording Pro Videos
 DLNow Video Downloader
Ollie Mattison
Mar 27, 2024• Proven solutions
You shouldn’t feel the need to have to invest in fancy equipment if you want to take good video – it’s not necessary. If you wanted to be involved in very high-level camera work, then you would need some fancier gear, but for most people’s purposes, what they have on their phone is just fine. This article is aimed at looking at how people can use their iPhone to record good quality videos which they can enjoy with their friends.

Use Stabilizers
Many people are critical of the ‘found footage’ types of movies which are sometimes released – the Blair Witch project being a prime example. This is generally because the shaky videography can make it difficult to really follow what is going on, or possibly also because it is hard to watch without feeling ill.
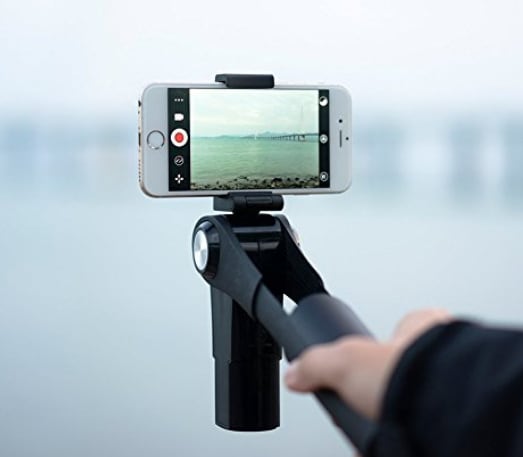
This same complaint is often used in iPhone videography – it is difficult to follow because the video is shaking. The shaking is what happens when the video lacks stability – remember that most professional camera work is done with cameras which are on some form of frame or tripod to keep the camera still. It isn’t that an iPhone is heavy – it is more to do with the video being hard to keep still, especially if our attention is distracted. For the best videos, people should invest in some form of tripod for their phone.
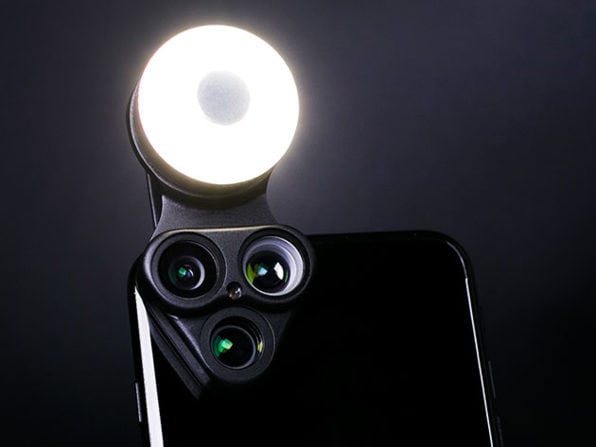
Use Light Properly
Professional video shoots use a lot of light in order to create the proper effect – most people would be surprised to learn how much light goes into even a ‘night-time’ set. Phone videos often suffer a lot because they do not make adequate use of light. Part of this can be solved by taking a camera class which covers light issues, but it can also be solved by paying attention to light sources where you are, and changing them to better suit your video if possible.
Avoid Using the Digital Zoom
It can be very tempting to try and use the zoom function on your camera to see people better, but this ultimately doesn’t work. You will end up with a grainy video of uncertain quality, rather than one which allows you to see everything in close up. Just move towards the point you are attempting to film – the quality of the video will be better, and you will not have to fiddle with controls and menus while making the video.

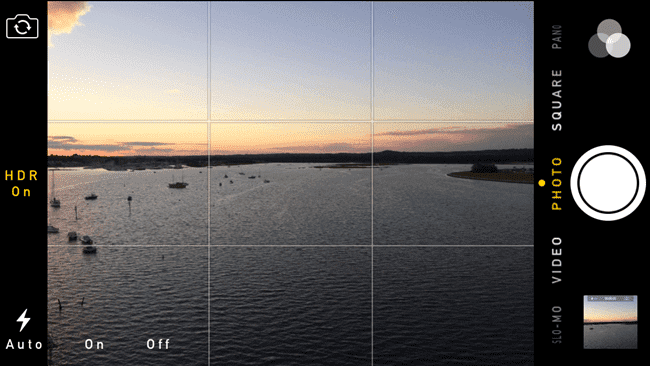
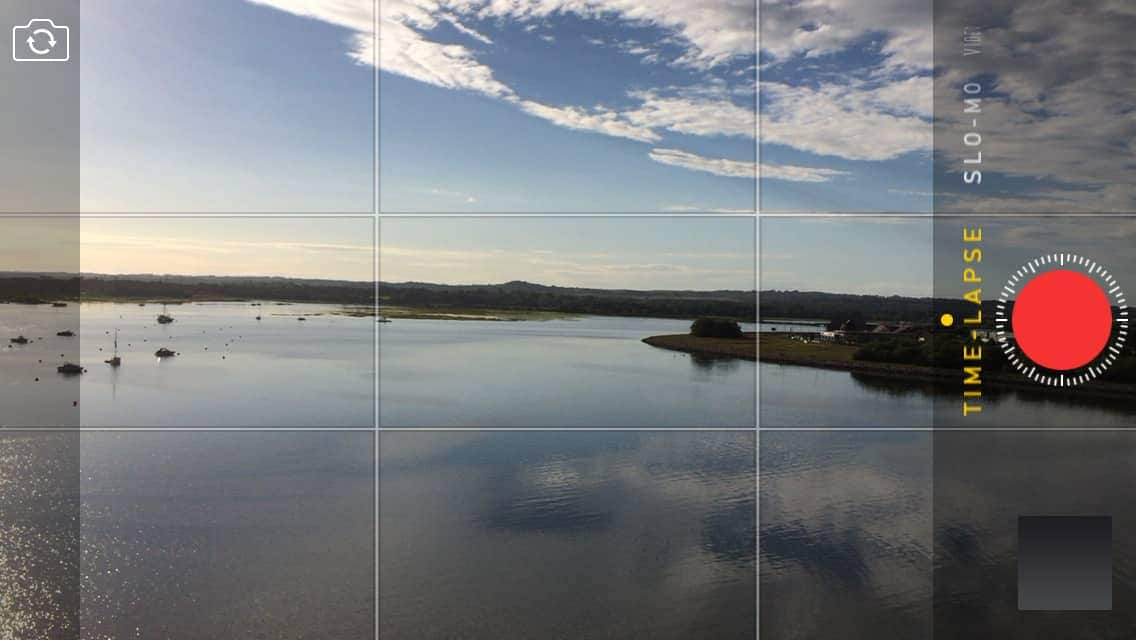
Use the Grid
Pictures and videos can be taken in either portrait or landscape format, as everybody who has tried to take a picture knows. When recording a video, you should use this to your advantage and try and find which grid would be the most effective for your video. Using the grids is very easy - simply tip the iPhone in the direction you want to film, and the film will automatically work in that format. Since it can be very easy for a phone to change grids while videoing, this is another opportunity for a stabiliser such as a tripod to be put into use.

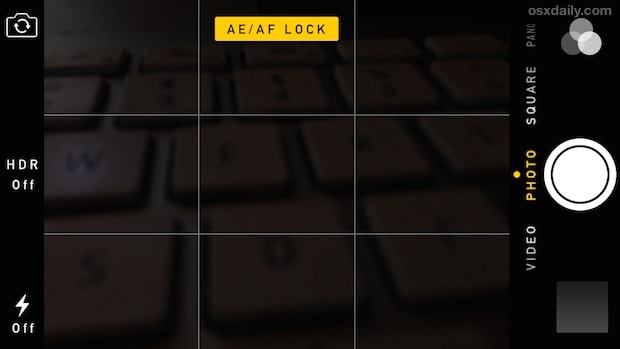
Use the Exposure Lock
When taking a video or a picture, you will have noticed that it can change the colour and the exposure while trying to get a lock and fix on what it is going to be recording. While it is good that it tries to find the best way to accommodate the light and sound in the room, having your video change exposure throughout will be at best annoying and at worst an outright distraction. Lock your exposure down on the iPhone once you have found the optimum conditions for the video, and it will not change.

Use Slow Motion\Time Lapse Mode
One way to make videos more interesting is to use either slow motion or time lapse features. The well-known use of time lapse video is if the video is extremely long, and it needs to be shortened – we are all aware of the use of montages in films, after all – and it can be very effective when used correctly. Slow motion is different - it can be used for the same reasons as in films, but it can also be used for when you need to follow instructions, or for when you want to follow what is being done in absolute detail.

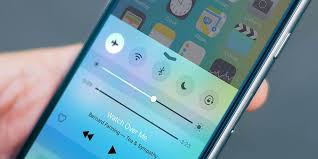
Put your iPhone in Airplane Mode
There is nothing worse than being in the middle of recording a great video, and then being interrupted by a notification. Even worse, since phones vibrate when they receive a notification, and it will ruin the entire video if that happens, since the phone will move and throw off the exposure and the light enhancements which you have been using.
Putting your phone in airplane mode allows you to stop any notifications from coming in at all, and thus keeping them from ruining your video.
Edit your Video with Filmora
Films go through extensive editing processes before being released to the general public, so why shouldn’t you edit your videos? Things go wrong in the process of making a video – somebody appears where they shouldn’t, a phone rings, people have conversations, the tripod falls down, the camera ends up pointed the wrong way….a lot can happen. Editing your video means that you can take all these problems out, and also means that you can tighten up the video generally, improve the sound quality, and make sure that everything is as it should be before you show it off.
 EmEditor Professional (Lifetime License, non-store app)


Conclusion
Using your iPhone to make a video is not something which requires a lot of extra equipment – it simply requires some planning on your part, as well as knowledge of your iPhone’s systems. Being able to control the grid for the videos, the exposure, and anything else which can be controlled through the iPhone systems makes for much better videos off the bat, while adding in video editing software and tripods can improve the experience even more. Videos on an iPhone shouldn’t be seen as impossible.
Ollie Mattison
Ollie Mattison is a writer and a lover of all things video.
Follow @Ollie Mattison
Ollie Mattison
Mar 27, 2024• Proven solutions
You shouldn’t feel the need to have to invest in fancy equipment if you want to take good video – it’s not necessary. If you wanted to be involved in very high-level camera work, then you would need some fancier gear, but for most people’s purposes, what they have on their phone is just fine. This article is aimed at looking at how people can use their iPhone to record good quality videos which they can enjoy with their friends.
Use Stabilizers
Many people are critical of the ‘found footage’ types of movies which are sometimes released – the Blair Witch project being a prime example. This is generally because the shaky videography can make it difficult to really follow what is going on, or possibly also because it is hard to watch without feeling ill.
This same complaint is often used in iPhone videography – it is difficult to follow because the video is shaking. The shaking is what happens when the video lacks stability – remember that most professional camera work is done with cameras which are on some form of frame or tripod to keep the camera still. It isn’t that an iPhone is heavy – it is more to do with the video being hard to keep still, especially if our attention is distracted. For the best videos, people should invest in some form of tripod for their phone.

Use Light Properly
Professional video shoots use a lot of light in order to create the proper effect – most people would be surprised to learn how much light goes into even a ‘night-time’ set. Phone videos often suffer a lot because they do not make adequate use of light. Part of this can be solved by taking a camera class which covers light issues, but it can also be solved by paying attention to light sources where you are, and changing them to better suit your video if possible.
Avoid Using the Digital Zoom
It can be very tempting to try and use the zoom function on your camera to see people better, but this ultimately doesn’t work. You will end up with a grainy video of uncertain quality, rather than one which allows you to see everything in close up. Just move towards the point you are attempting to film – the quality of the video will be better, and you will not have to fiddle with controls and menus while making the video.

Use the Grid
Pictures and videos can be taken in either portrait or landscape format, as everybody who has tried to take a picture knows. When recording a video, you should use this to your advantage and try and find which grid would be the most effective for your video. Using the grids is very easy - simply tip the iPhone in the direction you want to film, and the film will automatically work in that format. Since it can be very easy for a phone to change grids while videoing, this is another opportunity for a stabiliser such as a tripod to be put into use.

company, user or members of the same household. Action! - screen and game recorder</a>
Use the Exposure Lock
When taking a video or a picture, you will have noticed that it can change the colour and the exposure while trying to get a lock and fix on what it is going to be recording. While it is good that it tries to find the best way to accommodate the light and sound in the room, having your video change exposure throughout will be at best annoying and at worst an outright distraction. Lock your exposure down on the iPhone once you have found the optimum conditions for the video, and it will not change.
Use Slow Motion\Time Lapse Mode
One way to make videos more interesting is to use either slow motion or time lapse features. The well-known use of time lapse video is if the video is extremely long, and it needs to be shortened – we are all aware of the use of montages in films, after all – and it can be very effective when used correctly. Slow motion is different - it can be used for the same reasons as in films, but it can also be used for when you need to follow instructions, or for when you want to follow what is being done in absolute detail.
Put your iPhone in Airplane Mode
There is nothing worse than being in the middle of recording a great video, and then being interrupted by a notification. Even worse, since phones vibrate when they receive a notification, and it will ruin the entire video if that happens, since the phone will move and throw off the exposure and the light enhancements which you have been using.
Putting your phone in airplane mode allows you to stop any notifications from coming in at all, and thus keeping them from ruining your video.
.png) Kanto Player Professional
Kanto Player ProfessionalEdit your Video with Filmora
Films go through extensive editing processes before being released to the general public, so why shouldn’t you edit your videos? Things go wrong in the process of making a video – somebody appears where they shouldn’t, a phone rings, people have conversations, the tripod falls down, the camera ends up pointed the wrong way….a lot can happen. Editing your video means that you can take all these problems out, and also means that you can tighten up the video generally, improve the sound quality, and make sure that everything is as it should be before you show it off.
 TubeDigger - online video downloader from mostly any site
Conclusion
Using your iPhone to make a video is not something which requires a lot of extra equipment – it simply requires some planning on your part, as well as knowledge of your iPhone’s systems. Being able to control the grid for the videos, the exposure, and anything else which can be controlled through the iPhone systems makes for much better videos off the bat, while adding in video editing software and tripods can improve the experience even more. Videos on an iPhone shouldn’t be seen as impossible.
Ollie Mattison
Ollie Mattison is a writer and a lover of all things video.
Follow @Ollie Mattison
Ollie Mattison
Mar 27, 2024• Proven solutions
You shouldn’t feel the need to have to invest in fancy equipment if you want to take good video – it’s not necessary. If you wanted to be involved in very high-level camera work, then you would need some fancier gear, but for most people’s purposes, what they have on their phone is just fine. This article is aimed at looking at how people can use their iPhone to record good quality videos which they can enjoy with their friends.
Use Stabilizers
Many people are critical of the ‘found footage’ types of movies which are sometimes released – the Blair Witch project being a prime example. This is generally because the shaky videography can make it difficult to really follow what is going on, or possibly also because it is hard to watch without feeling ill.
This same complaint is often used in iPhone videography – it is difficult to follow because the video is shaking. The shaking is what happens when the video lacks stability – remember that most professional camera work is done with cameras which are on some form of frame or tripod to keep the camera still. It isn’t that an iPhone is heavy – it is more to do with the video being hard to keep still, especially if our attention is distracted. For the best videos, people should invest in some form of tripod for their phone.
Use Light Properly
Professional video shoots use a lot of light in order to create the proper effect – most people would be surprised to learn how much light goes into even a ‘night-time’ set. Phone videos often suffer a lot because they do not make adequate use of light. Part of this can be solved by taking a camera class which covers light issues, but it can also be solved by paying attention to light sources where you are, and changing them to better suit your video if possible.
Avoid Using the Digital Zoom
It can be very tempting to try and use the zoom function on your camera to see people better, but this ultimately doesn’t work. You will end up with a grainy video of uncertain quality, rather than one which allows you to see everything in close up. Just move towards the point you are attempting to film – the quality of the video will be better, and you will not have to fiddle with controls and menus while making the video.
Use the Grid
Pictures and videos can be taken in either portrait or landscape format, as everybody who has tried to take a picture knows. When recording a video, you should use this to your advantage and try and find which grid would be the most effective for your video. Using the grids is very easy - simply tip the iPhone in the direction you want to film, and the film will automatically work in that format. Since it can be very easy for a phone to change grids while videoing, this is another opportunity for a stabiliser such as a tripod to be put into use.
Use the Exposure Lock
When taking a video or a picture, you will have noticed that it can change the colour and the exposure while trying to get a lock and fix on what it is going to be recording. While it is good that it tries to find the best way to accommodate the light and sound in the room, having your video change exposure throughout will be at best annoying and at worst an outright distraction. Lock your exposure down on the iPhone once you have found the optimum conditions for the video, and it will not change.
Use Slow Motion\Time Lapse Mode
One way to make videos more interesting is to use either slow motion or time lapse features. The well-known use of time lapse video is if the video is extremely long, and it needs to be shortened – we are all aware of the use of montages in films, after all – and it can be very effective when used correctly. Slow motion is different - it can be used for the same reasons as in films, but it can also be used for when you need to follow instructions, or for when you want to follow what is being done in absolute detail.
Put your iPhone in Airplane Mode
There is nothing worse than being in the middle of recording a great video, and then being interrupted by a notification. Even worse, since phones vibrate when they receive a notification, and it will ruin the entire video if that happens, since the phone will move and throw off the exposure and the light enhancements which you have been using.
Putting your phone in airplane mode allows you to stop any notifications from coming in at all, and thus keeping them from ruining your video.
Edit your Video with Filmora
Films go through extensive editing processes before being released to the general public, so why shouldn’t you edit your videos? Things go wrong in the process of making a video – somebody appears where they shouldn’t, a phone rings, people have conversations, the tripod falls down, the camera ends up pointed the wrong way….a lot can happen. Editing your video means that you can take all these problems out, and also means that you can tighten up the video generally, improve the sound quality, and make sure that everything is as it should be before you show it off.

Conclusion
Using your iPhone to make a video is not something which requires a lot of extra equipment – it simply requires some planning on your part, as well as knowledge of your iPhone’s systems. Being able to control the grid for the videos, the exposure, and anything else which can be controlled through the iPhone systems makes for much better videos off the bat, while adding in video editing software and tripods can improve the experience even more. Videos on an iPhone shouldn’t be seen as impossible.
Ollie Mattison
Ollie Mattison is a writer and a lover of all things video.
Follow @Ollie Mattison
Ollie Mattison
Mar 27, 2024• Proven solutions
You shouldn’t feel the need to have to invest in fancy equipment if you want to take good video – it’s not necessary. If you wanted to be involved in very high-level camera work, then you would need some fancier gear, but for most people’s purposes, what they have on their phone is just fine. This article is aimed at looking at how people can use their iPhone to record good quality videos which they can enjoy with their friends.

Use Stabilizers
Many people are critical of the ‘found footage’ types of movies which are sometimes released – the Blair Witch project being a prime example. This is generally because the shaky videography can make it difficult to really follow what is going on, or possibly also because it is hard to watch without feeling ill.

This same complaint is often used in iPhone videography – it is difficult to follow because the video is shaking. The shaking is what happens when the video lacks stability – remember that most professional camera work is done with cameras which are on some form of frame or tripod to keep the camera still. It isn’t that an iPhone is heavy – it is more to do with the video being hard to keep still, especially if our attention is distracted. For the best videos, people should invest in some form of tripod for their phone.
Use Light Properly
Professional video shoots use a lot of light in order to create the proper effect – most people would be surprised to learn how much light goes into even a ‘night-time’ set. Phone videos often suffer a lot because they do not make adequate use of light. Part of this can be solved by taking a camera class which covers light issues, but it can also be solved by paying attention to light sources where you are, and changing them to better suit your video if possible.
Avoid Using the Digital Zoom
It can be very tempting to try and use the zoom function on your camera to see people better, but this ultimately doesn’t work. You will end up with a grainy video of uncertain quality, rather than one which allows you to see everything in close up. Just move towards the point you are attempting to film – the quality of the video will be better, and you will not have to fiddle with controls and menus while making the video.
Use the Grid
Pictures and videos can be taken in either portrait or landscape format, as everybody who has tried to take a picture knows. When recording a video, you should use this to your advantage and try and find which grid would be the most effective for your video. Using the grids is very easy - simply tip the iPhone in the direction you want to film, and the film will automatically work in that format. Since it can be very easy for a phone to change grids while videoing, this is another opportunity for a stabiliser such as a tripod to be put into use.
Use the Exposure Lock
When taking a video or a picture, you will have noticed that it can change the colour and the exposure while trying to get a lock and fix on what it is going to be recording. While it is good that it tries to find the best way to accommodate the light and sound in the room, having your video change exposure throughout will be at best annoying and at worst an outright distraction. Lock your exposure down on the iPhone once you have found the optimum conditions for the video, and it will not change.
Use Slow Motion\Time Lapse Mode
One way to make videos more interesting is to use either slow motion or time lapse features. The well-known use of time lapse video is if the video is extremely long, and it needs to be shortened – we are all aware of the use of montages in films, after all – and it can be very effective when used correctly. Slow motion is different - it can be used for the same reasons as in films, but it can also be used for when you need to follow instructions, or for when you want to follow what is being done in absolute detail.

 DEX 3 RE is Easy-To-Use DJ Mixing Software for MAC and Windows Designed for Today’s Versatile DJ.
Mix from your own library of music, iTunes or use the Pulselocker subsciprtion service for in-app access to over 44 million songs. Use with over 85 supported DJ controllers or mix with a keyboard and mouse.
DEX 3 RE is everything you need without the clutter - the perfect 2-deck mixing software solution for mobile DJs or hard-core hobbiests.
PCDJ DEX 3 RE (DJ Software for Win & MAC - Product Activation For 3 Machines)
Put your iPhone in Airplane Mode
There is nothing worse than being in the middle of recording a great video, and then being interrupted by a notification. Even worse, since phones vibrate when they receive a notification, and it will ruin the entire video if that happens, since the phone will move and throw off the exposure and the light enhancements which you have been using.
Putting your phone in airplane mode allows you to stop any notifications from coming in at all, and thus keeping them from ruining your video.
Edit your Video with Filmora
Films go through extensive editing processes before being released to the general public, so why shouldn’t you edit your videos? Things go wrong in the process of making a video – somebody appears where they shouldn’t, a phone rings, people have conversations, the tripod falls down, the camera ends up pointed the wrong way….a lot can happen. Editing your video means that you can take all these problems out, and also means that you can tighten up the video generally, improve the sound quality, and make sure that everything is as it should be before you show it off.
 Power Tools add-on for Google Sheets, Lifetime subscription
 PCDJ DEX 3 for Windows & MAC is the total entertainment DJ software solution, offering audio, video, and karaoke mixing ability. Automatic beat-sync, smart looping, 4 decks, DJ MIDI controller support, Karaoke Streaming and much more.
Conclusion
Using your iPhone to make a video is not something which requires a lot of extra equipment – it simply requires some planning on your part, as well as knowledge of your iPhone’s systems. Being able to control the grid for the videos, the exposure, and anything else which can be controlled through the iPhone systems makes for much better videos off the bat, while adding in video editing software and tripods can improve the experience even more. Videos on an iPhone shouldn’t be seen as impossible.

Ollie Mattison
Ollie Mattison is a writer and a lover of all things video.
Follow @Ollie Mattison
- Title: [New] Capturing the Best on iPhone 8 Techniques for Pro Video Shoots
- Author: Daniel
- Created at : 2024-07-25 02:01:59
- Updated at : 2024-07-26 02:01:59
- Link: https://extra-resources.techidaily.com/new-capturing-the-best-on-iphone-8-techniques-for-pro-video-shoots/
- License: This work is licensed under CC BY-NC-SA 4.0.