
"Rewind on the Fly IOS Video Flip"
Rewind on the Fly: IOS Video Flip
The flow of life is significant to all, and every moment you have captured or recorded becomes the flowery extract for all. Have you ever noticed how an event goes on, such as running, water falling from a mountain, raindrops, playing a game? Now, imagine you got a tool that will make this experience more hilarious by reverse order facilitation.
Here, you got the trail! The article gives you immense tools and application knowledge to quickly understand how to reverse video on iPhone with detailed guidelines.
So, let’s start the reverse video on the iPhone journey!
If you also need to reverse video on the computer, try Filmora video editor . It enables you to reverse, cut, split and combine videos in a few clicks and supports customizable speed controls, now up to 100x fast mo and 0.01x slow mo. It even provides various filter and overlay effects to touch up your video.
For Win 7 or later (64-bit)
For macOS 10.14 or later


In this article
01 Best Free Apps to Reverse Videos on iPhone
02 How to Reverse a Video on iPhone Without an App?
 CollageIt Pro
Part 1: Best Free Apps to Reverse Videos on iPhone
Reverse video technology is not an inbuilt feature for iPhone users. So, if you own one and are looking for ways to reverse a video iPhone device, let you know that there is some excellent application that will empower your iPhone to perform the task efficiently.
And to your surprise reverse video iPhone offered by such applications are free of cost. So, why delay getting deep insight over such free iOS apps and learning how to reverse a video on iPhone with ease.

1. Reverse Vid
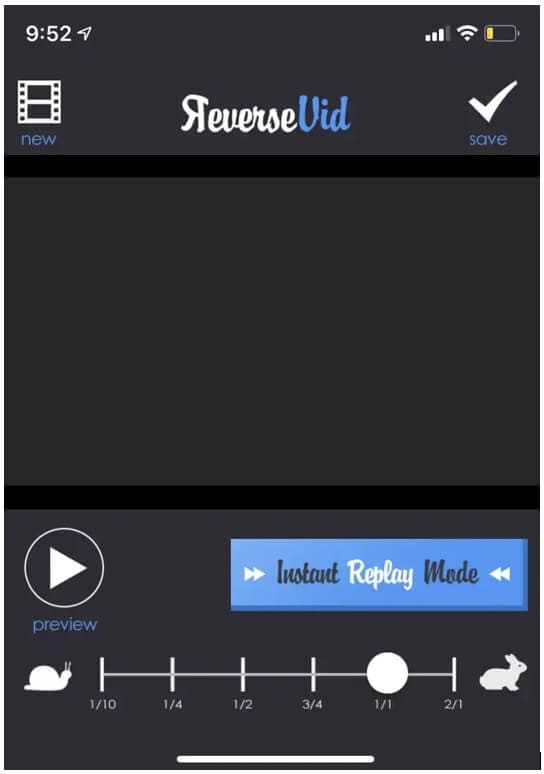
Reverse Vid is an easy and quick way to learn how to reverse video on iPhone. You can enjoy, make fun and laugh after switching the video with its easy interface and replay with instant mode.
Also, after editing and reversing the video, you will get the option to share among different platforms, social media sites, and your friends.
A simple guide to reverse a video on iPhone with Reverse Vid app:
Step 1: Get Reverse Vid on your iPhone
You can search Reverse Vid on App Store to download and install it. It requires iOS 12.0 or later versions.

Step 2: Add video to reverse to the app
Reverse Vid allows you to record a new video to reverse later, or import pre-recorded video from the video library. You can choose it based on your needs.
Step 3: Adjust Reverse Speed
From the slide bar present at the bottom screen, you will get the option to change the video reverse playing speed. After that, save the video by clicking the button from the top right end.

2. Filmora
Filmora is an easy-to-use video editing app for both iOS and Android devices. It provides all the essential tools for making a video on mobile quickly. You can use it to trim the footage to shorten the clips or split it into two or more segments. What’s more, you can add transitions, stickers, effects, filters and texts to the video easily. You can change the video speed to speed up or slow down, or play the video backwards.
A simple guide to reverse a video on iPhone with Filmora Go app:
Step 1: Get Filmora on your iPhone
Search for Filmora from the search bar on the App Store or click on the link to install it.

Step 2: Launch Filmora and add video
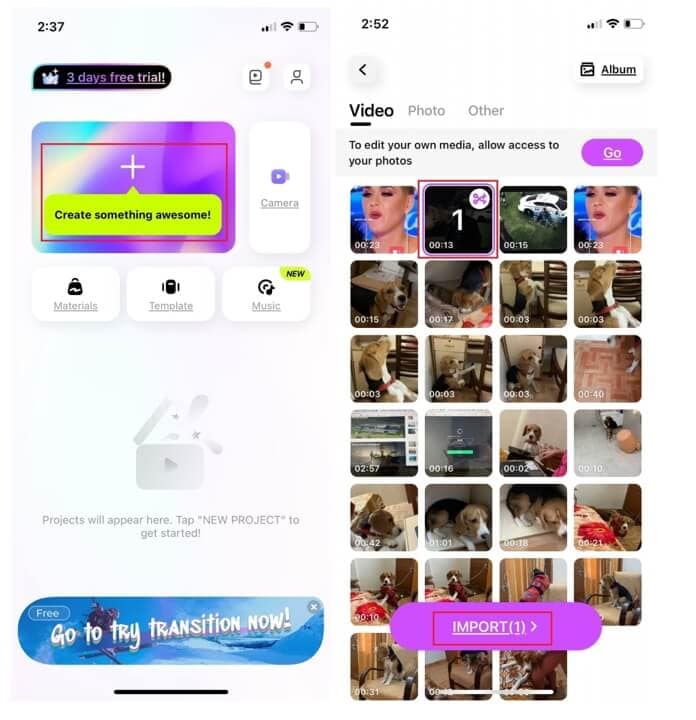
Now, open the application and follow the screen instructions. From the home window, click on the (+) icon to access the media files. Then go to the Video section and select the video you wish to reverse.
Step 3 : Edit and reverse video
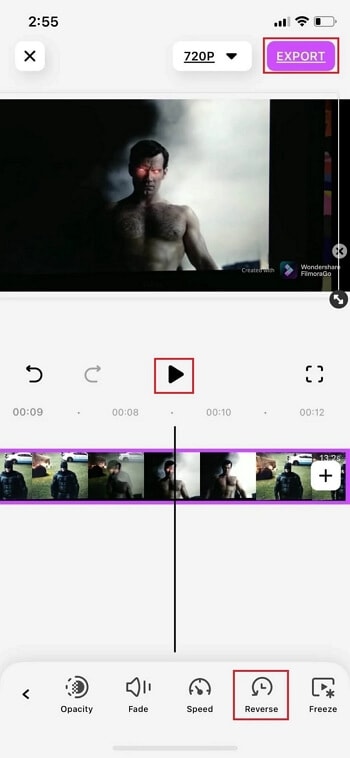
After that, go with the “import’ button. Then you can opt for different video editing options such as cut, trim, add effects, volume, split, video speed. Next to the Speed tab, there is a reverse button. Click on it and the app will start the reversing process. Then you can play it to check how the reverse effect looks and then click on the ‘Export’ button to save the reverse video on iPhone.

Part 2: How to Reverse a Video on iPhone Without an App?
Are you curious if it is possible to reverse a video on iPhone without going with any application? Then, yes, there are some other ways to make a video rewind from your browser window. Here, you get a complete guide to learn how to reverse video on iPhone without an app via some online video speed changers:
1. Clideo
Clideo offers reverse video iPhone services, under which you can easily access the page and follow some simple steps to reverse video with ease. It used to support almost all video formats, with fast editing options. There, you need not download any specific software. Simple visiting the website will open up the door for the video reverse link.
Steps:
In your device browser window, directly open the Clideo web page: https://clideo.com/reverse-video . You will see the ‘Choose File’ button right from the main screen. Click on it to select your video file from your device. Doing so will start uploading your video, which might take some time. After that, click on the ‘Reverse’ video button to start the reverse video iPhone process. Here, you will see three reverse speeds: double, same speed, or half speed.
While reversing the video, make sure to press the mute button to avoid any disturbance or additional voice issues. You can also change the video format. Once done with the primary selection, you can choose the reverse button to complete the process.

Now at the end, to save the reverse video iPhone clip, press the download button after previewing the edited video.
2. EZgif
The next video reverser for iPhone devices with free services comes with EZgif for all sorts of videos. In addition, to reverse a video iPhone, you will be able to cut, crop, resize, speed modifier, rotate direction, and a lot more. EZgif is also easily accessible through your device browser window from anywhere of your convenience.
To learn how to reverse a video on iPhone, follow the following steps:
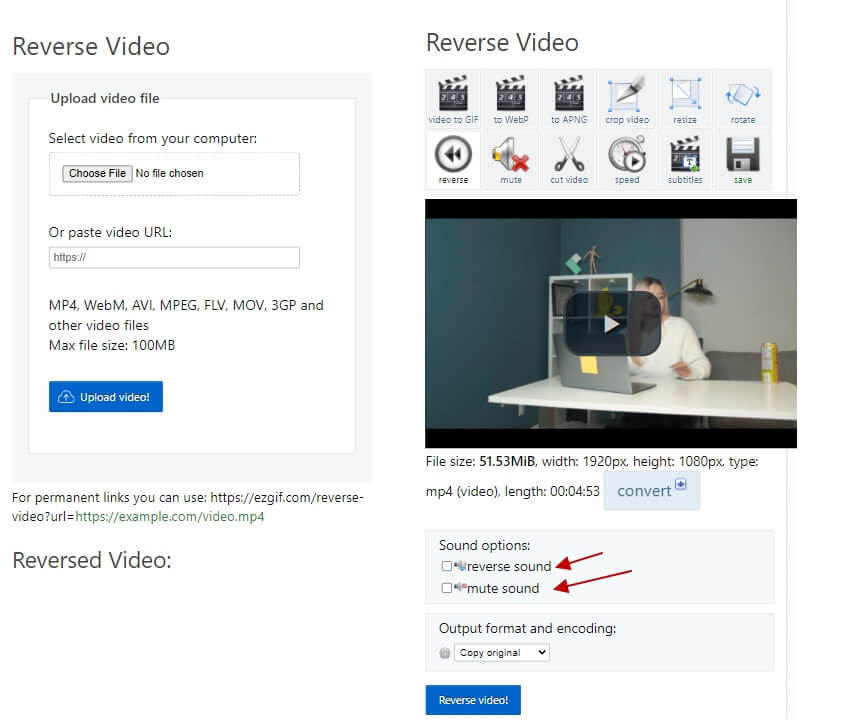
Visit the reverse video page on EZgif directly: https://ezgif.com/reverse-video . From here, you can upload your video from the device, or if you have a video link, then paste it directly. Note: Here, the Max size limit is 120 MB.
From the next window, you can go with the mute option, select the video format and then tick on the Reverse Video option. That’s it. Soon, the video reverse process will get started. After that, your video play and a download option will get appear. Choose the desired one.
Note: For quick access, online reverse video for iPhone devices is a good option. But such tools come with size limitations.
Bonus: How to Reverse Image Search on an iPhone?
Reverse images search is the process that will assist you in gaining permission request from the original copyright owner of the image or let you see if anyone uses your photos without permission.
Follow the steps below to reverse image search on your iPhone:
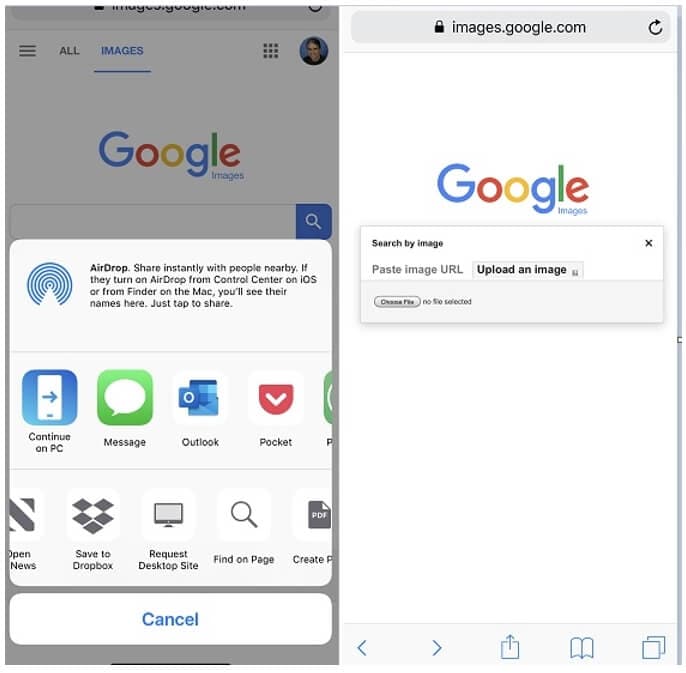
Open Safari App> go for images.google.com. Then From the screen end, click on the share button> And a request for the Desktop site. Click on the Camera icon right next to the Search box. Now, you can upload a photo from your iPhone or if you have a link, then directly paste it in the box area.
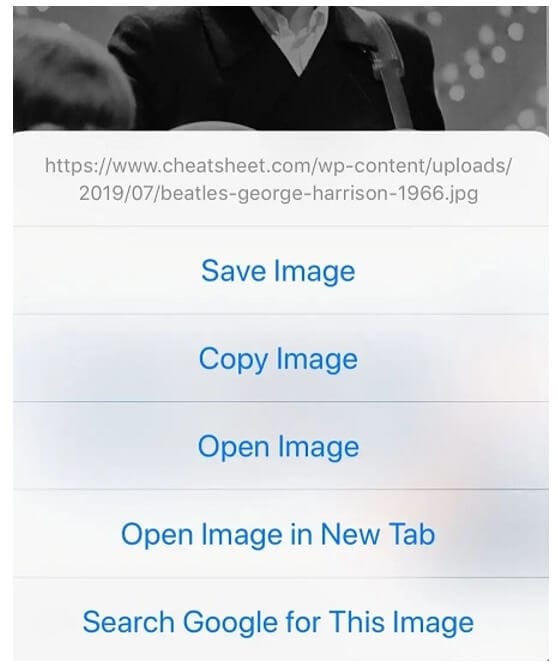
Also, to do a reverse search for an image on a webpage:
Open the Chrome app> the open the webpage from there visit the image you wish to do reverse image search> press and hold the image for few seconds> a dialog box appears> opt for ‘Search Google For This Image’ option. Doing so will result in reverse image search copyright-related information.
FAQs about reversing videos on iPhone
Q1. Can you reverse video in iMovie on iPhone?
The fact is the iPhones do not have any built-in reverse video facility. Even the built-in iMovie app for iPhone does not support a reverse video facility.
Q2. How do you reverse footage on iPhone without an app?
For this purpose, you can use online websites such as EZgif, Clideo, also mentioned in the article with detailed step guidelines.
Conclusion:
While concluding the journey, pinpointing the primary extract will quickly review the topic. In this article, you learn about the reverse video on iPhone, how to reverse video on iPhone with or without apps, a reverse image search for iPhone users, and some essential FAQs related to change order.
Hoping your concern about reverse video iPhone gets resolved here, so stay tuned with the upcoming articles and start experiencing life both ways.
For Win 7 or later (64-bit)
For macOS 10.14 or later

WPS Office Premium ( File Recovery, Photo Scanning, Convert PDF)–Yearly
In this article
01 Best Free Apps to Reverse Videos on iPhone
02 How to Reverse a Video on iPhone Without an App?
Part 1: Best Free Apps to Reverse Videos on iPhone
Reverse video technology is not an inbuilt feature for iPhone users. So, if you own one and are looking for ways to reverse a video iPhone device, let you know that there is some excellent application that will empower your iPhone to perform the task efficiently.
And to your surprise reverse video iPhone offered by such applications are free of cost. So, why delay getting deep insight over such free iOS apps and learning how to reverse a video on iPhone with ease.
1. Reverse Vid
Reverse Vid is an easy and quick way to learn how to reverse video on iPhone. You can enjoy, make fun and laugh after switching the video with its easy interface and replay with instant mode.
Also, after editing and reversing the video, you will get the option to share among different platforms, social media sites, and your friends.
A simple guide to reverse a video on iPhone with Reverse Vid app:
Step 1: Get Reverse Vid on your iPhone
You can search Reverse Vid on App Store to download and install it. It requires iOS 12.0 or later versions.
Step 2: Add video to reverse to the app
Reverse Vid allows you to record a new video to reverse later, or import pre-recorded video from the video library. You can choose it based on your needs.
Step 3: Adjust Reverse Speed
From the slide bar present at the bottom screen, you will get the option to change the video reverse playing speed. After that, save the video by clicking the button from the top right end.
2. Filmora
Filmora is an easy-to-use video editing app for both iOS and Android devices. It provides all the essential tools for making a video on mobile quickly. You can use it to trim the footage to shorten the clips or split it into two or more segments. What’s more, you can add transitions, stickers, effects, filters and texts to the video easily. You can change the video speed to speed up or slow down, or play the video backwards.
A simple guide to reverse a video on iPhone with Filmora Go app:
Step 1: Get Filmora on your iPhone
Search for Filmora from the search bar on the App Store or click on the link to install it.
Step 2: Launch Filmora and add video
Now, open the application and follow the screen instructions. From the home window, click on the (+) icon to access the media files. Then go to the Video section and select the video you wish to reverse.
Step 3 : Edit and reverse video
After that, go with the “import’ button. Then you can opt for different video editing options such as cut, trim, add effects, volume, split, video speed. Next to the Speed tab, there is a reverse button. Click on it and the app will start the reversing process. Then you can play it to check how the reverse effect looks and then click on the ‘Export’ button to save the reverse video on iPhone.

Part 2: How to Reverse a Video on iPhone Without an App?
Are you curious if it is possible to reverse a video on iPhone without going with any application? Then, yes, there are some other ways to make a video rewind from your browser window. Here, you get a complete guide to learn how to reverse video on iPhone without an app via some online video speed changers:

1. Clideo
Clideo offers reverse video iPhone services, under which you can easily access the page and follow some simple steps to reverse video with ease. It used to support almost all video formats, with fast editing options. There, you need not download any specific software. Simple visiting the website will open up the door for the video reverse link.
Steps:
In your device browser window, directly open the Clideo web page: https://clideo.com/reverse-video . You will see the ‘Choose File’ button right from the main screen. Click on it to select your video file from your device. Doing so will start uploading your video, which might take some time. After that, click on the ‘Reverse’ video button to start the reverse video iPhone process. Here, you will see three reverse speeds: double, same speed, or half speed.
While reversing the video, make sure to press the mute button to avoid any disturbance or additional voice issues. You can also change the video format. Once done with the primary selection, you can choose the reverse button to complete the process.
Now at the end, to save the reverse video iPhone clip, press the download button after previewing the edited video.
2. EZgif
The next video reverser for iPhone devices with free services comes with EZgif for all sorts of videos. In addition, to reverse a video iPhone, you will be able to cut, crop, resize, speed modifier, rotate direction, and a lot more. EZgif is also easily accessible through your device browser window from anywhere of your convenience.
To learn how to reverse a video on iPhone, follow the following steps:
Visit the reverse video page on EZgif directly: https://ezgif.com/reverse-video . From here, you can upload your video from the device, or if you have a video link, then paste it directly. Note: Here, the Max size limit is 120 MB.
From the next window, you can go with the mute option, select the video format and then tick on the Reverse Video option. That’s it. Soon, the video reverse process will get started. After that, your video play and a download option will get appear. Choose the desired one.
 PearlMountain Image Converter
Note: For quick access, online reverse video for iPhone devices is a good option. But such tools come with size limitations.
Bonus: How to Reverse Image Search on an iPhone?
Reverse images search is the process that will assist you in gaining permission request from the original copyright owner of the image or let you see if anyone uses your photos without permission.
Follow the steps below to reverse image search on your iPhone:
Open Safari App> go for images.google.com. Then From the screen end, click on the share button> And a request for the Desktop site. Click on the Camera icon right next to the Search box. Now, you can upload a photo from your iPhone or if you have a link, then directly paste it in the box area.
Also, to do a reverse search for an image on a webpage:
Open the Chrome app> the open the webpage from there visit the image you wish to do reverse image search> press and hold the image for few seconds> a dialog box appears> opt for ‘Search Google For This Image’ option. Doing so will result in reverse image search copyright-related information.
FAQs about reversing videos on iPhone
Q1. Can you reverse video in iMovie on iPhone?
The fact is the iPhones do not have any built-in reverse video facility. Even the built-in iMovie app for iPhone does not support a reverse video facility.
Q2. How do you reverse footage on iPhone without an app?
For this purpose, you can use online websites such as EZgif, Clideo, also mentioned in the article with detailed step guidelines.
Conclusion:
While concluding the journey, pinpointing the primary extract will quickly review the topic. In this article, you learn about the reverse video on iPhone, how to reverse video on iPhone with or without apps, a reverse image search for iPhone users, and some essential FAQs related to change order.
Hoping your concern about reverse video iPhone gets resolved here, so stay tuned with the upcoming articles and start experiencing life both ways.
For Win 7 or later (64-bit)
For macOS 10.14 or later
In this article
01 Best Free Apps to Reverse Videos on iPhone
02 How to Reverse a Video on iPhone Without an App?
Part 1: Best Free Apps to Reverse Videos on iPhone
Reverse video technology is not an inbuilt feature for iPhone users. So, if you own one and are looking for ways to reverse a video iPhone device, let you know that there is some excellent application that will empower your iPhone to perform the task efficiently.
And to your surprise reverse video iPhone offered by such applications are free of cost. So, why delay getting deep insight over such free iOS apps and learning how to reverse a video on iPhone with ease.
1. Reverse Vid
Reverse Vid is an easy and quick way to learn how to reverse video on iPhone. You can enjoy, make fun and laugh after switching the video with its easy interface and replay with instant mode.
Also, after editing and reversing the video, you will get the option to share among different platforms, social media sites, and your friends.
A simple guide to reverse a video on iPhone with Reverse Vid app:
Step 1: Get Reverse Vid on your iPhone
You can search Reverse Vid on App Store to download and install it. It requires iOS 12.0 or later versions.
Step 2: Add video to reverse to the app
Reverse Vid allows you to record a new video to reverse later, or import pre-recorded video from the video library. You can choose it based on your needs.
Step 3: Adjust Reverse Speed
From the slide bar present at the bottom screen, you will get the option to change the video reverse playing speed. After that, save the video by clicking the button from the top right end.
 With Screensaver Wonder you can easily make a screensaver from your own pictures and video files. Create screensavers for your own computer or create standalone, self-installing screensavers for easy sharing with your friends. Together with its sister product Screensaver Factory, Screensaver Wonder is one of the most popular screensaver software products in the world, helping thousands of users decorate their computer screens quickly and easily.
2. Filmora
Filmora is an easy-to-use video editing app for both iOS and Android devices. It provides all the essential tools for making a video on mobile quickly. You can use it to trim the footage to shorten the clips or split it into two or more segments. What’s more, you can add transitions, stickers, effects, filters and texts to the video easily. You can change the video speed to speed up or slow down, or play the video backwards.
A simple guide to reverse a video on iPhone with Filmora Go app:
Step 1: Get Filmora on your iPhone
Search for Filmora from the search bar on the App Store or click on the link to install it.

Step 2: Launch Filmora and add video
Now, open the application and follow the screen instructions. From the home window, click on the (+) icon to access the media files. Then go to the Video section and select the video you wish to reverse.
Step 3 : Edit and reverse video
After that, go with the “import’ button. Then you can opt for different video editing options such as cut, trim, add effects, volume, split, video speed. Next to the Speed tab, there is a reverse button. Click on it and the app will start the reversing process. Then you can play it to check how the reverse effect looks and then click on the ‘Export’ button to save the reverse video on iPhone.
Part 2: How to Reverse a Video on iPhone Without an App?
Are you curious if it is possible to reverse a video on iPhone without going with any application? Then, yes, there are some other ways to make a video rewind from your browser window. Here, you get a complete guide to learn how to reverse video on iPhone without an app via some online video speed changers:
1. Clideo
Clideo offers reverse video iPhone services, under which you can easily access the page and follow some simple steps to reverse video with ease. It used to support almost all video formats, with fast editing options. There, you need not download any specific software. Simple visiting the website will open up the door for the video reverse link.
Steps:
In your device browser window, directly open the Clideo web page: https://clideo.com/reverse-video . You will see the ‘Choose File’ button right from the main screen. Click on it to select your video file from your device. Doing so will start uploading your video, which might take some time. After that, click on the ‘Reverse’ video button to start the reverse video iPhone process. Here, you will see three reverse speeds: double, same speed, or half speed.
While reversing the video, make sure to press the mute button to avoid any disturbance or additional voice issues. You can also change the video format. Once done with the primary selection, you can choose the reverse button to complete the process.

Now at the end, to save the reverse video iPhone clip, press the download button after previewing the edited video.
 PDF application, powered by AI-based OCR, for unified workflows with both digital and scanned documents.
 2. EZgif
The next video reverser for iPhone devices with free services comes with EZgif for all sorts of videos. In addition, to reverse a video iPhone, you will be able to cut, crop, resize, speed modifier, rotate direction, and a lot more. EZgif is also easily accessible through your device browser window from anywhere of your convenience.
To learn how to reverse a video on iPhone, follow the following steps:
Visit the reverse video page on EZgif directly: https://ezgif.com/reverse-video . From here, you can upload your video from the device, or if you have a video link, then paste it directly. Note: Here, the Max size limit is 120 MB.
From the next window, you can go with the mute option, select the video format and then tick on the Reverse Video option. That’s it. Soon, the video reverse process will get started. After that, your video play and a download option will get appear. Choose the desired one.
Note: For quick access, online reverse video for iPhone devices is a good option. But such tools come with size limitations.

Bonus: How to Reverse Image Search on an iPhone?
Reverse images search is the process that will assist you in gaining permission request from the original copyright owner of the image or let you see if anyone uses your photos without permission.
Follow the steps below to reverse image search on your iPhone:
Open Safari App> go for images.google.com. Then From the screen end, click on the share button> And a request for the Desktop site. Click on the Camera icon right next to the Search box. Now, you can upload a photo from your iPhone or if you have a link, then directly paste it in the box area.
Also, to do a reverse search for an image on a webpage:
Open the Chrome app> the open the webpage from there visit the image you wish to do reverse image search> press and hold the image for few seconds> a dialog box appears> opt for ‘Search Google For This Image’ option. Doing so will result in reverse image search copyright-related information.
FAQs about reversing videos on iPhone
Q1. Can you reverse video in iMovie on iPhone?
The fact is the iPhones do not have any built-in reverse video facility. Even the built-in iMovie app for iPhone does not support a reverse video facility.
Q2. How do you reverse footage on iPhone without an app?
For this purpose, you can use online websites such as EZgif, Clideo, also mentioned in the article with detailed step guidelines.
Conclusion:
While concluding the journey, pinpointing the primary extract will quickly review the topic. In this article, you learn about the reverse video on iPhone, how to reverse video on iPhone with or without apps, a reverse image search for iPhone users, and some essential FAQs related to change order.
Hoping your concern about reverse video iPhone gets resolved here, so stay tuned with the upcoming articles and start experiencing life both ways.
For Win 7 or later (64-bit)
For macOS 10.14 or later

In this article
01 Best Free Apps to Reverse Videos on iPhone
02 How to Reverse a Video on iPhone Without an App?
Part 1: Best Free Apps to Reverse Videos on iPhone
Reverse video technology is not an inbuilt feature for iPhone users. So, if you own one and are looking for ways to reverse a video iPhone device, let you know that there is some excellent application that will empower your iPhone to perform the task efficiently.
And to your surprise reverse video iPhone offered by such applications are free of cost. So, why delay getting deep insight over such free iOS apps and learning how to reverse a video on iPhone with ease.
 WonderFox DVD Ripper Pro
1. Reverse Vid
Reverse Vid is an easy and quick way to learn how to reverse video on iPhone. You can enjoy, make fun and laugh after switching the video with its easy interface and replay with instant mode.
Also, after editing and reversing the video, you will get the option to share among different platforms, social media sites, and your friends.
A simple guide to reverse a video on iPhone with Reverse Vid app:
Step 1: Get Reverse Vid on your iPhone
You can search Reverse Vid on App Store to download and install it. It requires iOS 12.0 or later versions.

Step 2: Add video to reverse to the app
Reverse Vid allows you to record a new video to reverse later, or import pre-recorded video from the video library. You can choose it based on your needs.
Step 3: Adjust Reverse Speed
From the slide bar present at the bottom screen, you will get the option to change the video reverse playing speed. After that, save the video by clicking the button from the top right end.
2. Filmora
Filmora is an easy-to-use video editing app for both iOS and Android devices. It provides all the essential tools for making a video on mobile quickly. You can use it to trim the footage to shorten the clips or split it into two or more segments. What’s more, you can add transitions, stickers, effects, filters and texts to the video easily. You can change the video speed to speed up or slow down, or play the video backwards.
A simple guide to reverse a video on iPhone with Filmora Go app:
Step 1: Get Filmora on your iPhone
Search for Filmora from the search bar on the App Store or click on the link to install it.
Step 2: Launch Filmora and add video
Now, open the application and follow the screen instructions. From the home window, click on the (+) icon to access the media files. Then go to the Video section and select the video you wish to reverse.
Step 3 : Edit and reverse video
After that, go with the “import’ button. Then you can opt for different video editing options such as cut, trim, add effects, volume, split, video speed. Next to the Speed tab, there is a reverse button. Click on it and the app will start the reversing process. Then you can play it to check how the reverse effect looks and then click on the ‘Export’ button to save the reverse video on iPhone.
Part 2: How to Reverse a Video on iPhone Without an App?
Are you curious if it is possible to reverse a video on iPhone without going with any application? Then, yes, there are some other ways to make a video rewind from your browser window. Here, you get a complete guide to learn how to reverse video on iPhone without an app via some online video speed changers:
1. Clideo
Clideo offers reverse video iPhone services, under which you can easily access the page and follow some simple steps to reverse video with ease. It used to support almost all video formats, with fast editing options. There, you need not download any specific software. Simple visiting the website will open up the door for the video reverse link.
Steps:
In your device browser window, directly open the Clideo web page: https://clideo.com/reverse-video . You will see the ‘Choose File’ button right from the main screen. Click on it to select your video file from your device. Doing so will start uploading your video, which might take some time. After that, click on the ‘Reverse’ video button to start the reverse video iPhone process. Here, you will see three reverse speeds: double, same speed, or half speed.
While reversing the video, make sure to press the mute button to avoid any disturbance or additional voice issues. You can also change the video format. Once done with the primary selection, you can choose the reverse button to complete the process.
Now at the end, to save the reverse video iPhone clip, press the download button after previewing the edited video.
Parental Control Software
### 2\. EZgifThe next video reverser for iPhone devices with free services comes with EZgif for all sorts of videos. In addition, to reverse a video iPhone, you will be able to cut, crop, resize, speed modifier, rotate direction, and a lot more. EZgif is also easily accessible through your device browser window from anywhere of your convenience.
To learn how to reverse a video on iPhone, follow the following steps:
Visit the reverse video page on EZgif directly: https://ezgif.com/reverse-video . From here, you can upload your video from the device, or if you have a video link, then paste it directly. Note: Here, the Max size limit is 120 MB.
From the next window, you can go with the mute option, select the video format and then tick on the Reverse Video option. That’s it. Soon, the video reverse process will get started. After that, your video play and a download option will get appear. Choose the desired one.
Note: For quick access, online reverse video for iPhone devices is a good option. But such tools come with size limitations.
Bonus: How to Reverse Image Search on an iPhone?
Reverse images search is the process that will assist you in gaining permission request from the original copyright owner of the image or let you see if anyone uses your photos without permission.
Follow the steps below to reverse image search on your iPhone:
Open Safari App> go for images.google.com. Then From the screen end, click on the share button> And a request for the Desktop site. Click on the Camera icon right next to the Search box. Now, you can upload a photo from your iPhone or if you have a link, then directly paste it in the box area.

Also, to do a reverse search for an image on a webpage:
Open the Chrome app> the open the webpage from there visit the image you wish to do reverse image search> press and hold the image for few seconds> a dialog box appears> opt for ‘Search Google For This Image’ option. Doing so will result in reverse image search copyright-related information.
FAQs about reversing videos on iPhone
Q1. Can you reverse video in iMovie on iPhone?
The fact is the iPhones do not have any built-in reverse video facility. Even the built-in iMovie app for iPhone does not support a reverse video facility.
Q2. How do you reverse footage on iPhone without an app?
For this purpose, you can use online websites such as EZgif, Clideo, also mentioned in the article with detailed step guidelines.
Conclusion:
While concluding the journey, pinpointing the primary extract will quickly review the topic. In this article, you learn about the reverse video on iPhone, how to reverse video on iPhone with or without apps, a reverse image search for iPhone users, and some essential FAQs related to change order.
Hoping your concern about reverse video iPhone gets resolved here, so stay tuned with the upcoming articles and start experiencing life both ways.
- Title: Rewind on the Fly IOS Video Flip
- Author: Daniel
- Created at : 2024-07-25 02:46:56
- Updated at : 2024-07-26 02:46:56
- Link: https://extra-resources.techidaily.com/rewind-on-the-fly-ios-video-flip/
- License: This work is licensed under CC BY-NC-SA 4.0.