
Stealthy Photo Editing with Picsart
Stealthy Photo Editing with Picsart
Create High-Quality Video - Wondershare Filmora
An easy and powerful YouTube video editor
Numerous video and audio effects to choose from
Detailed tutorials provided by the official channel
Applying a blur effect on a face using Picsart allows you to change the focus of a photo. It is like going back to when you took the picture and intentionally pulling a part of it out of focus to highlight your subject better. Essentially, learning how to blur faces in Picsart will help you accentuate a part of a picture and draw the eye of the viewer to the in-focus part that you would like them to notice first.
In this article
02 The Formula for Picsart’s Success
03 How to Blur Faces in Picsart
04 Funny Blur Effects in Picsart
What Is Picsart?
Picsart is a feature-rich photo and video editor for Android and iOS mobile devices. It’s also available as a Windows Universal application for desktop and mobile. With over one billion downloads across 180 countries to date, Picsart is one of the most popular applications in the world.
The app allows you to edit your videos and photos with trendy effects and filters, easy-to-use templates, cool collages, fun stickers, share your images on Picsart and various social networks, and much more. You can pull a picture from the photo library or snap a new one.
With an image on-screen, use the buttons located underneath the interface to play with various features of the application. You can reset your photo to its original state, undo the last action, see after and before views of your image, reveal more controls with the plus button, and pinch to zoom. Every effect offers adjustability through sliders and a brush that allows you to choose where to remove or apply the effect.
The app has numerous easy-to-use editing tools designed to take images from simple to breathtaking in no time. Picsart is ideal for any experience level, and millions of people worldwide turn to the powerful tools this app offers to express themselves through art.
It is free to use this app, and there is a great selection of free content. However, there are in-app purchases for frames, fonts, stickers, and clipart sets, most of which cost $1.99 or 99 cents. You try out Picsart to get a taste of what the app can do without setting up an account.
The Formula for Picsart’s Success
This application takes an opposite approach to image enhancing from other platforms like Instagram. While the latter emphasizes simplicity, Picsart offers an expansive selection of image-editing options. The app’s filters are more adjustable and provide near-Photoshop-level tools, such as masks, curves, clone stamps, and layers. Clip art and drawing tools make Picsart far more than a photo application.
Applying a blur effect to images has never been easier with Picsart. This online photo editor features a helpful suite of simple and intuitive editing tools powerful enough to help users produce great images that they can share with their friends and families on social media. Learning how to blur face in Picsart is among the most versatile editing techniques you can use to make eye-catching edits. With this app, you can easily use the Blur image tool and achieve instantaneous and impressive results.
 The BootIt Collection covers multi-booting, partitioning, and disk imaging on traditional PC’s using the standard BIOS and newer PC’s using UEFI. The collection includes BootIt Bare Metal (BIBM) for standard BIOS systems and BootIt UEFI (BIU) for UEFI system.
How to Blur Faces in Picsart
Social media platforms are more invasive than before with tagging and linking personal detail with photos. In some cases, like with young children, you might not want these photos to be available online. It is a good thing that Picsart allows you to blur faces in pictures.
Additionally, all photos need to draw the eye of the viewer to something specific. Blurring the extraneous details like faces allows you to emphasize that central focus. Wondering how to blur face in Picsart? Follow the steps below:
- Download and install Picsart on your device.
- Launch the app, then press the plus sign to upload the picture you would like to blur.
- Click on Tools and press Selection; this will pull up the selection tools. Here, you will be able to pick out the area you want to Picsart blur face.
- Press Select, then Face. The app AI tool will select the face in the picture and highlight it in red.
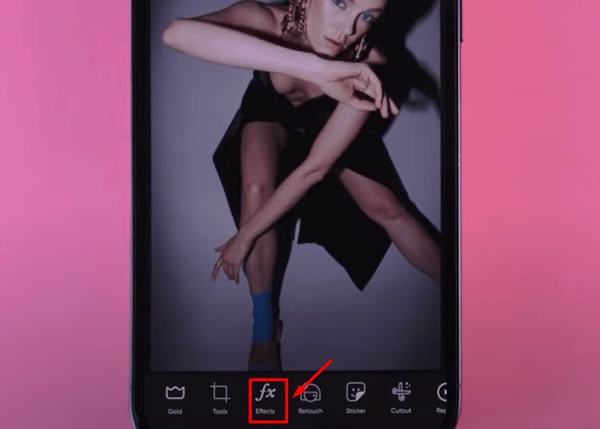
- In the top menu, tap on Effects.
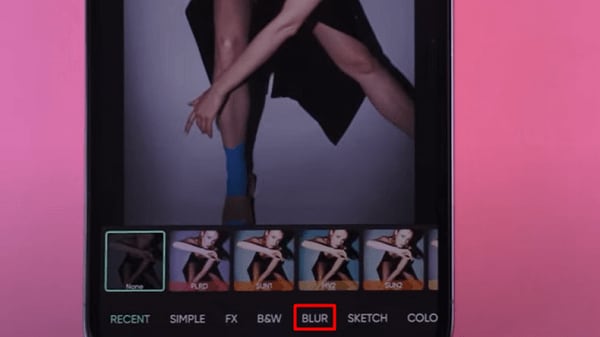
- Now, select the Blur option to open the available range of blur tools. Choose the blur filter that you prefer (Motion Blur, Smart Blur, Lens Blur, Radial Blur, Focal Zoom, Blur, and GBlur). Doing this will undoubtedly blur face Picsart.

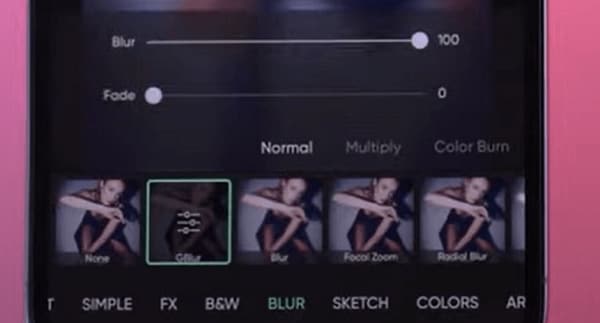
- You can adjust the blur settings manually by tapping and holding on to one of the filters in the above step.
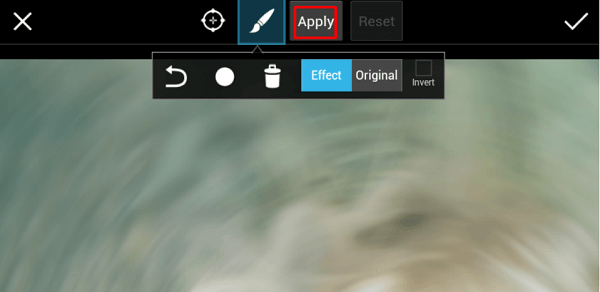
- If you are satisfied with the blur effect, tap Apply to save the changes. At this point, you can still modify your work, but ensure you have applied your changes in every step to save the modifications.
Now that you have blurred out the face in your photo, it is time to click the Next button to save and export the picture or post it online.
You can send it via email from within the Picsart app application. Alternatively, you can share it with Flickr, Twitter, Facebook, or Dropbox. You can also display the image on the platform for other Picsart users to see. The Picsart community has tons of images to explore, making it an excellent place to browse if you are looking for new ideas. You can check and follow images of specific users, and it also features comments and like buttons.
 Glary Utilities PRO - Premium all-in-one utility to clean, speed up, maintain and protect your PC
Funny Blur Effects in Picsart
You do not always have to take yourself seriously; sometimes, you only want to create a blur effect for fun. Picsart has a range of funny blur effects that you can apply to your image and have a whale of a time. These effects do not mirror reality but give your picture a cinematic look. Follow the steps above, but when you get to the part where you tap Effects and have selected the Blur options, opt for a different blur filter.
With that in mind, let’s look at some funny blur effects in Picsart that you might want to try.
Motion Blur

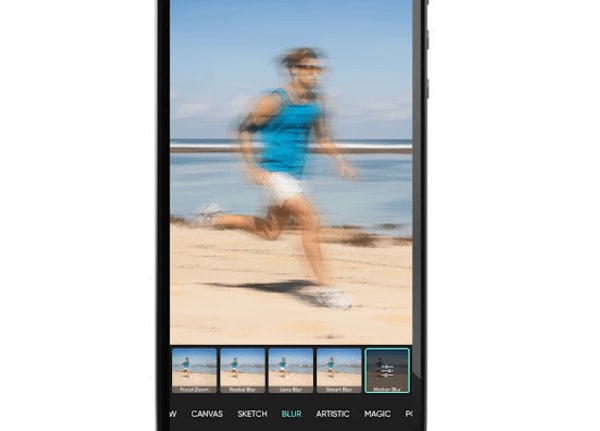
As the name suggests, this funny blur effect looks amazing on pictures of vehicles and people in motion. All you have to do is apply the filter, then use the adjustment slider to decrease or increase the intensity of the effect.
When you choose the Motion Blur, this effect automatically colorizes your picture. You can select the color you want by dragging the hue slider; unclick the box located next to the slider to turn the colorization off completely. Your picture will turn back to the original color.
What’s more? You can play around with Noise, Angle, and Distance sliders to apply the right amount of motion blur to photos and make sure the sense of movement will go in the right direction.
Smart Blur

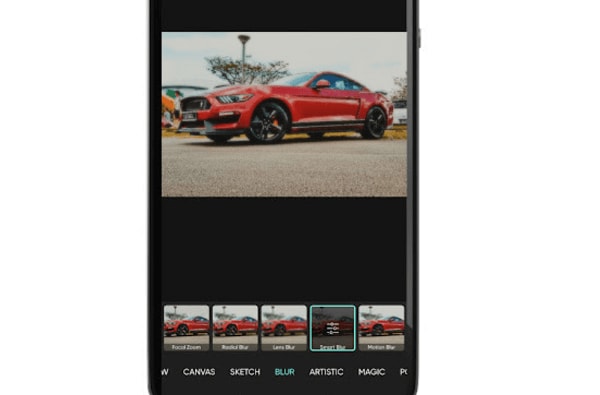
Smart Blur gives your photos a luxurious sheen; it blurs out details to make subjects appear less real and a bit more unnaturally perfect. You can consider it a magazine finish.
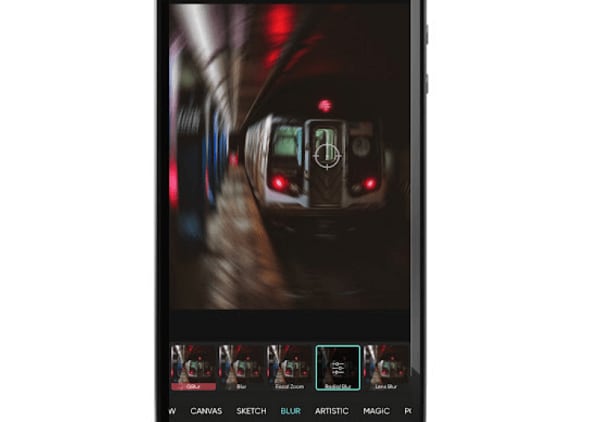
Radial Blur
 Jet Profiler for MySQL, Enterprise Version: Jet Profiler for MySQL is real-time query performance and diagnostics tool for the MySQL database server. Its detailed query information, graphical interface and ease of use makes this a great tool for finding performance bottlenecks in your MySQL databases.
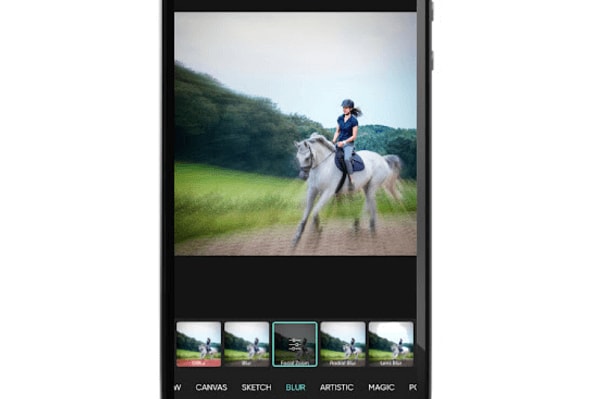
This blur effect allows you to turn photos into a spinning vortex. It allows you to create a circle of blur effect around a focal point in photos. Every circle has a focal point, and you can move the center of the blur by dragging the crosshairs located in the middle of the blur.
Objects in your image will bend with the curve of the blur; anything lying in the middle of the circling blur will become a greater point of focus. Move the Blur slider located in the effects settings menu to make your image less or more blurry Zero is the minimum, while 20 is the maximum.
You can try to apply the Radial Blur effect to automobiles, trains, and planes to intensify their velocity effect.
Focal Blur
Focal blur is a radial effect that warps the dimensions of your picture a little for an in-motion look. It’s perfect for images that have subjects in high-speed settings.
Conclusion
● Nowadays, the blur effect is a common thing that it’s difficult to believe that it used to be regarded as a sign of flawed photography. Photo blurring became widely acknowledged as legit in the late Nineties, and even an aspirational technique called bokeh, a Japanese term that loosely translates as blur quality.
● A quick scan of social media imagery shows how popular it has become over the years. You might have been looking in envy at those dreamy and hazy photos asking yourself: How did the photographer manage this? The answer is Picsart.
● This application has made blurring faces and backgrounds in photos a breeze. That means you can now easily reproduce the blur effect on your photography. The best part is: It is quick and simple to achieve this. Whether you want to hide distracting elements or highlight a figure in the foreground, Picsart can help.
Applying a blur effect on a face using Picsart allows you to change the focus of a photo. It is like going back to when you took the picture and intentionally pulling a part of it out of focus to highlight your subject better. Essentially, learning how to blur faces in Picsart will help you accentuate a part of a picture and draw the eye of the viewer to the in-focus part that you would like them to notice first.
In this article
02 The Formula for Picsart’s Success
03 How to Blur Faces in Picsart
04 Funny Blur Effects in Picsart
What Is Picsart?
Picsart is a feature-rich photo and video editor for Android and iOS mobile devices. It’s also available as a Windows Universal application for desktop and mobile. With over one billion downloads across 180 countries to date, Picsart is one of the most popular applications in the world.
The app allows you to edit your videos and photos with trendy effects and filters, easy-to-use templates, cool collages, fun stickers, share your images on Picsart and various social networks, and much more. You can pull a picture from the photo library or snap a new one.
With an image on-screen, use the buttons located underneath the interface to play with various features of the application. You can reset your photo to its original state, undo the last action, see after and before views of your image, reveal more controls with the plus button, and pinch to zoom. Every effect offers adjustability through sliders and a brush that allows you to choose where to remove or apply the effect.
The app has numerous easy-to-use editing tools designed to take images from simple to breathtaking in no time. Picsart is ideal for any experience level, and millions of people worldwide turn to the powerful tools this app offers to express themselves through art.
It is free to use this app, and there is a great selection of free content. However, there are in-app purchases for frames, fonts, stickers, and clipart sets, most of which cost $1.99 or 99 cents. You try out Picsart to get a taste of what the app can do without setting up an account.
The Formula for Picsart’s Success
This application takes an opposite approach to image enhancing from other platforms like Instagram. While the latter emphasizes simplicity, Picsart offers an expansive selection of image-editing options. The app’s filters are more adjustable and provide near-Photoshop-level tools, such as masks, curves, clone stamps, and layers. Clip art and drawing tools make Picsart far more than a photo application.
Applying a blur effect to images has never been easier with Picsart. This online photo editor features a helpful suite of simple and intuitive editing tools powerful enough to help users produce great images that they can share with their friends and families on social media. Learning how to blur face in Picsart is among the most versatile editing techniques you can use to make eye-catching edits. With this app, you can easily use the Blur image tool and achieve instantaneous and impressive results.
How to Blur Faces in Picsart
Social media platforms are more invasive than before with tagging and linking personal detail with photos. In some cases, like with young children, you might not want these photos to be available online. It is a good thing that Picsart allows you to blur faces in pictures.
Additionally, all photos need to draw the eye of the viewer to something specific. Blurring the extraneous details like faces allows you to emphasize that central focus. Wondering how to blur face in Picsart? Follow the steps below:
- Download and install Picsart on your device.
- Launch the app, then press the plus sign to upload the picture you would like to blur.
- Click on Tools and press Selection; this will pull up the selection tools. Here, you will be able to pick out the area you want to Picsart blur face.
- Press Select, then Face. The app AI tool will select the face in the picture and highlight it in red.
- In the top menu, tap on Effects.
 Project Manager - Asset Browser for 3Ds Max
- Now, select the Blur option to open the available range of blur tools. Choose the blur filter that you prefer (Motion Blur, Smart Blur, Lens Blur, Radial Blur, Focal Zoom, Blur, and GBlur). Doing this will undoubtedly blur face Picsart.
- You can adjust the blur settings manually by tapping and holding on to one of the filters in the above step.
- If you are satisfied with the blur effect, tap Apply to save the changes. At this point, you can still modify your work, but ensure you have applied your changes in every step to save the modifications.
Now that you have blurred out the face in your photo, it is time to click the Next button to save and export the picture or post it online.
You can send it via email from within the Picsart app application. Alternatively, you can share it with Flickr, Twitter, Facebook, or Dropbox. You can also display the image on the platform for other Picsart users to see. The Picsart community has tons of images to explore, making it an excellent place to browse if you are looking for new ideas. You can check and follow images of specific users, and it also features comments and like buttons.
 /a>
/a>Funny Blur Effects in Picsart
You do not always have to take yourself seriously; sometimes, you only want to create a blur effect for fun. Picsart has a range of funny blur effects that you can apply to your image and have a whale of a time. These effects do not mirror reality but give your picture a cinematic look. Follow the steps above, but when you get to the part where you tap Effects and have selected the Blur options, opt for a different blur filter.
With that in mind, let’s look at some funny blur effects in Picsart that you might want to try.
Motion Blur
As the name suggests, this funny blur effect looks amazing on pictures of vehicles and people in motion. All you have to do is apply the filter, then use the adjustment slider to decrease or increase the intensity of the effect.
When you choose the Motion Blur, this effect automatically colorizes your picture. You can select the color you want by dragging the hue slider; unclick the box located next to the slider to turn the colorization off completely. Your picture will turn back to the original color.
What’s more? You can play around with Noise, Angle, and Distance sliders to apply the right amount of motion blur to photos and make sure the sense of movement will go in the right direction.
Smart Blur
Smart Blur gives your photos a luxurious sheen; it blurs out details to make subjects appear less real and a bit more unnaturally perfect. You can consider it a magazine finish.
Radial Blur
This blur effect allows you to turn photos into a spinning vortex. It allows you to create a circle of blur effect around a focal point in photos. Every circle has a focal point, and you can move the center of the blur by dragging the crosshairs located in the middle of the blur.
Objects in your image will bend with the curve of the blur; anything lying in the middle of the circling blur will become a greater point of focus. Move the Blur slider located in the effects settings menu to make your image less or more blurry Zero is the minimum, while 20 is the maximum.
You can try to apply the Radial Blur effect to automobiles, trains, and planes to intensify their velocity effect.
Focal Blur
Focal blur is a radial effect that warps the dimensions of your picture a little for an in-motion look. It’s perfect for images that have subjects in high-speed settings.
Conclusion
● Nowadays, the blur effect is a common thing that it’s difficult to believe that it used to be regarded as a sign of flawed photography. Photo blurring became widely acknowledged as legit in the late Nineties, and even an aspirational technique called bokeh, a Japanese term that loosely translates as blur quality.
● A quick scan of social media imagery shows how popular it has become over the years. You might have been looking in envy at those dreamy and hazy photos asking yourself: How did the photographer manage this? The answer is Picsart.
● This application has made blurring faces and backgrounds in photos a breeze. That means you can now easily reproduce the blur effect on your photography. The best part is: It is quick and simple to achieve this. Whether you want to hide distracting elements or highlight a figure in the foreground, Picsart can help.
Applying a blur effect on a face using Picsart allows you to change the focus of a photo. It is like going back to when you took the picture and intentionally pulling a part of it out of focus to highlight your subject better. Essentially, learning how to blur faces in Picsart will help you accentuate a part of a picture and draw the eye of the viewer to the in-focus part that you would like them to notice first.
In this article
02 The Formula for Picsart’s Success
03 How to Blur Faces in Picsart
04 Funny Blur Effects in Picsart
What Is Picsart?
Picsart is a feature-rich photo and video editor for Android and iOS mobile devices. It’s also available as a Windows Universal application for desktop and mobile. With over one billion downloads across 180 countries to date, Picsart is one of the most popular applications in the world.
The app allows you to edit your videos and photos with trendy effects and filters, easy-to-use templates, cool collages, fun stickers, share your images on Picsart and various social networks, and much more. You can pull a picture from the photo library or snap a new one.
With an image on-screen, use the buttons located underneath the interface to play with various features of the application. You can reset your photo to its original state, undo the last action, see after and before views of your image, reveal more controls with the plus button, and pinch to zoom. Every effect offers adjustability through sliders and a brush that allows you to choose where to remove or apply the effect.
The app has numerous easy-to-use editing tools designed to take images from simple to breathtaking in no time. Picsart is ideal for any experience level, and millions of people worldwide turn to the powerful tools this app offers to express themselves through art.
It is free to use this app, and there is a great selection of free content. However, there are in-app purchases for frames, fonts, stickers, and clipart sets, most of which cost $1.99 or 99 cents. You try out Picsart to get a taste of what the app can do without setting up an account.

The Formula for Picsart’s Success
This application takes an opposite approach to image enhancing from other platforms like Instagram. While the latter emphasizes simplicity, Picsart offers an expansive selection of image-editing options. The app’s filters are more adjustable and provide near-Photoshop-level tools, such as masks, curves, clone stamps, and layers. Clip art and drawing tools make Picsart far more than a photo application.
Applying a blur effect to images has never been easier with Picsart. This online photo editor features a helpful suite of simple and intuitive editing tools powerful enough to help users produce great images that they can share with their friends and families on social media. Learning how to blur face in Picsart is among the most versatile editing techniques you can use to make eye-catching edits. With this app, you can easily use the Blur image tool and achieve instantaneous and impressive results.

How to Blur Faces in Picsart
Social media platforms are more invasive than before with tagging and linking personal detail with photos. In some cases, like with young children, you might not want these photos to be available online. It is a good thing that Picsart allows you to blur faces in pictures.
Additionally, all photos need to draw the eye of the viewer to something specific. Blurring the extraneous details like faces allows you to emphasize that central focus. Wondering how to blur face in Picsart? Follow the steps below:
- Download and install Picsart on your device.
- Launch the app, then press the plus sign to upload the picture you would like to blur.
- Click on Tools and press Selection; this will pull up the selection tools. Here, you will be able to pick out the area you want to Picsart blur face.
- Press Select, then Face. The app AI tool will select the face in the picture and highlight it in red.
- In the top menu, tap on Effects.
- Now, select the Blur option to open the available range of blur tools. Choose the blur filter that you prefer (Motion Blur, Smart Blur, Lens Blur, Radial Blur, Focal Zoom, Blur, and GBlur). Doing this will undoubtedly blur face Picsart.
- You can adjust the blur settings manually by tapping and holding on to one of the filters in the above step.
- If you are satisfied with the blur effect, tap Apply to save the changes. At this point, you can still modify your work, but ensure you have applied your changes in every step to save the modifications.
Now that you have blurred out the face in your photo, it is time to click the Next button to save and export the picture or post it online.
You can send it via email from within the Picsart app application. Alternatively, you can share it with Flickr, Twitter, Facebook, or Dropbox. You can also display the image on the platform for other Picsart users to see. The Picsart community has tons of images to explore, making it an excellent place to browse if you are looking for new ideas. You can check and follow images of specific users, and it also features comments and like buttons.
Funny Blur Effects in Picsart
You do not always have to take yourself seriously; sometimes, you only want to create a blur effect for fun. Picsart has a range of funny blur effects that you can apply to your image and have a whale of a time. These effects do not mirror reality but give your picture a cinematic look. Follow the steps above, but when you get to the part where you tap Effects and have selected the Blur options, opt for a different blur filter.
With that in mind, let’s look at some funny blur effects in Picsart that you might want to try.
Motion Blur
As the name suggests, this funny blur effect looks amazing on pictures of vehicles and people in motion. All you have to do is apply the filter, then use the adjustment slider to decrease or increase the intensity of the effect.
When you choose the Motion Blur, this effect automatically colorizes your picture. You can select the color you want by dragging the hue slider; unclick the box located next to the slider to turn the colorization off completely. Your picture will turn back to the original color.
What’s more? You can play around with Noise, Angle, and Distance sliders to apply the right amount of motion blur to photos and make sure the sense of movement will go in the right direction.
Smart Blur
Smart Blur gives your photos a luxurious sheen; it blurs out details to make subjects appear less real and a bit more unnaturally perfect. You can consider it a magazine finish.
Radial Blur

This blur effect allows you to turn photos into a spinning vortex. It allows you to create a circle of blur effect around a focal point in photos. Every circle has a focal point, and you can move the center of the blur by dragging the crosshairs located in the middle of the blur.
Objects in your image will bend with the curve of the blur; anything lying in the middle of the circling blur will become a greater point of focus. Move the Blur slider located in the effects settings menu to make your image less or more blurry Zero is the minimum, while 20 is the maximum.
You can try to apply the Radial Blur effect to automobiles, trains, and planes to intensify their velocity effect.
Focal Blur
Focal blur is a radial effect that warps the dimensions of your picture a little for an in-motion look. It’s perfect for images that have subjects in high-speed settings.
Conclusion
● Nowadays, the blur effect is a common thing that it’s difficult to believe that it used to be regarded as a sign of flawed photography. Photo blurring became widely acknowledged as legit in the late Nineties, and even an aspirational technique called bokeh, a Japanese term that loosely translates as blur quality.
● A quick scan of social media imagery shows how popular it has become over the years. You might have been looking in envy at those dreamy and hazy photos asking yourself: How did the photographer manage this? The answer is Picsart.
● This application has made blurring faces and backgrounds in photos a breeze. That means you can now easily reproduce the blur effect on your photography. The best part is: It is quick and simple to achieve this. Whether you want to hide distracting elements or highlight a figure in the foreground, Picsart can help.
Applying a blur effect on a face using Picsart allows you to change the focus of a photo. It is like going back to when you took the picture and intentionally pulling a part of it out of focus to highlight your subject better. Essentially, learning how to blur faces in Picsart will help you accentuate a part of a picture and draw the eye of the viewer to the in-focus part that you would like them to notice first.
In this article
02 The Formula for Picsart’s Success
03 How to Blur Faces in Picsart
04 Funny Blur Effects in Picsart
What Is Picsart?
Picsart is a feature-rich photo and video editor for Android and iOS mobile devices. It’s also available as a Windows Universal application for desktop and mobile. With over one billion downloads across 180 countries to date, Picsart is one of the most popular applications in the world.
The app allows you to edit your videos and photos with trendy effects and filters, easy-to-use templates, cool collages, fun stickers, share your images on Picsart and various social networks, and much more. You can pull a picture from the photo library or snap a new one.
With an image on-screen, use the buttons located underneath the interface to play with various features of the application. You can reset your photo to its original state, undo the last action, see after and before views of your image, reveal more controls with the plus button, and pinch to zoom. Every effect offers adjustability through sliders and a brush that allows you to choose where to remove or apply the effect.
The app has numerous easy-to-use editing tools designed to take images from simple to breathtaking in no time. Picsart is ideal for any experience level, and millions of people worldwide turn to the powerful tools this app offers to express themselves through art.
It is free to use this app, and there is a great selection of free content. However, there are in-app purchases for frames, fonts, stickers, and clipart sets, most of which cost $1.99 or 99 cents. You try out Picsart to get a taste of what the app can do without setting up an account.
The Formula for Picsart’s Success
This application takes an opposite approach to image enhancing from other platforms like Instagram. While the latter emphasizes simplicity, Picsart offers an expansive selection of image-editing options. The app’s filters are more adjustable and provide near-Photoshop-level tools, such as masks, curves, clone stamps, and layers. Clip art and drawing tools make Picsart far more than a photo application.
Applying a blur effect to images has never been easier with Picsart. This online photo editor features a helpful suite of simple and intuitive editing tools powerful enough to help users produce great images that they can share with their friends and families on social media. Learning how to blur face in Picsart is among the most versatile editing techniques you can use to make eye-catching edits. With this app, you can easily use the Blur image tool and achieve instantaneous and impressive results.
How to Blur Faces in Picsart
Social media platforms are more invasive than before with tagging and linking personal detail with photos. In some cases, like with young children, you might not want these photos to be available online. It is a good thing that Picsart allows you to blur faces in pictures.
Additionally, all photos need to draw the eye of the viewer to something specific. Blurring the extraneous details like faces allows you to emphasize that central focus. Wondering how to blur face in Picsart? Follow the steps below:
- Download and install Picsart on your device.
- Launch the app, then press the plus sign to upload the picture you would like to blur.
- Click on Tools and press Selection; this will pull up the selection tools. Here, you will be able to pick out the area you want to Picsart blur face.
- Press Select, then Face. The app AI tool will select the face in the picture and highlight it in red.
- In the top menu, tap on Effects.

- Now, select the Blur option to open the available range of blur tools. Choose the blur filter that you prefer (Motion Blur, Smart Blur, Lens Blur, Radial Blur, Focal Zoom, Blur, and GBlur). Doing this will undoubtedly blur face Picsart.
 CollageIt Pro
- You can adjust the blur settings manually by tapping and holding on to one of the filters in the above step.
- If you are satisfied with the blur effect, tap Apply to save the changes. At this point, you can still modify your work, but ensure you have applied your changes in every step to save the modifications.
Now that you have blurred out the face in your photo, it is time to click the Next button to save and export the picture or post it online.
You can send it via email from within the Picsart app application. Alternatively, you can share it with Flickr, Twitter, Facebook, or Dropbox. You can also display the image on the platform for other Picsart users to see. The Picsart community has tons of images to explore, making it an excellent place to browse if you are looking for new ideas. You can check and follow images of specific users, and it also features comments and like buttons.
Funny Blur Effects in Picsart
You do not always have to take yourself seriously; sometimes, you only want to create a blur effect for fun. Picsart has a range of funny blur effects that you can apply to your image and have a whale of a time. These effects do not mirror reality but give your picture a cinematic look. Follow the steps above, but when you get to the part where you tap Effects and have selected the Blur options, opt for a different blur filter.
With that in mind, let’s look at some funny blur effects in Picsart that you might want to try.
Motion Blur
As the name suggests, this funny blur effect looks amazing on pictures of vehicles and people in motion. All you have to do is apply the filter, then use the adjustment slider to decrease or increase the intensity of the effect.
When you choose the Motion Blur, this effect automatically colorizes your picture. You can select the color you want by dragging the hue slider; unclick the box located next to the slider to turn the colorization off completely. Your picture will turn back to the original color.
What’s more? You can play around with Noise, Angle, and Distance sliders to apply the right amount of motion blur to photos and make sure the sense of movement will go in the right direction.
Smart Blur
Smart Blur gives your photos a luxurious sheen; it blurs out details to make subjects appear less real and a bit more unnaturally perfect. You can consider it a magazine finish.
Radial Blur
This blur effect allows you to turn photos into a spinning vortex. It allows you to create a circle of blur effect around a focal point in photos. Every circle has a focal point, and you can move the center of the blur by dragging the crosshairs located in the middle of the blur.
Objects in your image will bend with the curve of the blur; anything lying in the middle of the circling blur will become a greater point of focus. Move the Blur slider located in the effects settings menu to make your image less or more blurry Zero is the minimum, while 20 is the maximum.
You can try to apply the Radial Blur effect to automobiles, trains, and planes to intensify their velocity effect.
Focal Blur
Focal blur is a radial effect that warps the dimensions of your picture a little for an in-motion look. It’s perfect for images that have subjects in high-speed settings.
Conclusion
● Nowadays, the blur effect is a common thing that it’s difficult to believe that it used to be regarded as a sign of flawed photography. Photo blurring became widely acknowledged as legit in the late Nineties, and even an aspirational technique called bokeh, a Japanese term that loosely translates as blur quality.
● A quick scan of social media imagery shows how popular it has become over the years. You might have been looking in envy at those dreamy and hazy photos asking yourself: How did the photographer manage this? The answer is Picsart.
● This application has made blurring faces and backgrounds in photos a breeze. That means you can now easily reproduce the blur effect on your photography. The best part is: It is quick and simple to achieve this. Whether you want to hide distracting elements or highlight a figure in the foreground, Picsart can help.
- Title: Stealthy Photo Editing with Picsart
- Author: Daniel
- Created at : 2024-07-25 03:35:59
- Updated at : 2024-07-26 03:35:59
- Link: https://extra-resources.techidaily.com/stealthy-photo-editing-with-picsart/
- License: This work is licensed under CC BY-NC-SA 4.0.