
Techniques for Stunning Shadow Photography on Your iPhone
Techniques for Stunning Shadow Photography on Your iPhone
iPhone Silhouette Photography Tips

Ollie Mattison
Mar 27, 2024• Proven solutions
Silhouette photography can be a good experiment when you are looking for some out of the box photography techniques. If you think, silhouetted photo is just a dark photo, there’s much more than what you believe. Silhouetting technique has the ability to create a sense of mystery, a special feel as well as captivating shapes and leaves the viewer with a fancy to create and explore the connection with the picture. We are going to provide you some impressive tips for iPhone silhouetting so that your picture will get the same attention what you get when catch the glimpse of silhouette photo.

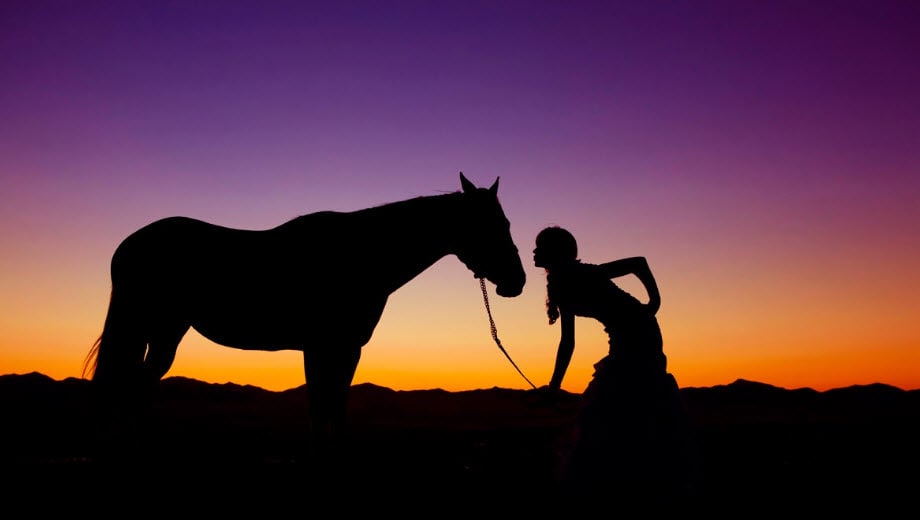
Image resource: YouTube
Tips on how to take silhouette photos with your iPhone

What makes a good silhouette?
A good silhouette image can really be good when you have some clue about it. First thing to get aware with when going for silhouetted photo is making sure what subject you choose. You should make certain that your subject carries a convincing and recognizable shape. The picture would also be compelling when taken against a setting sun, behind a curtain or sheet. Let us now get the tips and techniques in detail for perfect silhouette photography with your iPhone.
Tips
1. Light Source
Silhouette photography can be best done when the shot is taken against the source of light. The camera sensor generally fails to interpret the shadow details unlike a human eye. And therefore shooting against the light will help in providing the best silhouette effect. It simply implies keeping the subject against the sunlight or other source of light to get an automatic silhouette and shadowy effect. The most excellent way for emphasized and perfect silhouette photography is ensuring to shoot when there is low sunlight i.e. the time of sunrise and sunset.

Image source: Digital Photo Secrets
2. Low POV
A yet another tip for silhouetting effect is capturing the view from a low angle. When you will get down a little lower and capture from a low angle, it will present the picture with a plain and simple background and there will be no clumsiness related to background. The photo taken from low point or by lying down on the ground will result in position changing of the subject and adding more interest to it.
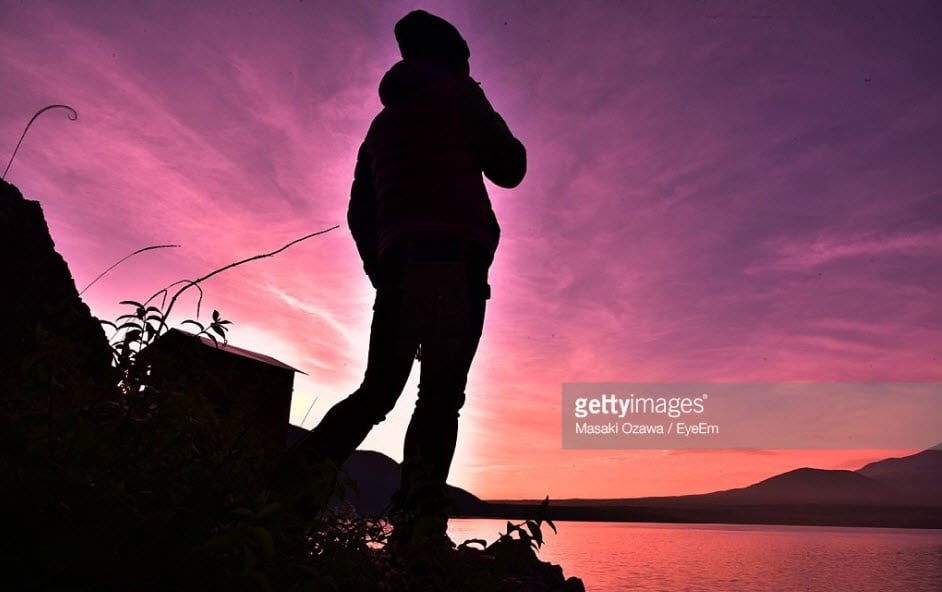
Image source: Gettyimages
3. Lucid Backgrounds
Background is one of the chief things to be considered while doing any kind of photography. When you do iPhone silhouette snapping, a mess-free background is what you should take into account. Keeping sky as the background would be perfect choice and the silhouette photography will go perfect when there are clouds in the sky. The subject will acquire a really dramatic effect. Birds and trees are other suggestions for better backdrop of your picture. In short, you should always consider the background when you desire an ideal silhouetted photo. Also, low angle shoot will work here too.

Image source: Pexels
4. Space is Essential
A very simple thing to keep in mind while going for silhouette photo moment is leaving enough space when the scene contains several subjects. This is important since it will become difficult to recognize the subject. For example, if there is a family silhouette photo, if you won’t give space, they will be difficult to identify separately in that shadowy effect. However, when shooting stationary subjects and they are very close, ensure a little change in the shooting angle. On the other hand, if shooting moving subjects, do it only when you feel a sufficient space between them.


Image source: astro-canada.ca
5. Ensuring Accurate Focus & Exposure
When you decide to take an iPhone silhouette photo, please note that iPhone offers a sound exposure that can help creating a pleasing silhouette. The device’s exposure is set automatically to the subject. In case of silhouette photography, it can happen that your subject is relatively large and when the exposure is automatically set to the subject, your silhouette picture can be destroyed ultimately fading the background. Therefore, in this case, you can just tap on the background place which is ideally the brightest part like cloud in the sky. This will in turn give a silhouette effect. Hence, setting focus and exposure accurately is necessary for processing exceptional silhouette photography.
6. Increase contrast
You can also apply post-production concept to get the remarkable silhouette effect in your snaps. This takes a little moderation in the photography after when you click it. You can use adjustments for a better silhouette effect by adding fair amount of light levels or darkness and highlight your subject. For the adjustments, increasing the contrast would be a recommended option to make the silhouette look darker and brighter. On the other hand, you can use a little amount of vignette effect at the outer range of the photo. This will bring better attention to your subject at the center and will make your silhouette photography moment perfect.

Image source: Flickr
Ollie Mattison
Ollie Mattison is a writer and a lover of all things video.
Follow @Ollie Mattison
Ollie Mattison
Mar 27, 2024• Proven solutions
Silhouette photography can be a good experiment when you are looking for some out of the box photography techniques. If you think, silhouetted photo is just a dark photo, there’s much more than what you believe. Silhouetting technique has the ability to create a sense of mystery, a special feel as well as captivating shapes and leaves the viewer with a fancy to create and explore the connection with the picture. We are going to provide you some impressive tips for iPhone silhouetting so that your picture will get the same attention what you get when catch the glimpse of silhouette photo.
Image resource: YouTube
Tips on how to take silhouette photos with your iPhone
What makes a good silhouette?
A good silhouette image can really be good when you have some clue about it. First thing to get aware with when going for silhouetted photo is making sure what subject you choose. You should make certain that your subject carries a convincing and recognizable shape. The picture would also be compelling when taken against a setting sun, behind a curtain or sheet. Let us now get the tips and techniques in detail for perfect silhouette photography with your iPhone.
Tips
1. Light Source
Silhouette photography can be best done when the shot is taken against the source of light. The camera sensor generally fails to interpret the shadow details unlike a human eye. And therefore shooting against the light will help in providing the best silhouette effect. It simply implies keeping the subject against the sunlight or other source of light to get an automatic silhouette and shadowy effect. The most excellent way for emphasized and perfect silhouette photography is ensuring to shoot when there is low sunlight i.e. the time of sunrise and sunset.
Image source: Digital Photo Secrets
2. Low POV
A yet another tip for silhouetting effect is capturing the view from a low angle. When you will get down a little lower and capture from a low angle, it will present the picture with a plain and simple background and there will be no clumsiness related to background. The photo taken from low point or by lying down on the ground will result in position changing of the subject and adding more interest to it.

Image source: Gettyimages
3. Lucid Backgrounds
Background is one of the chief things to be considered while doing any kind of photography. When you do iPhone silhouette snapping, a mess-free background is what you should take into account. Keeping sky as the background would be perfect choice and the silhouette photography will go perfect when there are clouds in the sky. The subject will acquire a really dramatic effect. Birds and trees are other suggestions for better backdrop of your picture. In short, you should always consider the background when you desire an ideal silhouetted photo. Also, low angle shoot will work here too.

Image source: Pexels
4. Space is Essential
A very simple thing to keep in mind while going for silhouette photo moment is leaving enough space when the scene contains several subjects. This is important since it will become difficult to recognize the subject. For example, if there is a family silhouette photo, if you won’t give space, they will be difficult to identify separately in that shadowy effect. However, when shooting stationary subjects and they are very close, ensure a little change in the shooting angle. On the other hand, if shooting moving subjects, do it only when you feel a sufficient space between them.
Image source: astro-canada.ca
5. Ensuring Accurate Focus & Exposure
When you decide to take an iPhone silhouette photo, please note that iPhone offers a sound exposure that can help creating a pleasing silhouette. The device’s exposure is set automatically to the subject. In case of silhouette photography, it can happen that your subject is relatively large and when the exposure is automatically set to the subject, your silhouette picture can be destroyed ultimately fading the background. Therefore, in this case, you can just tap on the background place which is ideally the brightest part like cloud in the sky. This will in turn give a silhouette effect. Hence, setting focus and exposure accurately is necessary for processing exceptional silhouette photography.
6. Increase contrast
You can also apply post-production concept to get the remarkable silhouette effect in your snaps. This takes a little moderation in the photography after when you click it. You can use adjustments for a better silhouette effect by adding fair amount of light levels or darkness and highlight your subject. For the adjustments, increasing the contrast would be a recommended option to make the silhouette look darker and brighter. On the other hand, you can use a little amount of vignette effect at the outer range of the photo. This will bring better attention to your subject at the center and will make your silhouette photography moment perfect.
Image source: Flickr

Key features:
• Import from any devices and cams, including GoPro and drones. All formats supported. Сurrently the only free video editor that allows users to export in a new H265/HEVC codec, something essential for those working with 4K and HD.
• Everything for hassle-free basic editing: cut, crop and merge files, add titles and favorite music
• Visual effects, advanced color correction and trendy Instagram-like filters
• All multimedia processing done from one app: video editing capabilities reinforced by a video converter, a screen capture, a video capture, a disc burner and a YouTube uploader
• Non-linear editing: edit several files with simultaneously
• Easy export to social networks: special profiles for YouTube, Facebook, Vimeo, Twitter and Instagram
• High quality export – no conversion quality loss, double export speed even of HD files due to hardware acceleration
• Stabilization tool will turn shaky or jittery footage into a more stable video automatically.
• Essential toolset for professional video editing: blending modes, Mask tool, advanced multiple-color Chroma Key
Ollie Mattison
Ollie Mattison is a writer and a lover of all things video.
Follow @Ollie Mattison
Ollie Mattison
Mar 27, 2024• Proven solutions
Silhouette photography can be a good experiment when you are looking for some out of the box photography techniques. If you think, silhouetted photo is just a dark photo, there’s much more than what you believe. Silhouetting technique has the ability to create a sense of mystery, a special feel as well as captivating shapes and leaves the viewer with a fancy to create and explore the connection with the picture. We are going to provide you some impressive tips for iPhone silhouetting so that your picture will get the same attention what you get when catch the glimpse of silhouette photo.
Image resource: YouTube

Tips on how to take silhouette photos with your iPhone

What makes a good silhouette?
A good silhouette image can really be good when you have some clue about it. First thing to get aware with when going for silhouetted photo is making sure what subject you choose. You should make certain that your subject carries a convincing and recognizable shape. The picture would also be compelling when taken against a setting sun, behind a curtain or sheet. Let us now get the tips and techniques in detail for perfect silhouette photography with your iPhone.

Tips
1. Light Source
Silhouette photography can be best done when the shot is taken against the source of light. The camera sensor generally fails to interpret the shadow details unlike a human eye. And therefore shooting against the light will help in providing the best silhouette effect. It simply implies keeping the subject against the sunlight or other source of light to get an automatic silhouette and shadowy effect. The most excellent way for emphasized and perfect silhouette photography is ensuring to shoot when there is low sunlight i.e. the time of sunrise and sunset.

Image source: Digital Photo Secrets
2. Low POV
A yet another tip for silhouetting effect is capturing the view from a low angle. When you will get down a little lower and capture from a low angle, it will present the picture with a plain and simple background and there will be no clumsiness related to background. The photo taken from low point or by lying down on the ground will result in position changing of the subject and adding more interest to it.

Image source: Gettyimages
3. Lucid Backgrounds
Background is one of the chief things to be considered while doing any kind of photography. When you do iPhone silhouette snapping, a mess-free background is what you should take into account. Keeping sky as the background would be perfect choice and the silhouette photography will go perfect when there are clouds in the sky. The subject will acquire a really dramatic effect. Birds and trees are other suggestions for better backdrop of your picture. In short, you should always consider the background when you desire an ideal silhouetted photo. Also, low angle shoot will work here too.
 Lyric Video Creator Professional Version
Image source: Pexels
4. Space is Essential
A very simple thing to keep in mind while going for silhouette photo moment is leaving enough space when the scene contains several subjects. This is important since it will become difficult to recognize the subject. For example, if there is a family silhouette photo, if you won’t give space, they will be difficult to identify separately in that shadowy effect. However, when shooting stationary subjects and they are very close, ensure a little change in the shooting angle. On the other hand, if shooting moving subjects, do it only when you feel a sufficient space between them.
Image source: astro-canada.ca
5. Ensuring Accurate Focus & Exposure
When you decide to take an iPhone silhouette photo, please note that iPhone offers a sound exposure that can help creating a pleasing silhouette. The device’s exposure is set automatically to the subject. In case of silhouette photography, it can happen that your subject is relatively large and when the exposure is automatically set to the subject, your silhouette picture can be destroyed ultimately fading the background. Therefore, in this case, you can just tap on the background place which is ideally the brightest part like cloud in the sky. This will in turn give a silhouette effect. Hence, setting focus and exposure accurately is necessary for processing exceptional silhouette photography.
6. Increase contrast
You can also apply post-production concept to get the remarkable silhouette effect in your snaps. This takes a little moderation in the photography after when you click it. You can use adjustments for a better silhouette effect by adding fair amount of light levels or darkness and highlight your subject. For the adjustments, increasing the contrast would be a recommended option to make the silhouette look darker and brighter. On the other hand, you can use a little amount of vignette effect at the outer range of the photo. This will bring better attention to your subject at the center and will make your silhouette photography moment perfect.
Image source: Flickr
Ollie Mattison
Ollie Mattison is a writer and a lover of all things video.
Follow @Ollie Mattison
Ollie Mattison
Mar 27, 2024• Proven solutions
Silhouette photography can be a good experiment when you are looking for some out of the box photography techniques. If you think, silhouetted photo is just a dark photo, there’s much more than what you believe. Silhouetting technique has the ability to create a sense of mystery, a special feel as well as captivating shapes and leaves the viewer with a fancy to create and explore the connection with the picture. We are going to provide you some impressive tips for iPhone silhouetting so that your picture will get the same attention what you get when catch the glimpse of silhouette photo.
Image resource: YouTube
Tips on how to take silhouette photos with your iPhone
What makes a good silhouette?
A good silhouette image can really be good when you have some clue about it. First thing to get aware with when going for silhouetted photo is making sure what subject you choose. You should make certain that your subject carries a convincing and recognizable shape. The picture would also be compelling when taken against a setting sun, behind a curtain or sheet. Let us now get the tips and techniques in detail for perfect silhouette photography with your iPhone.
Tips
1. Light Source
Silhouette photography can be best done when the shot is taken against the source of light. The camera sensor generally fails to interpret the shadow details unlike a human eye. And therefore shooting against the light will help in providing the best silhouette effect. It simply implies keeping the subject against the sunlight or other source of light to get an automatic silhouette and shadowy effect. The most excellent way for emphasized and perfect silhouette photography is ensuring to shoot when there is low sunlight i.e. the time of sunrise and sunset.
 Jet Profiler for MySQL, Enterprise Version: Jet Profiler for MySQL is real-time query performance and diagnostics tool for the MySQL database server. Its detailed query information, graphical interface and ease of use makes this a great tool for finding performance bottlenecks in your MySQL databases.
Image source: Digital Photo Secrets
2. Low POV
A yet another tip for silhouetting effect is capturing the view from a low angle. When you will get down a little lower and capture from a low angle, it will present the picture with a plain and simple background and there will be no clumsiness related to background. The photo taken from low point or by lying down on the ground will result in position changing of the subject and adding more interest to it.
Image source: Gettyimages
3. Lucid Backgrounds
Background is one of the chief things to be considered while doing any kind of photography. When you do iPhone silhouette snapping, a mess-free background is what you should take into account. Keeping sky as the background would be perfect choice and the silhouette photography will go perfect when there are clouds in the sky. The subject will acquire a really dramatic effect. Birds and trees are other suggestions for better backdrop of your picture. In short, you should always consider the background when you desire an ideal silhouetted photo. Also, low angle shoot will work here too.
Image source: Pexels
4. Space is Essential
A very simple thing to keep in mind while going for silhouette photo moment is leaving enough space when the scene contains several subjects. This is important since it will become difficult to recognize the subject. For example, if there is a family silhouette photo, if you won’t give space, they will be difficult to identify separately in that shadowy effect. However, when shooting stationary subjects and they are very close, ensure a little change in the shooting angle. On the other hand, if shooting moving subjects, do it only when you feel a sufficient space between them.
Image source: astro-canada.ca
5. Ensuring Accurate Focus & Exposure
When you decide to take an iPhone silhouette photo, please note that iPhone offers a sound exposure that can help creating a pleasing silhouette. The device’s exposure is set automatically to the subject. In case of silhouette photography, it can happen that your subject is relatively large and when the exposure is automatically set to the subject, your silhouette picture can be destroyed ultimately fading the background. Therefore, in this case, you can just tap on the background place which is ideally the brightest part like cloud in the sky. This will in turn give a silhouette effect. Hence, setting focus and exposure accurately is necessary for processing exceptional silhouette photography.
6. Increase contrast
You can also apply post-production concept to get the remarkable silhouette effect in your snaps. This takes a little moderation in the photography after when you click it. You can use adjustments for a better silhouette effect by adding fair amount of light levels or darkness and highlight your subject. For the adjustments, increasing the contrast would be a recommended option to make the silhouette look darker and brighter. On the other hand, you can use a little amount of vignette effect at the outer range of the photo. This will bring better attention to your subject at the center and will make your silhouette photography moment perfect.
Image source: Flickr
Ollie Mattison
Ollie Mattison is a writer and a lover of all things video.
Follow @Ollie Mattison
- Title: Techniques for Stunning Shadow Photography on Your iPhone
- Author: Daniel
- Created at : 2024-07-25 04:22:40
- Updated at : 2024-07-26 04:22:40
- Link: https://extra-resources.techidaily.com/techniques-for-stunning-shadow-photography-on-your-iphone/
- License: This work is licensed under CC BY-NC-SA 4.0.