
The Key to Dramatic Contrast in HDR Portrait Photography
The Key to Dramatic Contrast in HDR Portrait Photography
HDR or high dynamic range photography is a method that allows us to blend several photos to get extreme light and shadow details that we can’t get in a single shot. We capture multiple images of the same subject or a scene with slightly different exposure and then mix all the images into a final perfect photograph.
A portrait is one of the most liked genres of photography, especially on the occasions of weddings, get-togethers, meet-ups, and many more. A good portrait photograph can capture a person’s detailed personality and emotions.
The camera can perform fantastic functions, but it is still a machine at the end of the day, and its sensors have limitations. But by the HDR technique, you can create a scene closer to what the human eye sees.
In this article, you’ll learn how to shoot and create impressive HDR portraits, whether a beginner or a professional. We have written about creating both still and moving HDR portraits in an easy way.
People often find it challenging to shoot a perfect HDR photograph from a phone camera. In this tutorial, we will answer some common questions on how to create an impressive HDR portrait. So let’s get started.
How to Shoot HDR Portraits?
HDR portraits are best captured when your subject is still and the camera is also fixed on a tripod. So first, we will talk about how to shoot still portraits and then moving portraits.

Still HDR Portraits
You can create a high-quality HDR portrait by following these simple steps.
Step1Camera Setting
The first and most crucial part of your camera setting is to choose between two modes, i.e., manual or aperture mode. We have compared these two below so you can choose whichever way fits your situation.
| Manual mode | Aperture Mode |
|---|---|
| In manual mode, you can control both aperture and shutter speed and select any desired value. | In this mode, you just have to select your desired aperture value, like f/2.0 or f/1.8, and the camera will automatically pick the suitable shutter speed. |
| It can be used when the lighting conditions are intense and constant, and you have plenty of time to think and adjust the exposure. | Useful when the light conditions are changing rapidly. It selects the best suitable exposure itself and has the advantage of speed. |
| You have more control over your camera settings. | The camera itself matches the aperture value with the appropriate shutter speed. |
| Suitable for professionals. | Suitable for beginners. |
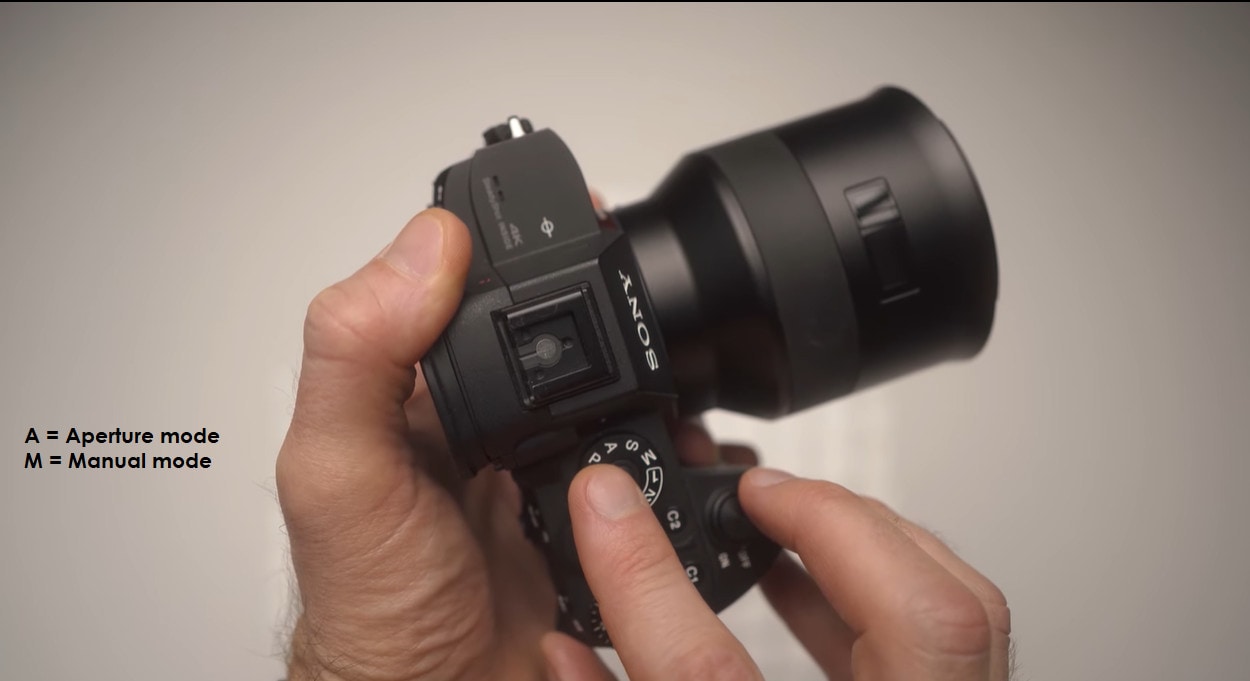
So it is your choice which mode you want to use. Both work perfectly with HDR photography.
Step2Bracketing
HDR photography uses the technique of bracketing in which multiple shots of the same subject are taken using different camera contrast settings and then merging these images to get a final result.
You can take numerous pictures manually by selecting a new exposure after every photo. Still, it is very time-consuming, and the chances of the subject moving during the shoot also increase.
So almost all DSLRs come with this beneficial feature of bracketing. You can check the user manual of your device to activate this feature. For some devices, it is started by a single click, while in some, it is hidden deep in the menu. Once you start it, you have to select the number of images you want to take and the increase in exposure after every snap.
Usually, three shots are ideal for HDR portraits as the chances of moving decrease. Nowadays, many latest DSLRs have the option of automatic exposure bracketing as it provides the photographer with different levels of exposure in a single click without spending valuable time adjusting camera settings.

Once you are done with your bracketing settings, all you have to do is press and hold the shutter, and your specified number of photos will be taken, each with a different exposure value.
Some Useful Tips to Remember
- Try to Keep the Subject Still
HDR portrait shooting takes time as you have to take 3-5 images of your subject. So you have to keep your subject still in every frame; otherwise, your final image will not be good.
To avoid moving, you can give them some support to lean on, like a wall, or ask them to sit on a chair.
- Avoid Shaking the Camera
Same is the case for your camera. You have to use a tripod stand to avoid camera shaking.
- Autofocus should be OFF
You should adjust the focus manually instead of autofocus, as it may shift the focus accidentally while pressing the shutter.

 Software Update Pro - Check and update software installed on your computer.
HDR Effects on Phone Camera
Of course, everyone can’t use a DSLR camera for shooting HDR portraits as the process is a bit difficult and requires some expertise. But you can achieve the same effects on your mobile phone. Many latest mobiles offer HDR features in their camera. Unlike the bracketing effect of professional cameras, mobile usually takes only one picture and then you can edit by using some third-party app. Hundreds of these photo editing apps allow you to change the brightness and contrast of your image to create a “pseudo” HDR image.
Now that you know how to shoot still HDR portraits, let’s put some light on shooting HDR moving portraits.
Moving HDR Portraits?
People usually ask, “ Can I shoot moving subjects in HDR?“ or “What is the basic method to get sharp-looking HDR photos of moving people?“
Shooting moving portraits in HDR can get a bit difficult because of blurring and exposure issues. But you don’t need to worry because here are some of the effective solutions for recording moving HDR portraits.
Solution 1. You can use two DSLRs with the same lens and set them so that the difference in the viewing angle is minimum.
Solution 2. Using RAW files you can get a dynamic range of exposures that you wouldn’t be able to get with a JPEG file.
Solution 3. DSLRs with high-quality exposure and depth sensors can also help shoot HDR moving portraits.
How to Edit and Merge Images to Create an HDR Portrait?
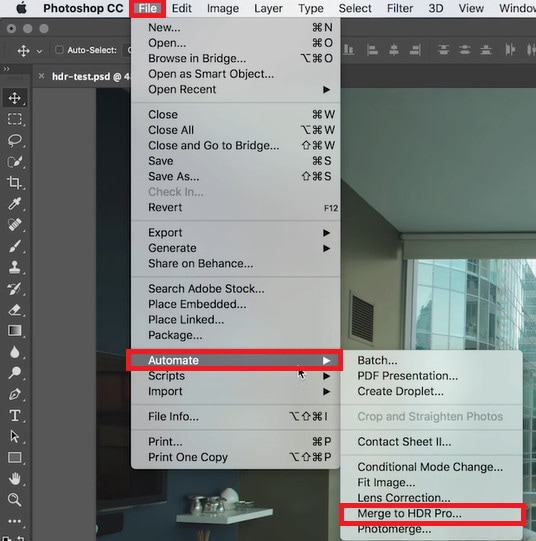
After you have shot the images, the next step is to merge and edit them on photoshop or any other software to create a single perfect portrait.
Step1Merging the Images
Hundreds of editing software are available but here we are going to talk about photoshop as it is used worldwide and is user-friendly.
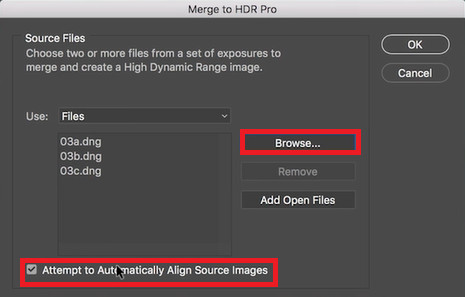
- First, when you open Photoshop, go to Files > Automate > Merge to HDR pro, Or click on Tools > Photoshop > Merge to HDR pro
- Click on Browse and select the images you want to merge.
- Before clicking the OK button, you can tick on the Attempt to Automatically Align Source Images option so that minor artifacts introduced while shooting the images can be removed by photoshop.
- After the images are loaded, a dialogue box will appear on the right side with all the tools you need to edit your HDR portrait.
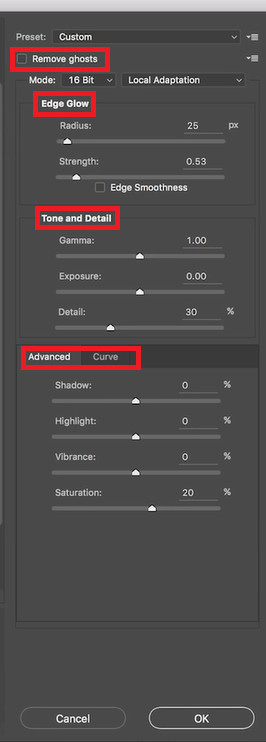
- Tick on the option of Remove ghosts to avoid any halos in the editing process.
- For regular HDR portraits, select 16 Bit mode in the first section.
- The second section is Edge Glow. If you want a natural-looking portrait photo, you should decrease the Strength and Radius levels; otherwise, you can increase them according to your need.
- Next, you have the Tone and Detail Reducing the Gamma adds more contrast to your image and vice versa. Exposure is simply the brightness of the image. The Detail option adds an HDR effect to your image, but you should avoid over-detailing as it may ruin the natural look of your portrait.
- Finally, there is the option of Advanced and Curve, in which you can adjust the levels of Shadow, Highlights, Vibrance, and Saturation of your image.
Once you are done with all the adjustments, you’ll finally have your perfect HDR portrait.
Step2Editing the Portrait
If you are not satisfied with your resulting portrait image, you can further edit it in Lightroom or Photoshop.
Final Words
HDR portraits are way better than conventional portrait images as they bring out the photograph’s fine details that are impossible to achieve otherwise.
It is not as difficult as it seems to shoot an HDR portrait. We have made it as simple as we can for you people. So go outside and try this fantastic genre of photography, explore the limits of your camera and create some striking HDR portraits.
Free Download For Win 7 or later(64-bit)
Free Download For macOS 10.14 or later
How to Shoot HDR Portraits?
HDR portraits are best captured when your subject is still and the camera is also fixed on a tripod. So first, we will talk about how to shoot still portraits and then moving portraits.

Still HDR Portraits
You can create a high-quality HDR portrait by following these simple steps.
Step1Camera Setting
The first and most crucial part of your camera setting is to choose between two modes, i.e., manual or aperture mode. We have compared these two below so you can choose whichever way fits your situation.
| Manual mode | Aperture Mode |
|---|---|
| In manual mode, you can control both aperture and shutter speed and select any desired value. | In this mode, you just have to select your desired aperture value, like f/2.0 or f/1.8, and the camera will automatically pick the suitable shutter speed. |
| It can be used when the lighting conditions are intense and constant, and you have plenty of time to think and adjust the exposure. | Useful when the light conditions are changing rapidly. It selects the best suitable exposure itself and has the advantage of speed. |
| You have more control over your camera settings. | The camera itself matches the aperture value with the appropriate shutter speed. |
| Suitable for professionals. | Suitable for beginners. |
So it is your choice which mode you want to use. Both work perfectly with HDR photography.
Step2Bracketing
HDR photography uses the technique of bracketing in which multiple shots of the same subject are taken using different camera contrast settings and then merging these images to get a final result.
You can take numerous pictures manually by selecting a new exposure after every photo. Still, it is very time-consuming, and the chances of the subject moving during the shoot also increase.
So almost all DSLRs come with this beneficial feature of bracketing. You can check the user manual of your device to activate this feature. For some devices, it is started by a single click, while in some, it is hidden deep in the menu. Once you start it, you have to select the number of images you want to take and the increase in exposure after every snap.
Usually, three shots are ideal for HDR portraits as the chances of moving decrease. Nowadays, many latest DSLRs have the option of automatic exposure bracketing as it provides the photographer with different levels of exposure in a single click without spending valuable time adjusting camera settings.
Once you are done with your bracketing settings, all you have to do is press and hold the shutter, and your specified number of photos will be taken, each with a different exposure value.
Some Useful Tips to Remember
- Try to Keep the Subject Still
HDR portrait shooting takes time as you have to take 3-5 images of your subject. So you have to keep your subject still in every frame; otherwise, your final image will not be good.
To avoid moving, you can give them some support to lean on, like a wall, or ask them to sit on a chair.
- Avoid Shaking the Camera
Same is the case for your camera. You have to use a tripod stand to avoid camera shaking.
- Autofocus should be OFF
You should adjust the focus manually instead of autofocus, as it may shift the focus accidentally while pressing the shutter.
HDR Effects on Phone Camera
Of course, everyone can’t use a DSLR camera for shooting HDR portraits as the process is a bit difficult and requires some expertise. But you can achieve the same effects on your mobile phone. Many latest mobiles offer HDR features in their camera. Unlike the bracketing effect of professional cameras, mobile usually takes only one picture and then you can edit by using some third-party app. Hundreds of these photo editing apps allow you to change the brightness and contrast of your image to create a “pseudo” HDR image.
Now that you know how to shoot still HDR portraits, let’s put some light on shooting HDR moving portraits.
Moving HDR Portraits?
People usually ask, “ Can I shoot moving subjects in HDR?“ or “What is the basic method to get sharp-looking HDR photos of moving people?“
Shooting moving portraits in HDR can get a bit difficult because of blurring and exposure issues. But you don’t need to worry because here are some of the effective solutions for recording moving HDR portraits.
Solution 1. You can use two DSLRs with the same lens and set them so that the difference in the viewing angle is minimum.
Solution 2. Using RAW files you can get a dynamic range of exposures that you wouldn’t be able to get with a JPEG file.
Solution 3. DSLRs with high-quality exposure and depth sensors can also help shoot HDR moving portraits.
How to Edit and Merge Images to Create an HDR Portrait?
After you have shot the images, the next step is to merge and edit them on photoshop or any other software to create a single perfect portrait.
Step1Merging the Images
Hundreds of editing software are available but here we are going to talk about photoshop as it is used worldwide and is user-friendly.
- First, when you open Photoshop, go to Files > Automate > Merge to HDR pro, Or click on Tools > Photoshop > Merge to HDR pro
- Click on Browse and select the images you want to merge.
- Before clicking the OK button, you can tick on the Attempt to Automatically Align Source Images option so that minor artifacts introduced while shooting the images can be removed by photoshop.

- After the images are loaded, a dialogue box will appear on the right side with all the tools you need to edit your HDR portrait.
- Tick on the option of Remove ghosts to avoid any halos in the editing process.
- For regular HDR portraits, select 16 Bit mode in the first section.
- The second section is Edge Glow. If you want a natural-looking portrait photo, you should decrease the Strength and Radius levels; otherwise, you can increase them according to your need.
- Next, you have the Tone and Detail Reducing the Gamma adds more contrast to your image and vice versa. Exposure is simply the brightness of the image. The Detail option adds an HDR effect to your image, but you should avoid over-detailing as it may ruin the natural look of your portrait.
- Finally, there is the option of Advanced and Curve, in which you can adjust the levels of Shadow, Highlights, Vibrance, and Saturation of your image.
Once you are done with all the adjustments, you’ll finally have your perfect HDR portrait.
Step2Editing the Portrait
If you are not satisfied with your resulting portrait image, you can further edit it in Lightroom or Photoshop.
Final Words
HDR portraits are way better than conventional portrait images as they bring out the photograph’s fine details that are impossible to achieve otherwise.
It is not as difficult as it seems to shoot an HDR portrait. We have made it as simple as we can for you people. So go outside and try this fantastic genre of photography, explore the limits of your camera and create some striking HDR portraits.
Free Download For Win 7 or later(64-bit)
Free Download For macOS 10.14 or later
- Title: The Key to Dramatic Contrast in HDR Portrait Photography
- Author: Daniel
- Created at : 2024-07-25 01:41:20
- Updated at : 2024-07-26 01:41:20
- Link: https://extra-resources.techidaily.com/the-key-to-dramatic-contrast-in-hdr-portrait-photography/
- License: This work is licensed under CC BY-NC-SA 4.0.