![[Updated] A Comprehensive Guide to Subtitle Sharing on Tumblr and Discord](https://thmb.techidaily.com/ce80644caee7b986767dc148a3626afb6dedcf8d303ed5814c688bdf2e6498bb.jpg)
[Updated] A Comprehensive Guide to Subtitle Sharing on Tumblr and Discord
A Comprehensive Guide to Subtitle Sharing on Tumblr and Discord
If you’re a content creator, then you should know the importance of adding subtitles to your videos.
Today, a lot of social media users, especially on Facebook, tend to watch videos without turning on the sounds. But the big question is ‘If your audience doesn’t turn on the sound of your videos, how do they get the message you’re trying to pass?” Well, this is why adding ‘Subtitles’ to your videos is crucial. However, for a subtitle to work, it needs to comply with the structure of a video player or any platform you intend to use it on. And fortunately, SRT is a universal format, making it usable on any social media platform.
In this guide, you’ll be introduced to the simple methods you can utilize to upload SRT files to social media platforms including YouTube, Twitter, Facebook, etc. But before we proceed, let’s take a look at an overview of the different social media platforms and the subtitle file formats they support.
| Social Media Platform | SRT | VTT | STL | SSA |
|---|---|---|---|---|
| YouTube | ||||
| Vimeo | ||||
From the overview table above, it’s obvious you can easily create one SRT file and easily use it on different social media channels. This saves you the stress of creating different subtitle files for each platform. So, without further ado, let’s dive in to find out how to upload and add .srt files to different social media platforms.
Part 1: Upload SRT Files to YouTube Videos
If you’re a YouTube video content creator, but you still don’t know the benefit of adding subtitles to your videos, let’s give you the top two main hints on how subtitles affect your videos;
- Subtitles help your videos to be understood not only by folks who hear and see but also by folks who have hearing problems. Hence helping your video to reach more audience.
- You need subtitles to make your videos SEO rich as phrases in your subtitle can be used as keywords by Google when users search for stuff related to your video online.
That being said, keep in mind that SRT subtitles and CC are two different things. Although they are often used interchangeably, they are both distinct. The only similarity CC and SRT share is that they’re text version of the audio aspect of videos.
CC, also known as Close Caption the words spoken in the video, and it allows viewers understand the information being passed in a video without necessarily turning on the volume.
SRT subtitles, on the other hand, are translations of the word that’s spoken in a video. For example, if you’re streaming Korean movie, but you don’t understand the language, you’d need a translation of the dialogue at the bottom of your screen. The English translation that’s displayed on your screen is known as the SRT subtitles.
Now you know how subtitles affect your videos, and what the difference between SRT and CC are, let’s proceed to learn how to upload SRT files to YouTube videos.
Step1Sign in to your YouTube channel and locate the ‘YouTube Creator Studio’. Then select ‘Subtitles’ on the right menu.
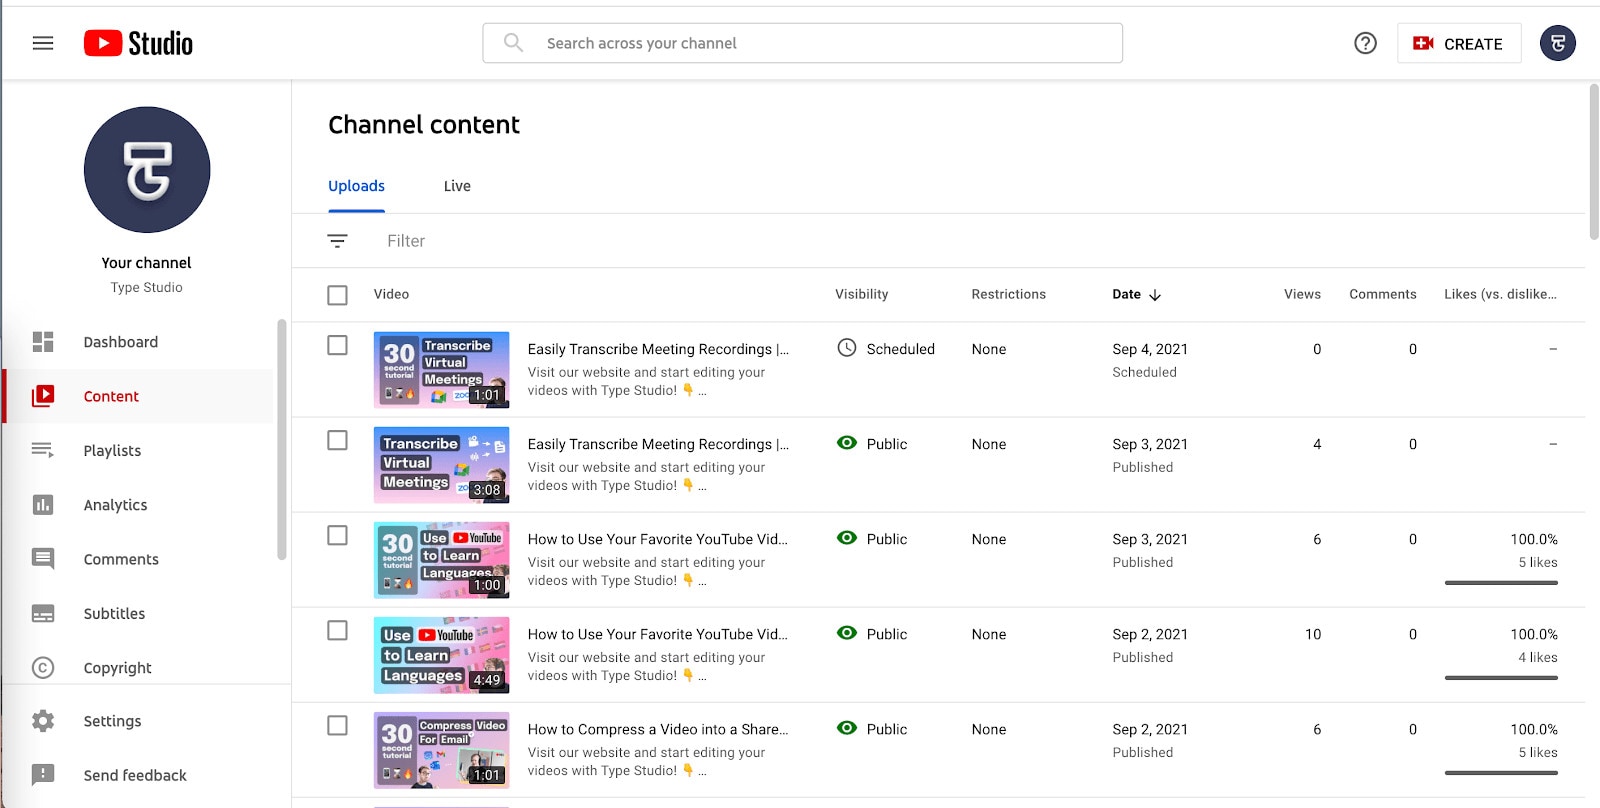
Step2Select the Video that you want to add SRT to. Then click ‘Add Language’ and select the language you wrote your Subtitle.
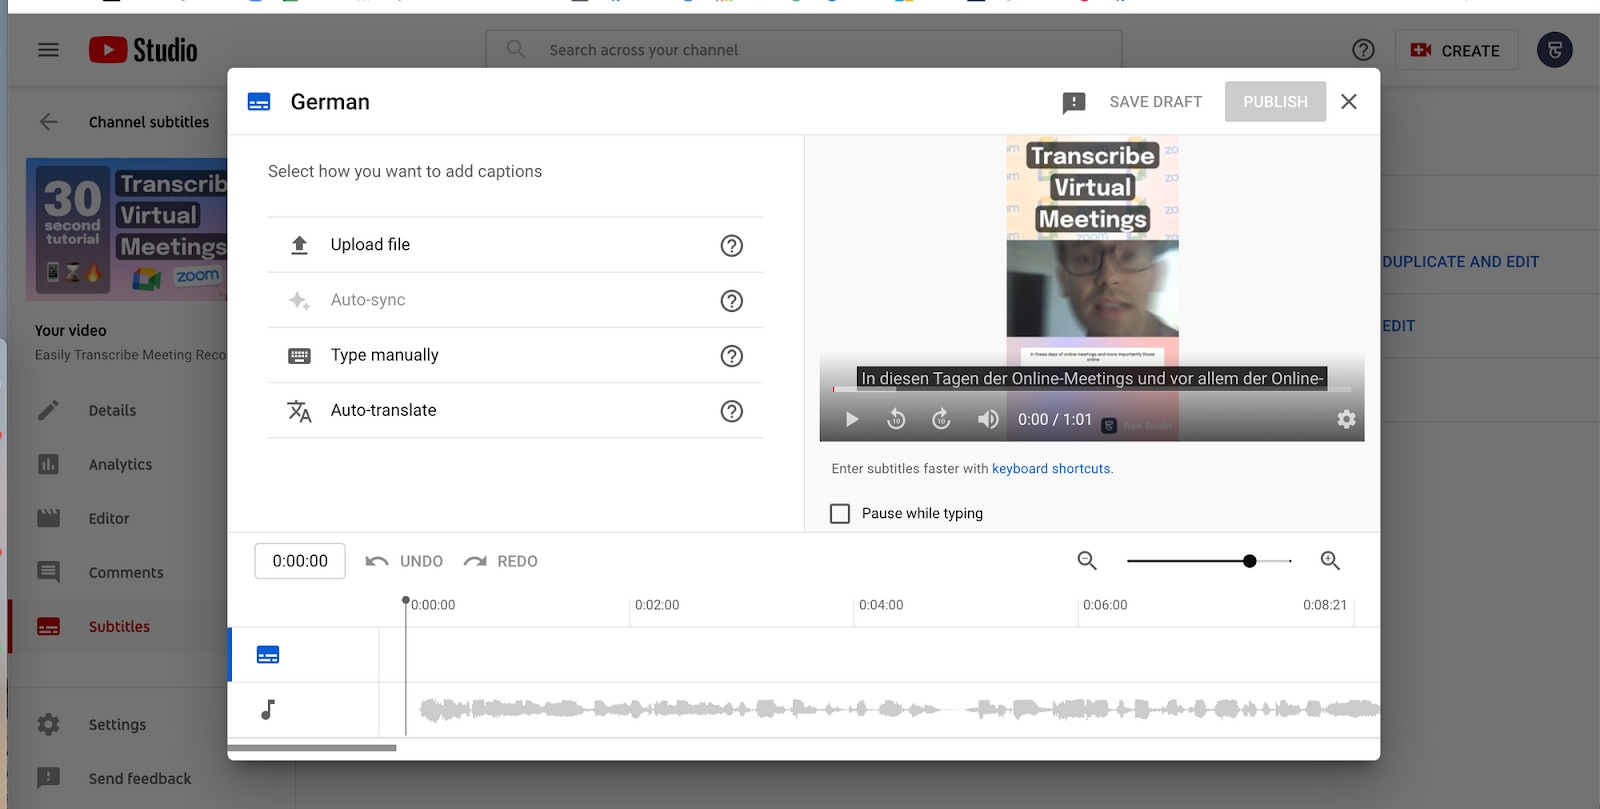
Step3Click Add under the Subtitle section and upload your SRT file through the pop-up that appears on your screen.
Part 2: Upload SRT Files to Tweets
Before now, Twitter users can only upload SRT files to video via the ‘Media Studio’, but this feature was not available to all users, making it difficult for some users to add subtitles to their videos.
However, the new version of Twitter now allows users to easily add SRT files to their tweets from the ‘Compose Tweet’ area. This made uploading SRT to tweet very straightforward. All you just have to do is to compose a tweet with your video then use the “Upload Caption File (.srt)” option to upload the SRT file. See the process to complete the action below;
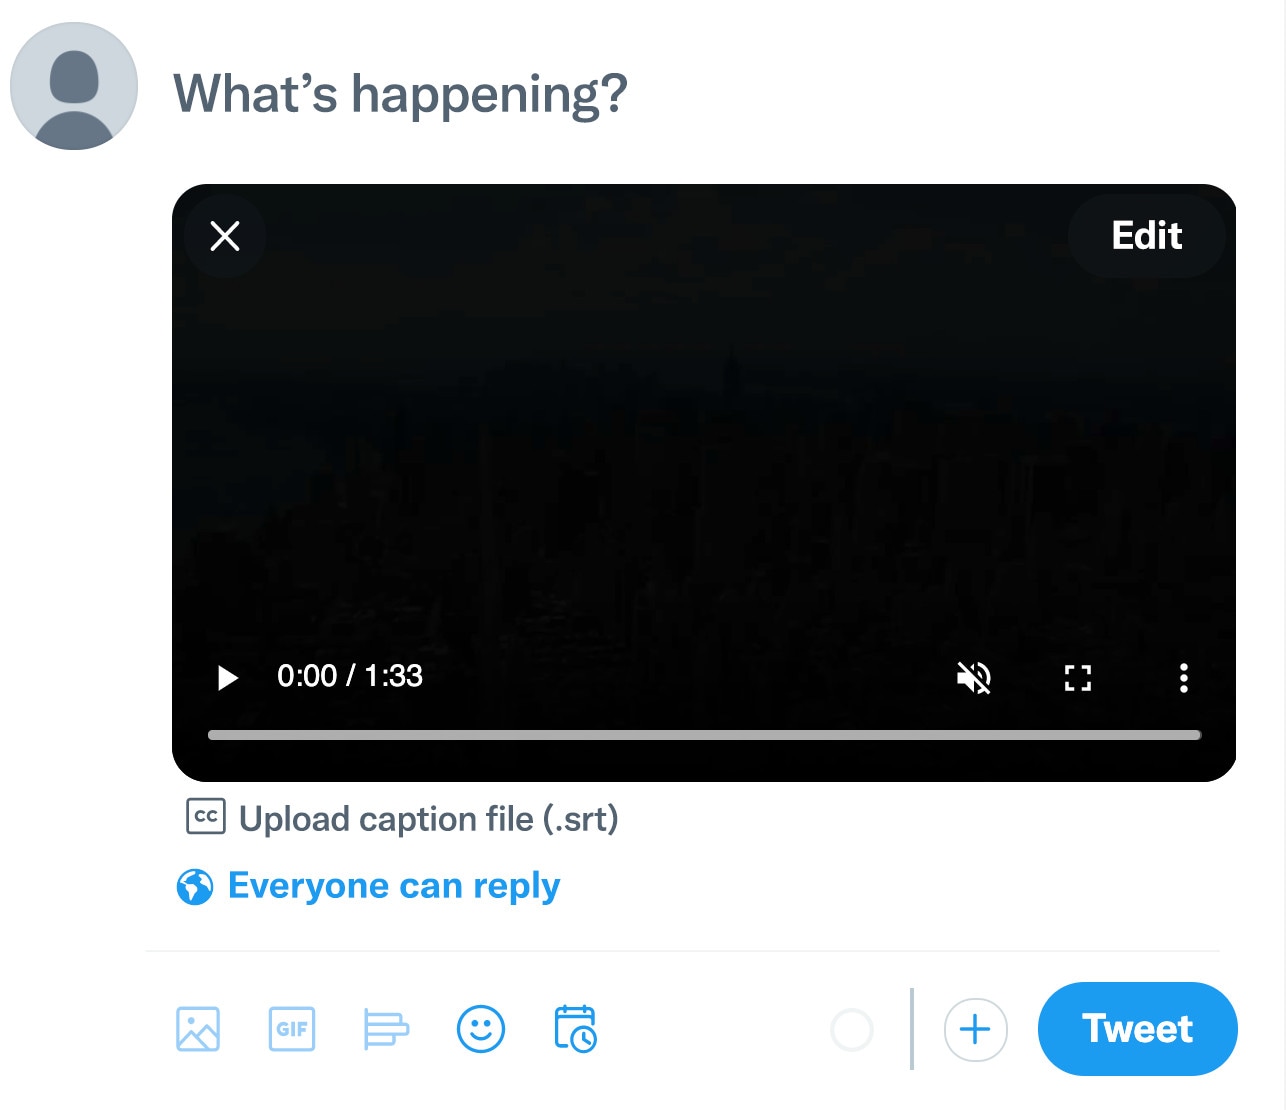
Step1Open Twitter on your device and click the relevant button to compose a new tweet.
Step2Upload the video you want to add the SRT file to. Then select ‘Upload Caption File’ (.srt) below the video.
Step3Click on ‘Upload Caption’ from the pop-up that appears on your screen. Then choose the SRT file that you want to upload.

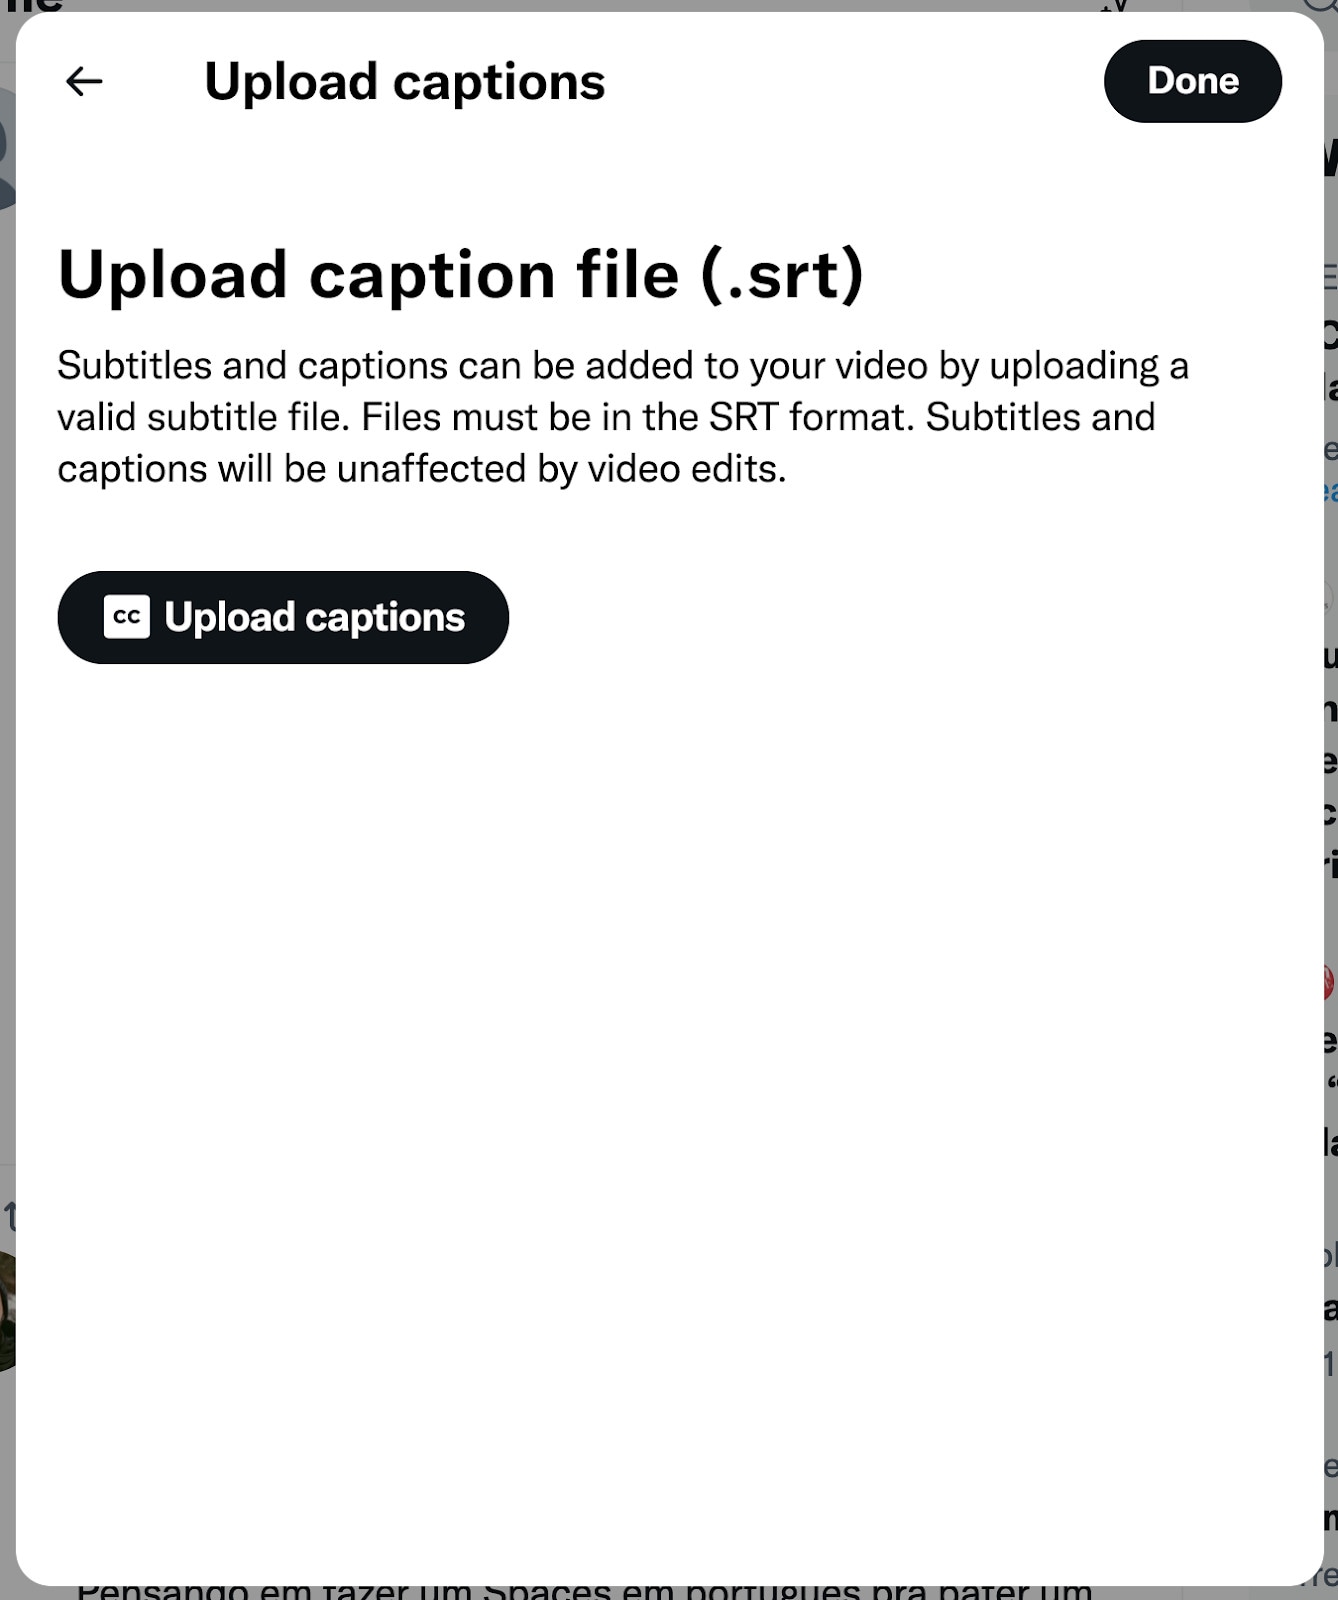
Step4Click Done. Then you’ll see the name of the language in your captions is written
Step5Now play the video to preview the subtitle and if you’re satisfied, publish your tweet instantly.

Part 3: Upload SRT Files to Your Vimeo Video
Vimeo is another platform that’s similar to YouTube. It allows users to upload and watch video content online. So, if you’re using Vimeo, you can easily add SRT files to your video by following the steps outlined below;
Step1Open Vimeo and sign in to your account. Then scroll to ‘My Videos’ at the top bat and click on it.
Step2Choose the video that you want to add the SRT file to and click on ‘Settings’.
Step3Click ‘Advanced’ from the Settings page. Then navigate to “Add Caption & Subtitles” > click on “Choose File” to upload your SRT file.

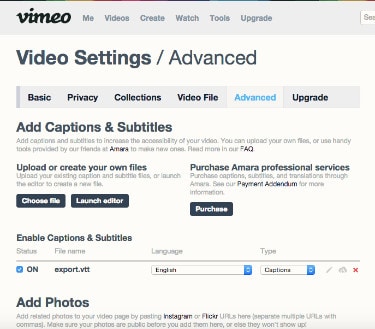
Step4Once you’ve successfully uploaded the SRT file, it’ll show up under “Enable Captions & Subtitles”. Then verify that ‘Status’ is turned ON and select your file language and file type is SRT.
Step5Finally, hit the ‘Save’ button to complete the operation.
Part 4: Upload SRT Files to Facebook Videos
Facebook is one of the biggest social media apps, and videos posted on the app have the potential of reaching millions of folks globally. So, if you’ve been posting videos on Facebook without subtitles, then that has to change because adding SRT to Facebook videos will not only allow your video to be easily understandable without turning on audio but also broaden your social reach.
Let’s dive into the step-by-step process to upload SFRT files to Facebook videos without hassles;
Step1Open your Facebook account and locate the Video that you want to add SRT subtitles to. Afterward, click on “Edit”.
Step2Click on “Ädd Captions” and use the “Upload” button to add your SRT file. Your SRT file must be in this format Filename.en_US.srt.
Step3Once the SRT file upload is completed, use the Save button to complete the SRT upload operation.
Bonus Tips: Level Up Your Video by Editing SRT Subtitles Before Uploading
If the need to edit your SRT subtitle arises, then Filmora software is the right SRT editing tool to help you get the job done without having any issues. This software is popularly known for its outstanding capacity to not only edit SRT file but also edit different aspects of a video file seamlessly.
Since its launch, Filmora software has been the go-to option for both tech-savvy and non-tech-savvy individuals to execute different types of SRT editing tasks including editing time code, changing subtitles, editing SRT file language, and lots more.
Now let’s proceed to the steps on how to edit SRT files with the Filmora video editor. Make sure you’ve installed the software.
Free Download For Win 7 or later(64-bit)
Free Download For macOS 10.14 or later
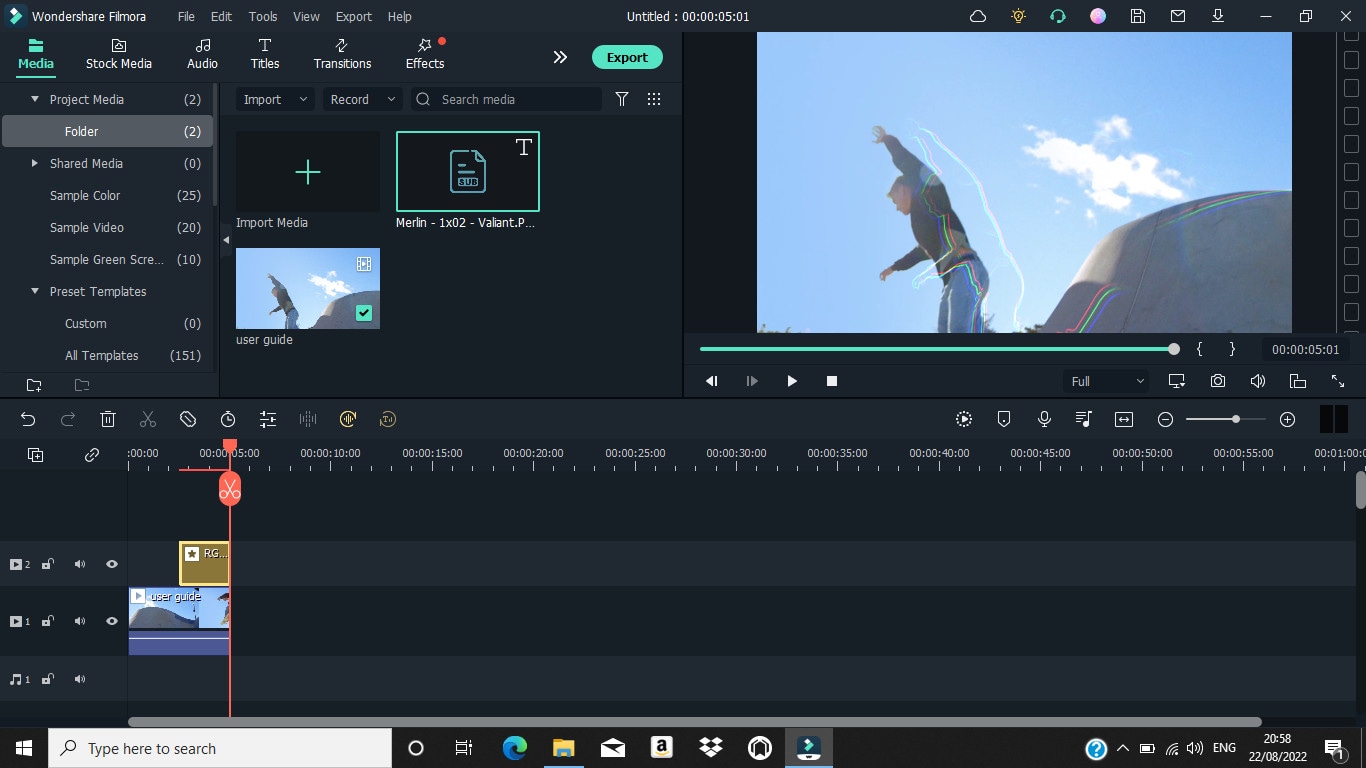
Step1Launch the Filmora software on your PC and use the Import button to upload the SRT file from your PC or just drag-n-drop it.
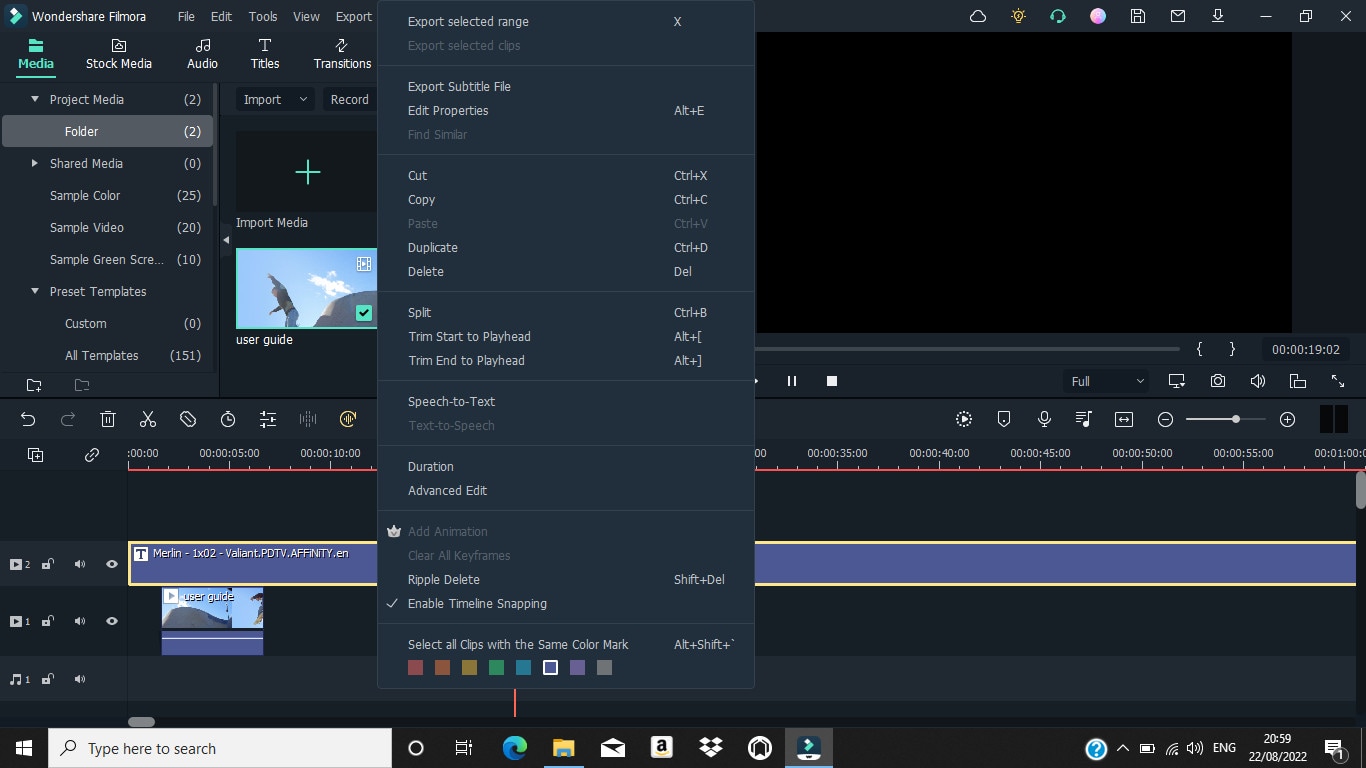
Step2Move the uploaded SRT file to the timeline and right-click on it, then select “Advanced Edit” from the pop-up list.
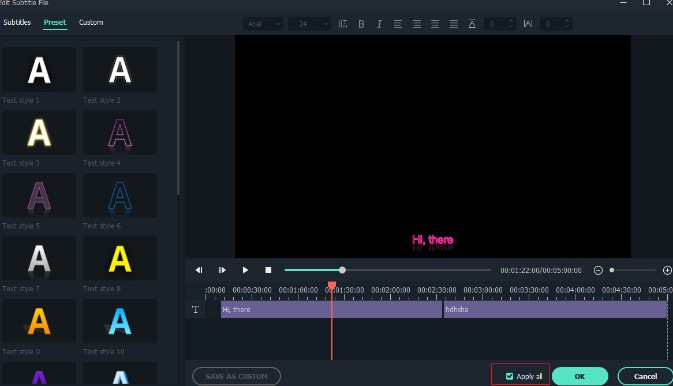
Step3Edit different aspects of the SRT subtitle ranging from its time code, text, etc., and changing subtitle styles, like text color, shadow, fonts, etc.
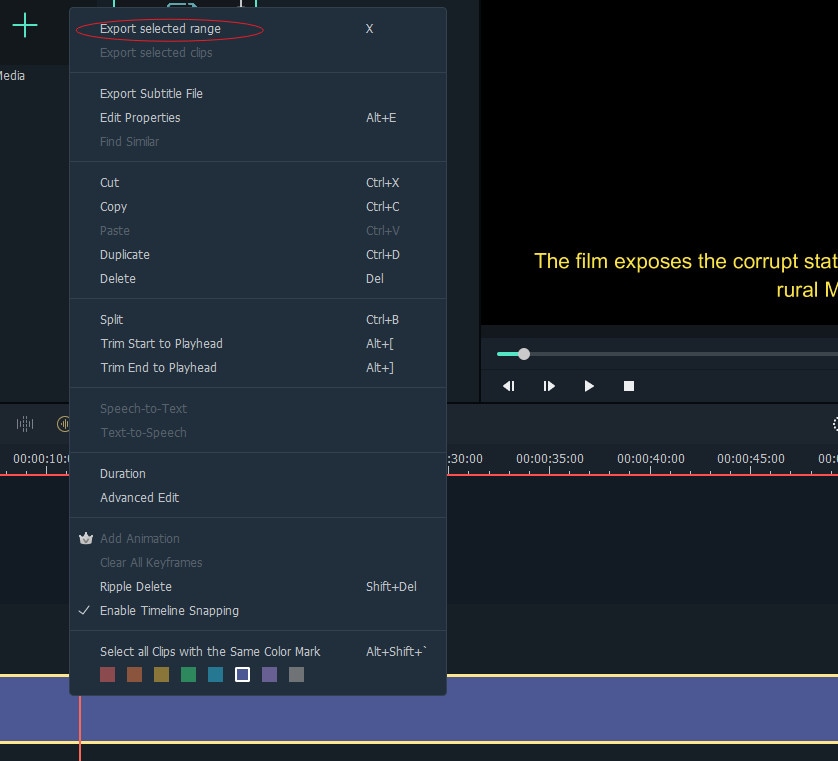
Step4Once editing is completed, navigate to the timeline of the SRT file and right-click on it, then choose “Export Subtitle file” to complete the action.
Final Words
Uploading SRT files to your social media videos is a great way to enhance the chances of your video reaching a wider range of audiences including folks who have hearing problems. And as you can see from the article above, the process of uploading SRT to social media platforms is concise.
However, when you’re looking to edit SRT subtitle file, the best thing to do is to employ an advanced SRT editing software like Filmora to get the job done for you, Yes, this is because Filmora is more versatile, and unlike other tools, it boasts a wide range of video editing functionalities besides SRT editing.
Free Download For Win 7 or later(64-bit)
Free Download For macOS 10.14 or later
From the overview table above, it’s obvious you can easily create one SRT file and easily use it on different social media channels. This saves you the stress of creating different subtitle files for each platform. So, without further ado, let’s dive in to find out how to upload and add .srt files to different social media platforms.
Part 1: Upload SRT Files to YouTube Videos
If you’re a YouTube video content creator, but you still don’t know the benefit of adding subtitles to your videos, let’s give you the top two main hints on how subtitles affect your videos;
- Subtitles help your videos to be understood not only by folks who hear and see but also by folks who have hearing problems. Hence helping your video to reach more audience.
- You need subtitles to make your videos SEO rich as phrases in your subtitle can be used as keywords by Google when users search for stuff related to your video online.
That being said, keep in mind that SRT subtitles and CC are two different things. Although they are often used interchangeably, they are both distinct. The only similarity CC and SRT share is that they’re text version of the audio aspect of videos.
CC, also known as Close Caption the words spoken in the video, and it allows viewers understand the information being passed in a video without necessarily turning on the volume.
SRT subtitles, on the other hand, are translations of the word that’s spoken in a video. For example, if you’re streaming Korean movie, but you don’t understand the language, you’d need a translation of the dialogue at the bottom of your screen. The English translation that’s displayed on your screen is known as the SRT subtitles.
Now you know how subtitles affect your videos, and what the difference between SRT and CC are, let’s proceed to learn how to upload SRT files to YouTube videos.
Step1Sign in to your YouTube channel and locate the ‘YouTube Creator Studio’. Then select ‘Subtitles’ on the right menu.
Step2Select the Video that you want to add SRT to. Then click ‘Add Language’ and select the language you wrote your Subtitle.
Step3Click Add under the Subtitle section and upload your SRT file through the pop-up that appears on your screen.

Part 2: Upload SRT Files to Tweets
Before now, Twitter users can only upload SRT files to video via the ‘Media Studio’, but this feature was not available to all users, making it difficult for some users to add subtitles to their videos.
However, the new version of Twitter now allows users to easily add SRT files to their tweets from the ‘Compose Tweet’ area. This made uploading SRT to tweet very straightforward. All you just have to do is to compose a tweet with your video then use the “Upload Caption File (.srt)” option to upload the SRT file. See the process to complete the action below;
Step1Open Twitter on your device and click the relevant button to compose a new tweet.
Step2Upload the video you want to add the SRT file to. Then select ‘Upload Caption File’ (.srt) below the video.
Step3Click on ‘Upload Caption’ from the pop-up that appears on your screen. Then choose the SRT file that you want to upload.
Step4Click Done. Then you’ll see the name of the language in your captions is written
Step5Now play the video to preview the subtitle and if you’re satisfied, publish your tweet instantly.
Part 3: Upload SRT Files to Your Vimeo Video
Vimeo is another platform that’s similar to YouTube. It allows users to upload and watch video content online. So, if you’re using Vimeo, you can easily add SRT files to your video by following the steps outlined below;
Step1Open Vimeo and sign in to your account. Then scroll to ‘My Videos’ at the top bat and click on it.
Step2Choose the video that you want to add the SRT file to and click on ‘Settings’.
Step3Click ‘Advanced’ from the Settings page. Then navigate to “Add Caption & Subtitles” > click on “Choose File” to upload your SRT file.
Step4Once you’ve successfully uploaded the SRT file, it’ll show up under “Enable Captions & Subtitles”. Then verify that ‘Status’ is turned ON and select your file language and file type is SRT.
Step5Finally, hit the ‘Save’ button to complete the operation.
Part 4: Upload SRT Files to Facebook Videos
Facebook is one of the biggest social media apps, and videos posted on the app have the potential of reaching millions of folks globally. So, if you’ve been posting videos on Facebook without subtitles, then that has to change because adding SRT to Facebook videos will not only allow your video to be easily understandable without turning on audio but also broaden your social reach.
Let’s dive into the step-by-step process to upload SFRT files to Facebook videos without hassles;
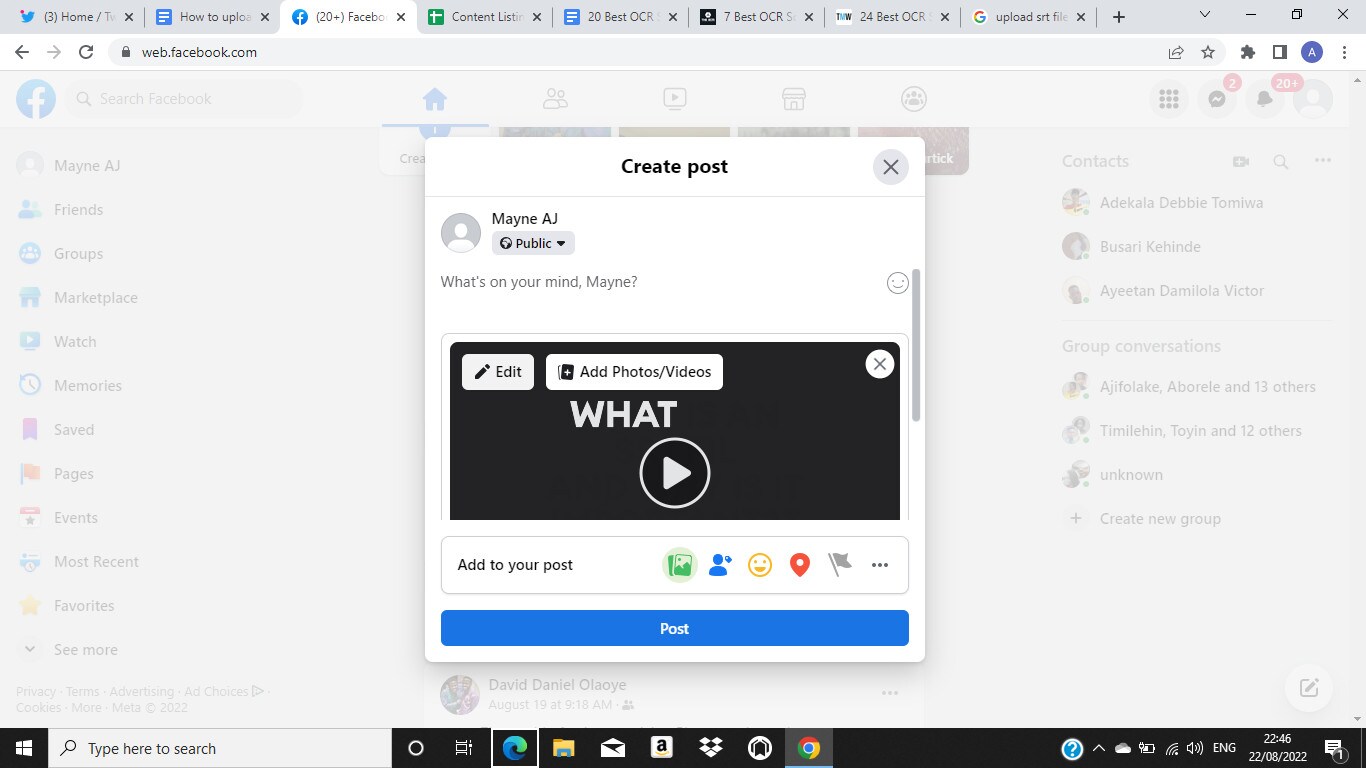
Step1Open your Facebook account and locate the Video that you want to add SRT subtitles to. Afterward, click on “Edit”.

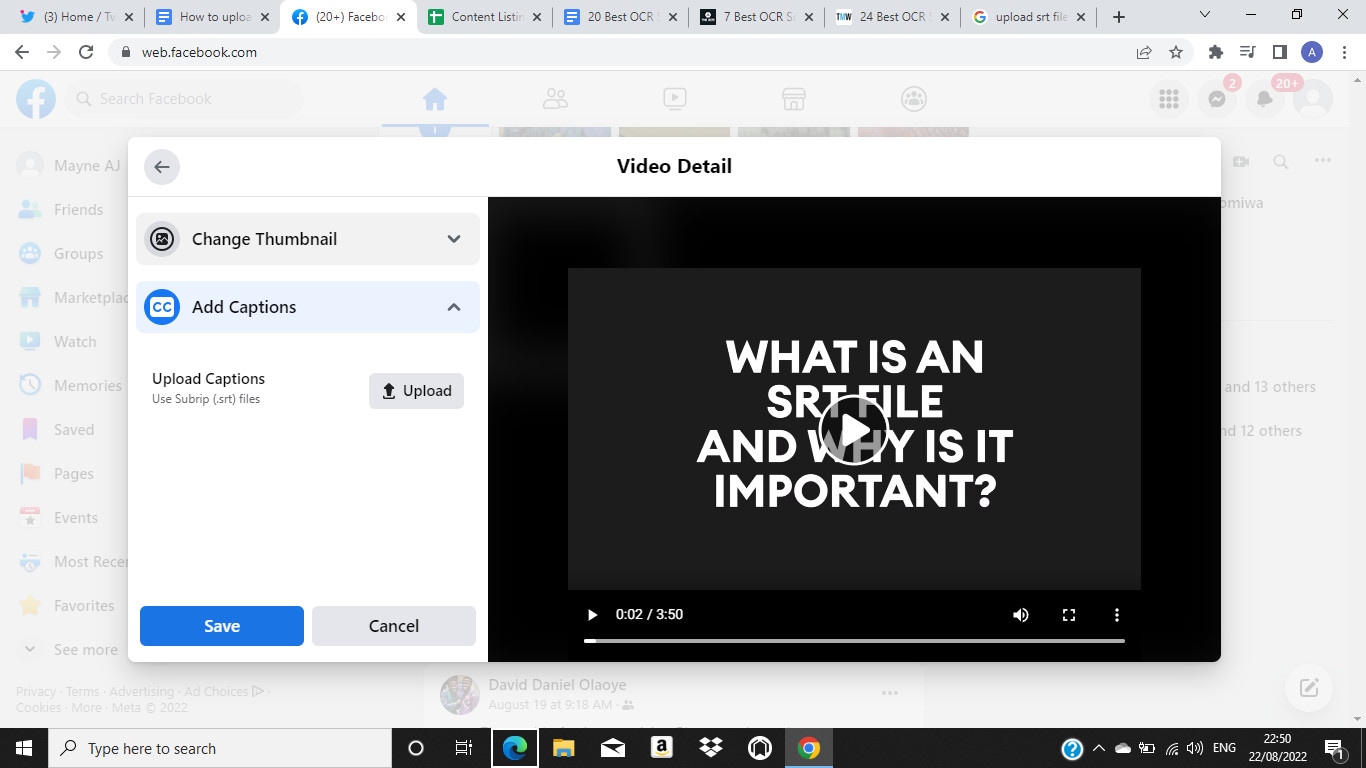
Step2Click on “Ädd Captions” and use the “Upload” button to add your SRT file. Your SRT file must be in this format Filename.en_US.srt.

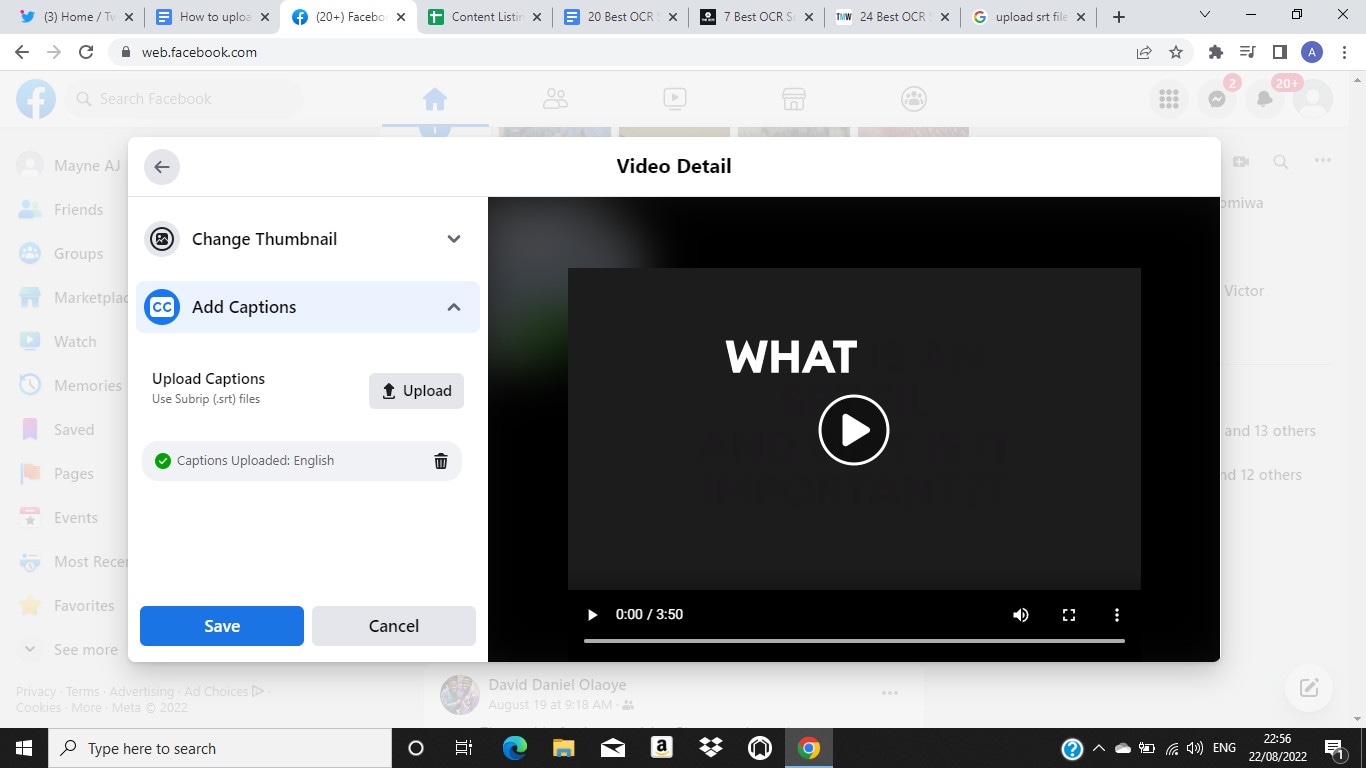
Step3Once the SRT file upload is completed, use the Save button to complete the SRT upload operation.
Bonus Tips: Level Up Your Video by Editing SRT Subtitles Before Uploading
If the need to edit your SRT subtitle arises, then Filmora software is the right SRT editing tool to help you get the job done without having any issues. This software is popularly known for its outstanding capacity to not only edit SRT file but also edit different aspects of a video file seamlessly.
Since its launch, Filmora software has been the go-to option for both tech-savvy and non-tech-savvy individuals to execute different types of SRT editing tasks including editing time code, changing subtitles, editing SRT file language, and lots more.
Now let’s proceed to the steps on how to edit SRT files with the Filmora video editor. Make sure you’ve installed the software.
Free Download For Win 7 or later(64-bit)
Free Download For macOS 10.14 or later
Step1Launch the Filmora software on your PC and use the Import button to upload the SRT file from your PC or just drag-n-drop it.
Step2Move the uploaded SRT file to the timeline and right-click on it, then select “Advanced Edit” from the pop-up list.

Step3Edit different aspects of the SRT subtitle ranging from its time code, text, etc., and changing subtitle styles, like text color, shadow, fonts, etc.

Step4Once editing is completed, navigate to the timeline of the SRT file and right-click on it, then choose “Export Subtitle file” to complete the action.

Final Words
Uploading SRT files to your social media videos is a great way to enhance the chances of your video reaching a wider range of audiences including folks who have hearing problems. And as you can see from the article above, the process of uploading SRT to social media platforms is concise.
However, when you’re looking to edit SRT subtitle file, the best thing to do is to employ an advanced SRT editing software like Filmora to get the job done for you, Yes, this is because Filmora is more versatile, and unlike other tools, it boasts a wide range of video editing functionalities besides SRT editing.
Free Download For Win 7 or later(64-bit)
Free Download For macOS 10.14 or later
- Title: [Updated] A Comprehensive Guide to Subtitle Sharing on Tumblr and Discord
- Author: Daniel
- Created at : 2024-07-25 03:40:13
- Updated at : 2024-07-26 03:40:13
- Link: https://extra-resources.techidaily.com/updated-a-comprehensive-guide-to-subtitle-sharing-on-tumblr-and-discord/
- License: This work is licensed under CC BY-NC-SA 4.0.